


8:43 AM, Tuesday April 6th 2021
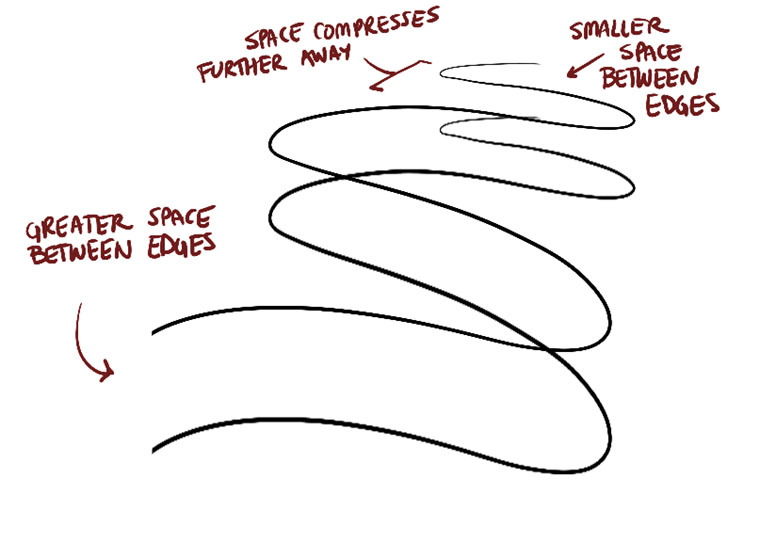
Starting with your arrows, you're drawing these with a good deal of confidence, although keep in mind that you should be compressing the gaps between the zigzagging sections as we look farther back in space, as explained here. As this was pointed out in your lesson 3 work, and your lesson 2 work... I understand these were quite some time ago, but you should always make a point of looking back over past feedback to make sure you don't repeat the same mistakes.
Continuing onto your leaves, there are a few key issues here:
-
First and foremost, you're drawing these very small. This will severely hamper your brain's ability to solve spatial problems, while also making it harder for you to engage your whole arm while drawing.
-
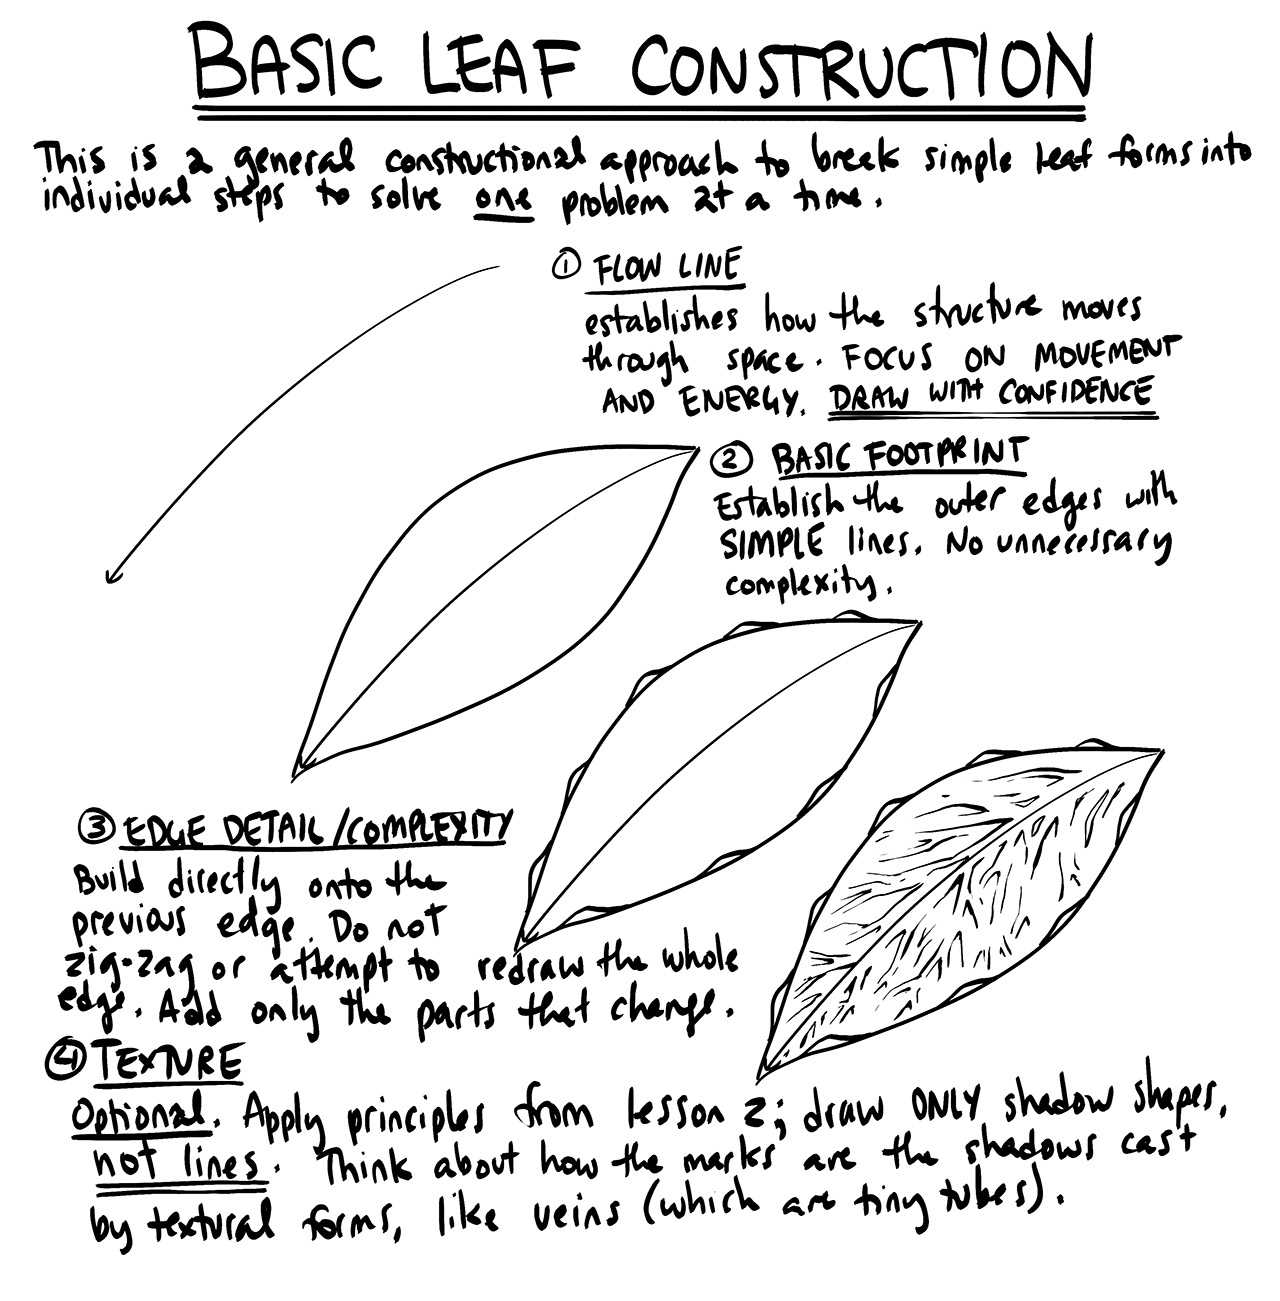
Your linework in general appears to be somewhat hesitant throughout, showing that you're likely prioritizing accuracy over flow and fluidity, in contradiction of the principles of markmaking from Lesson 1. Since this is the first lesson where students get to draw actual objects, it is somewhat understandable that there will be an urge to focus on capturing things as accurately as you can, but that really isn't the focus here. Constructional drawing is all about taking a complex problem and breaking it down into smaller, simpler problems that can be solved one at a time. That is precisely what we see in the leaves exercise instructions - we solve one problem at a time, and each step has its own focus. The first step, for example, focuses on establishing how the leaf flows through space. In order to do this, we draw that initial line with confidence. One thing that can help with this is to add a little arrow head on the end of the flow line, as this can remind us of how we approach the arrows exercise.
-
When adding edge detail on this leaf, you definitely end up falling into the pattern of zigzagging your edge detail. Instead, you want to be building up each little spike separately, coming off the previous phase of construction and returning to it, rather than drawing all of them in one go. This way, we maintain the solidity of the existing structure and merely build upon it, rather than attempting to replace it. Constructional drawing is not about redrawing the entirety of the structure with every pass.
-
Lastly, when it comes to capturing texture, please employ the techniques discussed back in Lesson 2 - that means ensuring that every single textural mark is a cast shadow shape, not just an arbitrary stroke. Approach your textural marks using this two step process - first outlining your intended shadow shape, then filling it in. This will help you think more about how the shadow you're drawing relates to the textural forms that casts it, rather than simply putting down random marks without consideration for what actually causes them to exist.
Moving onto your branches, there are a couple of issues at play here:
-
First and foremost, I don't think you really followed the instructions particularly closely. [As explained here](), you are to draw a segment from one ellipse, past the second, and halfway to the third. Then for the next segment, you draw from the second ellipse, past the third, and halfway to the fourth. This results in a healthy overlap between the segments, which allows us to transition more smoothly and seamlessly from one segment to the next. From what I can see, you have a single segment span over many more ellipses, and end up with a fairly limited overlap between segments, resulting in a more jarring transition.
-
When doing this exercise, try to keep the width of the branch consistent throughout its length. This will help you give the impression of a simpler overall form, which is an important factor when it comes down to making our forms feel solid and three dimensional. Every bit of complexity makes it a little bit harder for the viewer to accept a form as three dimensional.
-
Right now your ellipses all appear to be roughly the same degree. As you slide along the length of a cylinder, even if it's perfectly rigid and straight, the degree of its cross-sections are going to shift wider or narrower, as you move farther away from the viewer, or closer towards them. This is explained in a couple places in the lessons, but the recently updated video for the ellipses section in Lesson 1 makes a point of explaining this more thoroughly. I strongly recommend that you take a look.
Looking over your plant constructions, the main points I've raised already definitely play a significant role here. There are key places - for example, the banana plant - where you're given the tools to execute things like constructing the large leaves soo they flow fluidly and smoothly through space, but where you simply opt only to partially apply the steps. I suspect that when faced with something like drawing a large, complex object, you may be getting overwhelmed with the task at hand, and try to do many different things at once.
When this happens, instead of panicking and trying to just jump into the problem with what you can remember, take a step back and take stock of the situation. Reach back and find the instructions for things like the leaf construction exercise, and apply them step by step to the problem at hand. Break that problem into smaller parts, and solve them one by one, focusing only on executing the specific task and not the dozen that come afterwards. And most importantly, use the ghosting method for every single mark you draw to ensure that they are drawn confidently, without hesitation, without wavering.
Just for the sake of completeness, here are a few things to keep in mind in regards to your constructions:
-
For the bunny ear cactus, you appear not to have drawn through the ellipse shapes, resulting in uneven, complex shapes that didn't really read as being entirely solid. Note that you didn't follow the steps of the demo.
-
For this mushroom, I'd recommend avoiding using solid black shapes for anything other than cast shadows. Here it seems like you tried to fill in the negative space between ridges instead. We focus on cast shadows specifically because of how their shape relates directly to the form casting them, in a way that implies the presence of that form.
-
This aloe plant is coming along okay, and I'm glad to see that you mostly drew each leaf form in its entirety (although one of them appears to get cut off, instead of being fully enclosed). Drawing forms in their entirety, even when they're overlapped by another, is important because it helps us to better understand how they exist in space, and how they relate to one another within that space. Don't forget to draw around your ellipses two full times before lifting your pen though, and construct your cylindrical forms around a central minor axis line. Also be sure to add additional ellipses where needed - like to establish the thickness of the rim of that flower pot, the separate level of the soil, etc. Here the pot got a little oversimplified.
All in all, there is a lot that you're missing here, and I think first and foremost you need to reacquaint yourself with the core principles of markmaking, and the steps behind the ghosting method in Lesson 1. I'm going to assign some revisions to get you back on course with that, though a lot of it will fall to you to read/watch the old material, and to make a more direct, conscious effort to apply those concepts in your work.
Next Steps:
Please submit the following:
-
1 page of the ellipses in planes exercise
-
1 page of organic forms with contour ellipses
-
1 page of leaves
-
1 page of branches
-
3 pages of plant constructions


