ran

Giver of Life

Joined 3 years ago

7075 Reputation

ran's Sketchbook

  • Sharing the Knowledge
  • Giver of Life
  • Dimensional Dominator
  • The Relentless
  • Basics Brawler
    1 users agree
    8:41 PM, Monday May 31st 2021

    Hi kleb92,

    Good job on completing the 250 box challenge. I'll be reviewing your homework.

    I notice a great improvement in your line convergence. You've drawn a great variety of rotated boxes and extended the lines in the right direction. Also your hatching lines look really clean.

    Things you can improve:

    • You nicely added line weight the lines to each box. However, it looks like you also emphasized the inner lines of each box. You should only add line weight to the silhouette of each box (the outer lines). If you focus the weight on the internal edges, you'll give the impression that your box is really just a loose collection of lines. Adding them to the silhouette on the other hand will enclose them into a single cohesive group. See section about line weight.

    • Most of your boxes contains dramatic foreshortening. It's good to also practice drawing boxes with shallow foreshortening. These will be especially relevant in later lessons as we use boxes to construct more complex objects, due to most things we're drawing not being so immensely large. Still, it is valuable to get used to both situations, as they both pose different kinds of challenges.

    • Although I see great improvement in you convergence, I notice some divergence from the inner corner on some of your boxes. It's pretty normal to have the inner corners come out pretty off, as they are affected by the accumulation of previously done mistakes.

    One way to improve your convergence is to start thinking about the relationships between your set of lines, instead that just in pairs. When we are doing our boxes, we usually compare the one we are drawing with the main converging line, this is a first step. However, what's better, is to take into account all the other lines that converge into that point so we can guess better how the angle of our next line should be.

    Now, I know how confusing it sounds, so check this diagram and see if somethings clicks. If you don't immediately get it, don't worry, just keep checking it from time to time and it eventually will make sense.

    Another way to improve your line convergence is to change the order you draw your boxes in. By drawing the inner corner before the last line of the box, some people find it easier to use the previously mentioned info above of thinking about the relationship between lines. Here's the order I'm talking about: https://imgur.com/a/DHlA3Jh. This takes into advantage something explained in the rotated boxes exercise too (taking advantage of lines that are very close), so give a look at the page if you want to know more about it.

    Next Steps:

    Well done. Keep practicing drawing boxes during your warmups and make sure to also practice shallow foreshortening. Continue with lesson 2.

    This community member feels the lesson should be marked as complete. In order for the student to receive their completion badge, this critique will need 2 agreements from other members of the community.
    3 users agree
    7:19 PM, Monday May 24th 2021

    Hi Hassaan,

    Good job on completing lesson 1. I'll be reviewing your homework.

    Superimposed Lines

    Most of your lines look straight and confident. You also managed to fray only at the end of each line. Some of your lines are arcing or are a little wobbly, but that'll improve over time with frequent practice.

    Ghosted Lines

    You nicely plotted each line and most of them look straight and confident. Some of them are a little wobbly. Keep practicing with the ghosting method and also this will improve over time.

    Ghosted Planes

    You have correctly plotted each plane and most of your lines are straight. 2 things I notice here are arcing lines and undershooting lines (not connecting them with the rest of the pane). Don't be afraid to overshoot. In general, overshooting isn't that big of a deal right now. You'll get better at it, and it's always better than hesitating.

    One approach to prevent arcing lines is to consciously arc your line slightly in the opposite direction. The expected result is that this conscious adjustment will compensate for the issue and will result in a straight line that does not arc in either direction. Over time and practice, your brain will associate this motion with a straight line, and eventually you won't have to be quite so conscious of it.

    Tables of Ellipses

    Your ellipses are drawn within each bound and you've drawn through your ellipses more than once, which is good. Try to make more use of the ghosting method, which will help you achieve smoother ellipses.

    Ellipses in Planes

    You have drawn your ellipses nicely between the bounds of each plane. So good work on that.

    Funnels

    Most of your ellipses are correctly aligned with the minor axes and drawn within the bounds of each funnel.

    Plotted Perspective

    Your boxes are plotted correctly in 2 point perspective. Good work.

    Rough Perspective

    You did a decent attempt on estimating the vanishing points. Keep practicing this during your warming ups to get more accurate. Keep in mind that all horizontal lines should be perfectly parallel to the horizon and all vertical lines should be perfectly perpendicular to the horizon.

    Rotated Boxes

    You managed to draw all the boxes and draw through them. Great work. I would have hatched the the side planes of each box for a better view on each front face, but that's not mandatory.

    Organic Perspective

    You managed to create a good contrast between the boxes which are closer and further away from the user. Good work on that. Lots of your boxes are not converging though. Not a big deal at this point, since you'll be getting enough practice during the 250 box challenge.

    Next Steps:

    Well done. Continue with the 250 box challenge.

    This community member feels the lesson should be marked as complete, and 3 others agree. The student has earned their completion badge for this lesson and should feel confident in moving onto the next lesson.
    2 users agree
    8:18 PM, Tuesday May 18th 2021

    Hi SedroPantos,

    Good job on completing lesson 2. I'll be reviewing your homework.

    Organic Arrows

    You have drawn smooth, confident lines and managed to make them overlap. One thing you could improve is applying perspective to your arrows. Try to push them more into perspective by applying more foreshortening (making the farther end smaller and the closer end larger). This will give your arrows more depth and give a better illusion of them flowing in 3D space.

    Organic Forms with Contour Lines

    You did great on drawing the ellipses and contour lines inside the organic forms. So good work on that. When drawing the ellipses inside the organic forms, make sure to change the degree to show how the form twists and turns. See this diagram for more info. Also when drawing organic forms, make sure they always look like two identical spheres connected by a tube of consistent width.

    Texture Analysis

    You've made a great attempt at creating a transition from dense to sparse. Be careful with drawing the contour lines of the texture instead of the casting shadows. Other than that, great work.

    Dissections

    You drew the textures nicely around the forms and managed to break the silhouette. Well done.

    Form Intersections

    You did well on filling up the whole page with forms of consistent size and defining the intersections. Try to avoid repeating lines. Keep striving to draw straight, confident lines and don't forget to use the ghosting method!

    Organic Intersections

    Your organic forms look great. They're are placed nicely in a 3D space, giving them different kinds of flexibility and mass.

    Next Steps:

    Well done. Continue with lesson 3.

    This community member feels the lesson should be marked as complete, and 2 others agree. The student has earned their completion badge for this lesson and should feel confident in moving onto the next lesson.
    5:38 PM, Tuesday May 18th 2021

    Hi goodboy123,

    Thanks again for the helpful and constructive feedback. It helps me a lot. I noticed afterwards that I went a little overboard with the line weights. I had some trouble with getting the lines flow fluently during the branch exercise. 2 things I'm going to work on in the future.

    2 users agree
    9:13 PM, Monday May 10th 2021

    Hi vitoriaana,

    Good job on completing the 250 box challenge. I'll be reviewing your homework.

    I see great improvement in your line convergence throughout the boxes. Line weight is nicely added to each box and you have extended the lines in the correct direction. You also have drawn a good variety of rotated boxes in shallow and dramatic perspective.

    Things you can improve:

    • Some of your boxes look deformed. When drawing a box using the Y method, strive to make the angels greater than 90 degrees.

    • Although I see great improvement in you convergence, I notice some divergence here and there from the inner corner. It's pretty normal to have the inner corners come out pretty off, as they are affected by the accumulation of previously done mistakes. Now, a way to improve your convergence is to start thinking about the relationships between your set of lines, instead that just in pairs. When we are doing our boxes, we usually compare the one we are drawing with the main converging line, this is a first step. However, what's better, is to take into account all the other lines that converge into that point so we can guess better how the angle of our next line should be.

    Now, I know how confusing it sounds, so check this diagram and see if somethings clicks. If you don't immediately get it, don't worry, just keep checking it from time to time and it eventually will make sense.

    Another way to improve your line convergence is to change the order you draw your boxes in. By drawing the inner corner before the last line of the box, some people found it easier to use the previously mentioned info above of thinking about the relationship between lines. Here's the order I'm talking about: https://imgur.com/a/DHlA3Jh. This takes into advantage something explained in the rotated boxes exercise too (taking advantage of lines that are very close), so give a look at the page if you want to know more about it.

    Next Steps:

    Well done. Continue with lesson 2.

    This community member feels the lesson should be marked as complete, and 2 others agree. The student has earned their completion badge for this lesson and should feel confident in moving onto the next lesson.
    2 users agree
    8:49 PM, Monday May 10th 2021

    Hi CyTori,

    Good job on completing lesson 1. I'll be reviewing your homework.

    Superimposed lines

    Your lines look straight and confident. Keep doing this exercise during a warming up to improve accuracy.

    Ghosted lines

    Looks good. You've plotted your lines correctly. Some wobbly lines here and there. In drawabox you should always prioritize confidence over accuracy. A wobbly line is a mistake, no matter how accurate, and a confident line will be correct, as with practice the accuracy will get better. When plotting your lines (placing a start and end dot for each line), don't draw these points too heavily - ideally the resulting line should swallow both of them up.

    Ghosted planes

    Looks good. Nice plotting of lines and good accuracy. Keep practicing with the ghosting method for straight, confident lines.

    Table of Ellipses

    Looks great. Your ellipses are placed nicely inside the bounds and you've drawn through them more than once.

    Ellipses in planes

    Your ellipses are drawn nicely between the bounds. Make sure you ghost your ellipses before drawing them to create smooth, round ellipses.

    Funnels

    You did a good attempt on keeping your ellipses aligned to the central minor axis line.

    Plotted perspective

    Your boxes are correctly plotted.

    Rough perspective

    Looks good. Your estimates come close to the actual vanishing points. Keep practicing this during a warm up to improve in estimating the vanishing points. Keep in mind that all horizontal lines should be parallel to the horizon and all vertical lines run perpendicular to the horizon.

    Rotated boxes

    Looks great. You drew all the boxes and drew through them. One thing I may want to point out is, while not necessary, to hatch the overlapping faces of each box, which adds more depth to your drawing.

    Organic perspective

    Looks decent. There is a clear difference between boxes which are closer to the viewer and boxes which are further away. I do notice some divergence, but that's something you will improve during the 250 box challenge.

    Next Steps:

    Well done. Continue with the 250 box challenge.

    This community member feels the lesson should be marked as complete, and 2 others agree. The student has earned their completion badge for this lesson and should feel confident in moving onto the next lesson.
    2 users agree
    8:58 AM, Monday May 10th 2021

    Hi Xulu,

    Good job on completing lesson 2. I'll be reviewing your homework.

    Organic Arrows

    You made great use of perspective and you did great on overlapping your edges. One thing I notice is some wobbly lines. Try to make smooth, confident strokes by drawing from your shoulder.

    Organic Forms with Contour Lines

    You did great on drawing the ellipses and contour lines inside the organic forms. Drawing the ellipses in different degrees emphasized that the forms are floating in 3D space. So good work on that. I would practice more on drawing the organic forms itself. Some of them look a little straight, which makes them look flat. Remember, your sausages should always look like two identical spheres connected by a tube of consistent width.

    Texture Analysis

    You've made a great attempt at creating a transition from dense to sparse. You could've done this a little better in the last row though. Be careful with drawing the forms of the texture instead of the casting shadows. Other than that, good work.

    Dissections

    You drew the textures nicely around the forms and managed to break the silhouette. Well done.

    Form Intersections

    You did well on filling up the whole page with forms of consistent size and defined the intersections. What I do see, is some of your boxes are diverging. Keep the convergence in mind like you had during the 250 box challenge. Also, you've drawn some stretched spheres. For this exercises, try to draw circles for evenly shaped spheres.

    Organic Intersections

    Your organic forms look great. They're are placed nicely in a 3D space, giving them different kinds of flexibility and mass. Your casting shadows need a little more work though. Avoid letting the shadows stick to its forms.

    Next Steps:

    Well done! Continue with lesson 3.

    This community member feels the lesson should be marked as complete, and 2 others agree. The student has earned their completion badge for this lesson and should feel confident in moving onto the next lesson.
    0 users agree
    8:43 PM, Tuesday April 20th 2021

    Hi xyz_leonardo,

    Good job on completing lesson 1. I'll be reviewing your homework submission.

    Superimposed lines

    Looks good. Most of your lines look straight and drawn with confident. I notice some fraying on both ends. The line should never fray on the starting dot. Always place the pen carefully at the beginning of each line so this does not happen.

    Ghosted lines

    Looks good. You've plotted your lines correctly. Some wobbly lines here and there. In drawabox you should always prioritize confidence over accuracy. A wobbly line is a mistake, no matter how accurate, and a confident line will be correct, as with practice the accuracy will get better. When plotting your lines (placing a start and end dot for each line), don't draw these points too heavily - ideally the resulting line should swallow both of them up.

    Ghosted planes

    Looks good. Nice plotting of lines and good accuracy. Keep practicing the ghosting method and drawing straight, confident lines.

    Table of Ellipses

    Looks great. Your ellipses are placed nicely inside the bounds and you've drawn through them more than once. Make sure not to to overdraw you ellipses. 2 times is ideal.

    Ellipses in planes

    Looks great. Your ellipses are drawn nicely between the bounds.

    Funnels

    Looks great. You did a good attempt on keeping your ellipses aligned to the central minor axis line.

    Plotted perspective

    Looks great. The boxes are correctly plotted.

    Rough perspective

    Looks good. Your estimates come close to the actual vanishing points. Keep practicing this during a warm up to improve in estimating the vanishing points. Keep in mind that all horizontal lines should be parallel to the horizon and all vertical lines run perpendicular to the horizon.

    Rotated boxes

    Looks great. You drew all the boxes and drew through them. One thing I may want to point out is, while not necessary, to hatch the overlapping faces of each box, which adds some more depth to your drawing.

    Organic perspective

    Looks decent. There is a clear difference between boxes which are closer to the viewer and boxes which are further away. I do notice some divergence, but that's something you will get better at during the 250 box challenge.

    Next Steps:

    Well done! Continue with the 250 box challenge.

    This community member feels the lesson should be marked as complete. In order for the student to receive their completion badge, this critique will need 2 agreements from other members of the community.
    0 users agree
    9:08 PM, Tuesday April 13th 2021

    Hi kennylasa,

    Good job on completing the 250 box challenge. I'll be reviewing your homework.

    I see great improvement in your boxes. You also have a good variety of different rotated boxes and you have extended your lines in the right direction most of the time. Also good job on drawing shallow and dramatic boxes, to practice different kinds of perspective and line convergence.

    Some things you can improve:

    Parallel lines

    A box in 3 point perspective will ALWAYS have their lines converge. They can never diverge, or be parallel. It is possible for them to converge very slightly, but they have to converge. Even if it's really hard to notice it, the convergence has to be there. I have noticed some parallel lines on some of your boxes. Keep an eye out for that.

    Line weight

    When adding line weight to the silhouette, make sure to keep it subtle.

    Box sizes

    You could have drawn your boxes a little bit bigger, since they're pretty small now. Maybe you did this so you could extend your lines more.

    Convergence from the inner corner

    Although I see great improvement in you convergence, I notice some divergence here and there from the inner corner. It's pretty normal to have the inner corners come out pretty off, as they are affected by the accumulation of previously done mistakes. Now, a way to improve your convergence is to start thinking about the relationships between your set of lines, instead that just in pairs. When we are doing our boxes, we usually compare the one we are drawing with the main converging line, this is a first step. However, what's better, is to take into account all the other lines that converge into that point so we can guess better how the angle of our next line should be.

    Now, I know how confusing it sounds, so check this diagram and see if somethings clicks. If you don't immediately get it, don't worry, just keep checking it from time to time and it eventually will make sense.

    Another way to improve your line convergence is to change the order you draw your boxes in. By drawing the inner corner before the last line of the box, some people found it easier to use the previously mentioned info above of thinking about the relationship between lines. Here's the order I'm talking about: https://imgur.com/a/DHlA3Jh. This takes into advantage something explained in the rotated boxes exercise too (taking advantage of lines that are very close), so give a look at the page if you want to know more about it.

    Next Steps:

    Well done! Keep practicing drawing boxes during your warm ups. Continue with lesson 2.

    This community member feels the lesson should be marked as complete. In order for the student to receive their completion badge, this critique will need 2 agreements from other members of the community.
    1:15 PM, Wednesday April 7th 2021

    Hi goodboy123,

    Thanks a lot for your feedback. Really appreciate it. And I agree with your feedback on the texture analysis. I'm going to try to do the 25 texture challenge along side the constructional lessons to get better at it.

The recommendation below is an advertisement. Most of the links here are part of Amazon's affiliate program (unless otherwise stated), which helps support this website. It's also more than that - it's a hand-picked recommendation of something I've used myself. If you're interested, here is a full list.
PureRef

PureRef

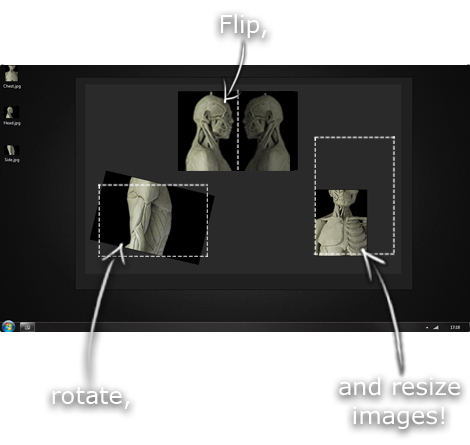
This is another one of those things that aren't sold through Amazon, so I don't get a commission on it - but it's just too good to leave out. PureRef is a fantastic piece of software that is both Windows and Mac compatible. It's used for collecting reference and compiling them into a moodboard. You can move them around freely, have them automatically arranged, zoom in/out and even scale/flip/rotate images as you please. If needed, you can also add little text notes.

When starting on a project, I'll often open it up and start dragging reference images off the internet onto the board. When I'm done, I'll save out a '.pur' file, which embeds all the images. They can get pretty big, but are way more convenient than hauling around folders full of separate images.

Did I mention you can get it for free? The developer allows you to pay whatever amount you want for it. They recommend $5, but they'll allow you to take it for nothing. Really though, with software this versatile and polished, you really should throw them a few bucks if you pick it up. It's more than worth it.

This website uses cookies. You can read more about what we do with them, read our privacy policy.