junnie

Basics Brawler

The Indomitable (Summer 2022)

Joined 2 years ago

3575 Reputation

junnie's Sketchbook

  • The Indomitable (Summer 2022)
  • Sharing the Knowledge
  • Basics Brawler
    2 users agree
    7:22 PM, Friday July 8th 2022

    Hi! I'm Junnie! Welcome to Drawabox and congratulations on finishing Lesson 1! Thank you for waiting! I'll be giving you feedback regarding your work now.

    1. Lines

    Superimposed Lines

    • Fantastic growth from page 1 to page 2. Fraying (especially at the end point) is significantly less apparent in the second page of your exercise!

    • Some minor fraying at the starting point which may cause issues down the line when using superimposed lines for adding line weight. Don't forget that it's okay to take as much time as you want to place the tip of your pen as our goal is to make all of our lines (and movement) intentional! (Just don't overthink too much or else you will lose your concentration)

    • Fraying towards the end point is fine and to be expected at the start! Our goal at this point is straight, confident lines and I think you have that down! So now all that's left is to practice and get better. One technique that helped me get better is looking at the end point instead of the tip of my pen while drawing. Looking at the line makes me consciously correct my line trajectory which results in wavering (which is also present in your lines, mostly the longer ones).

    • Your superimposed lines, in general, are very impressive! When you do it again for your warm-ups, I suggest adding more line length variation so your practice can be productive!

    Ghosted Lines and Planes

    • There's a lot more wavering and signs of course correction in your lines. A couple of lines also show undershooting. These could happen when you're focusing more on hitting the desired end point, which shouldn't be our priority at our current level. Remember that there are three different levels for ghosting (level 1: straight lines; level 2: straight lines that pass through the end point but overshoot; level 3: straight lines that end exactly at the end point). There's no need to rush to level 3 as you'll naturally reach that point with more practice. It's better to have our mistakes be seen than to hide them, since mistakes are part of the learning process.

    • I also see a lot of light marks because of ghosting! This was most definitely unintentional but I do think it was worth pointing out!

    • Great variety of line lengths! Keep that up! I also love how you maximized your paper space for the ghosted planes exercise!

    • There's a bit of variation in your line weight, as well. If it isn't intentional, it could possibly mean two things: (1) your fineliner is running out of ink or is defective, or (2) you're subconsciously applying uneven pressure to your pen while drawing. I hope you can figure out the reason for that as it might impact your future exercises that place a bit more importance on line weight!

    • I also like how you improvised a new exercise by doing superimposed lines on your ghosted lines! This will be very helpful for exercises that require line weight addition such as the 250 box challenge!

    2. Ellipses

    Table of Ellipses

    • Your ellipses are great! You did an excellent job drawing through them smoothly and confidently! There are still some issues with symmetry but that should improve through practice (there's actually a subtle improvement from page 1 to page 2, I think)

    • Most of your large ellipses were drawn within their set boundaries so there weren't many issues with undershooting and overshooting. However, the same can't be said for your smaller ellipses. Quite a few of them don't touch edges they should be touching. Drawing smaller ellipses with your arms might be a bit more difficult because most people's arms aren't used to making smaller, precise movements, but this should get better with practice! Don't forget to stretch regularly and loosen up your arms before drawing! I suggest using more of the empty space in the other frames to practice!

    • Another point for improvement is the variety in ellipse degrees! You did a good job varying the sizes by dividing the page unevenly, but the ellipse degrees you drew were more on the thicker side. Try to draw narrower ellipses, as well. In general, draw narrower, big ellipses, more varied small ellipses, and a lot more big circular ellipses.

    • I noticed you tried to vary your degree rotation, too, but in the end there were only a few that went past 45 degrees. Try to be more mindful of variety when doing exercises, so you don't accidentally neglect some areas for improvement!

    Ellipses in Planes

    • Your ellipses are still really good, overall! However, deformation (https://drawabox.com/lesson/1/13/deformed) is a lot more prevalent in this exercise. This is what the TA said about deformation in his critique of my own L1 homework: "This is likely happening because you are too worried about accuracy and are probably slowing down your stroke to compensate. Try and rely a bit more on the muscle memory of the motion you build up while ghosting and almost make your mark without thinking. Although accuracy is our end goal it can't really be forced and tends to come through mileage and consistent practice more than anything."

    • Try visualizing the ellipse you want to dry and tracing over it during the ghosting step. This might help you improve your accuracy! Just make sure that the muscle memory guides your motion during the drawing step, not your eyes.

    • I love that you marked your own mistakes. That shows your ability to give yourself feedback, which will be vital in your personal growth! However, don't forget that being too critical of yourself is also a bad thing. You can always post on Discord to ask for other's critique and get a second opinion. I also suggest using a different color to mark those things so they don't obscure the mistake.

    Ellipses in Funnels

    • I think your ellipses here are looking a lot more consistent and better! Great job!

    • However, your funnels have very minor misalignment (https://drawabox.com/lesson/1/14/notaligned) issues. Try to be more mindful of this as you visualize the ellipse you're trying to draw while ghosting. For reference, I think the only funnel without any noticeable misalignment is the second one to the left rotated at around 35 degrees.

    • The misalignment might also be because of incorrect curve alignment. I'm not really sure because there's no center line. Try to draw a center line perpendicular to the funnel length and align the highest points of your curves there. The center line will also as a reminder for you to vary your funnel widths. Doing so would let you practice drawing ellipses of more shapes and sizes!

    • I think you're already doing a great job with the standard exercise so I suggest trying the more advanced version Comfy showed. You can start varying the ellipse degrees within a funnel from smaller degrees and smoothly progressing to larger degrees as you move away from the center line.

    • Overall, like your lines, your ellipses are actually really great, but still have some room for improvement!

    3. Boxes

    Plotted Perspective

    • Excellent work with this exercise! It's very clean and legible, mostly due to the line quality and line weight consistency! I think in the future, you can choose to add some line weight to the edges of the boxes, too, to improve their visibility and ability to convey a 3D shape!

    • This is a very small nitpick but there are vertical lines that aren't perpendicular to the horizon line, but that really doesn't matter in the long run as we won't be using rulers so much!

    • I also think you could have added more variety to your box configurations, such as making more pizza box-like boxes or more thin, tall boxes. Try to keep variety in mind when you do all of these exercises again in the future (either as warm-up or as a re-visiting of this lesson)

    Rough Perspective

    • Same issues with your ghosted lines as before but since the lines are shorter, overshooting is more prevalent than undershooting (which is actually better). Refer to my comments in the ghosted lines section (particularly, the one about the different ghosting levels)!

    • It's good that you draw through all of your boxes, meaning you drew the back face, as well! Drawing the back face will help us visualize the boxes as 3D objects in space instead of just a set of lines on a 2D surface!

    • Your estimations are all pretty good! Some are even spot-on! All that's left is to practice this even more!

    • I like how you added variety to vanishing point and box positioning! I think you could still draw even more box shapes, but other than that, you did an amazing job with this exercise!
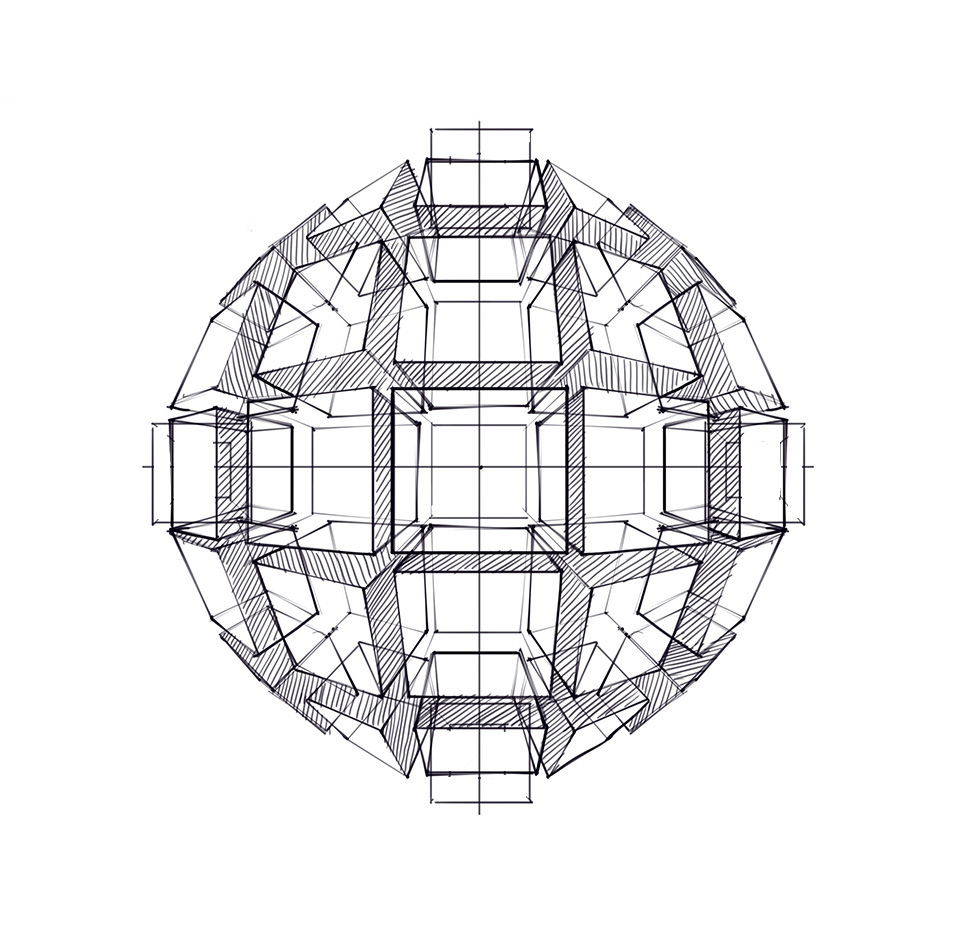
    Rotated Boxes

    • I think you did a great job conveying an overall spherical shape! You also did an amazing job keeping the corners of the boxes close together.

    • The left side boxes became deformed/longer. Carefully plotting each corner point with their VPs in mind should help with this. Don't worry about taking too much time as our goal is to execute each line to the best of our abilities (as I mentioned before). Partitioning the page in your hand during the plotting process could also prove to be useful for making a more symmetrical shape!

    • The boxes just look like a set of lines instead of actual 3D shapes. I think this might be because of the lack of variation in line weight (the external edges aren't thickened).

    • I think your hatching lines are also looking good, but because the edges aren't thickened, they all just mesh together to form black space instead of representing faces of boxes. Take a look at this image and take note of how they used line weights and hatching lines (https://d15v304a6xpq4b.cloudfront.net/lesson_images/9a2db6a0.jpg)

    • You're lacking four boxes in each corner. I assume you didn't draw them because of the perceived lack of space but do try to complete the exercise no matter how bad it might look! Try to carefully plan your rotation progression to avoid issues like this when you're doing this exercise again in the future!

    • I think you made a lot of effort to complete this exercise so no revisions are necessary. This is a great exercise to come back to after a few lessons to see how much your spatial thinking ability has improved. If you plan to do it again, make sure to keep the above points in mind.

    Organic Perspective

    • I like how much variety there is in line paths for this exercise! As usual, your work looks very clean!

    • Try to experiment more with using box spacing and sizes to convey depth and distance better!

    • Some frames lack variation in box rotations, but the others are really good (especially the second page, middle frame)

    • Your boxes actually look really nice but I'm sure they'll get even better as you do the 250 box challenge!

    Overall, I think this is a very solid submission! Your lines and ellipses are no joke! In that sense, I think it's even a bigger challenge for you to improve, but don't give up and always strive towards more consistency! Most of the mistakes I pointed out are very minor so make an extra effort to keep them in mind moving forward! I'm more than happy to mark your Lesson 1 as complete! I hope to see more of you around in the Discord server! Don't forget that you can ask the rest of us for some advice/critique while you're working, and that you're not in this alone!

    Next Steps:

    Your next step is the 250 box challenge! Make sure to do warm-ups using the exercises from lesson 1 before each drawing session. Comfy suggests around 15 minutes of warm-ups each time! Try to be more mindful of your movements (especially with your accidental marks during the ghosting step)! Our goal is to execute each line with intention to our fullest ability!

    This community member feels the lesson should be marked as complete, and 2 others agree. The student has earned their completion badge for this lesson and should feel confident in moving onto the next lesson.
    5:47 PM, Friday July 8th 2022
    • The box sizes in the organic perspective exercise could still use some more variation, but I think this is fine!

    • Your ghosted lines are looking great! A bit of arcing but not that much!

    • The rough perspective exercise is a lot better now! Make sure to experiment with box and vanishing point placements in the future when you're doing this as a warm-up!

    Apart from those, I think you did great! Your worked hard so I'll mark your Lesson 1 as complete now!

    Next Steps:

    You may proceed to the 250 box challenge! Make sure to warm-up before each of your drawing sessions using the skills and exercises you learned in Lesson 1. Always remember not to repeat your mistakes and execute each line to your fullest ability!

    Good luck!

    This community member feels the lesson should be marked as complete, and 2 others agree. The student has earned their completion badge for this lesson and should feel confident in moving onto the next lesson.
    2 users agree
    3:51 AM, Friday July 8th 2022

    Hi! I'm Junnie! Congratulations on finishing Lesson 1! I'll be giving you feedback regarding your work.

    1. Lines

    Superimposed Lines

    • Adding edge lines to create lines of equal length without a ruler was very resourceful of you! Good job!

    • Very good line variety! I also like how you added lines with multiple curves

    • You did a great job drawing straight, confident lines. There doesn't seem to be a lot of wobble, which means you're drawing the lines at the proper speed.

    • There also doesn't seem to be any obvious arcing, showing that your drawing position is already pretty good. Always make sure you're in a comfortable position that lets you extend your arm freely and quickly.

    • There's fraying on both ends of the line. Although it's more apparent at the end point (which is fine at the start; it'll get better as you practice more), there's some very subtle fraying at the starting point in a couple of lines. It's not as visible because they're very packed, but this ends up adding unnecessary line thickness to the earlier parts of the line. This is not good because ideally, we'll be using superimposed lines to add even line thickness in future exercises. Make sure to spend more time trying to properly place the tip of your pen before starting to draw.

    • Another advice I can give is for you to keep your eyes on the end point instead of the tip of your pen as you're drawing. This is also helpful for ghosted lines.

    • My last comment on this exercise is not really related to your lines. Please don't do the exercises more times than what was asked of you. You're only supposed to do two pages of the superimposed lines exercise. Make sure to follow the homework instructions precisely.

    • Otherwise, excellent job with this exercise! Feel free to do this again as your drawing warm-up once you're marked as complete for this lesson!

    Ghosted Lines

    • Is the one in blue ink your ghosted lines homework? I'll assume it is for the sake of critique.

    • When making ghosted lines, always make sure to plot both the starting point and the end point. I only see one plotted point for each line.

    • While it's okay to add superimposed lines on your ghosted lines for warm-ups, it's not part of the instructions for this exercise. Comfy made each one with a progression in mind, backed by many years of experience. Please trust him and follow all of his directions.

    • Please redo this exercise with the above points in mind and submit a link to your work by replying to this message.

    Ghosted Planes

    • There's a lot more wavering and signs of course correction in your ghosted lines for this exercise. This could happen when you're focusing more on hitting the desired end point, which shouldn't be our priority at our current level. Remember that there are three different levels for ghosting (level 1: straight lines; level 2: straight lines that pass through the end point but overshoot; level 3: straight lines that end exactly at the end point). Right now, you're at level 1. There's no need to rush to level 3 as you'll naturally reach that point with more practice.

    • I noticed you repeated some lines whenever they don't hit the end point. Try to avoid doing this in your future work as these mistakes will serve as reminders of what not to do. It's better to have our mistakes be seen than to hide them, since mistakes are part of the learning process.

    • Your line weight seems to vary a lot. If it isn't intentional, it could possibly mean two things. (1) Your fineline is running out of ink or is defective, or (2) you're subconsciously applying uneven pressure to your pen while drawing. Try to be more conscious of this because one of our goals as aspiring artists is to be intentional with each of our lines. That includes being intentional with line weight.

    • I like the amount of variety you included in your exercise. Keep that up!

    • Again, don't do exercises beyond what is required of you. This is considered grinding. I suggest revisiting Lesson 0 to review the purpose of these exercises and how to use this course (https://drawabox.com/lesson/0/)

    2. Ellipses

    Table of Ellipses

    • The overall shape of your ellipses here are really good! A lot of them show proper symmetry! Most of the problem comes from deformation (https://drawabox.com/lesson/1/13/deformed). This is what the TA said about deformation in his critique of my own L1 homework: "This is likely happening because you are too worried about accuracy and are probably slowing down your stroke to compensate. Try and rely a bit more on the muscle memory of the motion you build up while ghosting and almost make your mark without thinking. Although accuracy is our end goal it can't really be forced and tends to come through mileage and consistent practice more than anything."

    • You did a great job drawing within the expected boundaries of each ellipse but this could partly be due to you slowing down your strokes in exchange for accuracy. One thing that might help you is to add more loops to your ghosting step. When ghosting ellipses, first, visualize the ellipse you want to draw, then trace over it multiple times as you ghost. Once you're ready, place the tip of your pen on the page and let muscle memory guide your hand.

    • A lot of your ellipses were either drawn through more than 3 times or just one time. Remember to always draw through your loops 2-3 times, nothing more, nothing less. You can add more loops to your ghosting movement, instead, and focus on executing each ellipse to your fullest ability.

    • I think you should fill in more of the empty spaces in frames with small ellipses in the future. You need to practice drawing smaller ellipses with your entire arm, as well, and those spaces give you the perfect opportunity to do so. You need to do this more as your smaller ellipses tend to be a lot more wobbly and deformed. If you feel a bit of jerking movement in your arm when drawing ellipses, check if you're in a comfortable drawing position. You can also do some arm stretches to loosen up your arms before drawing. A good stretch is always a nice addition to anyone's daily routine, not just artists.

    • You did an excellent job adding variety to your ellipses! I'm seeing ellipses of different sizes and degrees, which is a great thing. Make sure to keep doing that when you do this exercise as homework!

    Ellipses in Planes

    • Your ellipses here are a bit smoother than those in your table of ellipses exercise, which shows growth and improvement! You'll get even better with more practice!

    • However, in addition to some deformation (see comments above), undershooting and overshooting is a lot more apparent here leading to floating ellipses (https://drawabox.com/lesson/1/13/floating). Although this problem is better resolved AFTER you become able to consistently draw smooth, confident ellipses, you should still be aiming to touch all four sides of the ghosted plane. You don't have to follow the midpoint lines you drew during the ghosting exercise as your main goal is to draw an ellipse that fits within a boundary with four sides. Feel free to rotate your ellipses and change their degrees to achieve this. Re-watch the homework video if you're having a hard time visualizing this.

    • I also noticed that your ellipses here follow the 2-3 loops rule, which is good! Make sure to keep doing this in the future when drawing ellipses!

    Ellipses in Funnels

    • Great job! Your ellipses here are actually a lot smoother (with a few outliers, but at least your consistency is getting better)!

    • However, a couple of your funnels have misalignment (https://drawabox.com/lesson/1/14/notaligned). Try to be more mindful of this as you visualize the ellipse you're trying to draw while ghosting.

    • Your funnels are looking a bit awkward because the circle edge you used are a bit too small. Try to look for something bigger to draw curves with less severe curvature. This will make the progression in your ellipse lengths look a lot more natural!

    • You can try adding more variety to your funnels (e.g. drawing the curves farther apart) so you can practice drawing ellipses of different sizes!

    • Once you've gotten better at drawing smooth, confident, and accurate ellipses, you can even choose to add progression to the degrees of ellipses in the same funnel. Refer to the homework page if you need an explanation or some examples for this!

    • Overall, there's a lot of room for improvement in your ellipses than your lines. Make sure to work on this in the future during your warm-ups!

    3. Boxes

    Plotted Perspective

    • These are pretty good and clean boxes! Good job! I think in the future, you can choose to add some line weight to the edges of the boxes and some hatching lines to improve their visibility and ability to convey a 3D shape!

    • However, a majority of your vertical lines aren't perpendicular to the horizon line. It seems you ghosted the lines of the actual boxes, which is actually not what the homework asked for. You're supposed to use a ruler for all the lines in this exercise. With that, make sure to take the time to draw each line carefully to avoid overshooting and accidental slips!

    • I won't ask you to redo this exercise as we won't be using rulers a lot in future exercises, anyway. The point of this exercise is to help you understand two-point perspective better, and I think your work demonstrated that. But, please follow the exercise directions next time.

    Rough Perspective

    • Many of your ghosted lines here are a lot smoother than before so great job! There's still some course correction and repeated lines, though (check line exercises comments).

    • It's good that you draw through all of your boxes, meaning you drew the back face, as well! Drawing the back face will help us visualize the boxes as 3D objects in space instead of just a set of lines on a 2D surface!

    • One of the pages has two plotted vanishing points. Remember that we're practicing one-point perspective in this exercise.

    • One of the boxes is angled. To quote the exercise explanation: "In one point perspective, one of the horizontal vanishing points of our boxes is going to be at infinity, as will be one of the vertical vanishing points. As such, all of our vertical lines will run perpendicular to the horizon, and all of the horizontal lines will run parallel to it, leaving only one set of lines that converges (towards our single vanishing point)."

    • The biggest problem I see with this exercise is the lack of extended lines. Make sure to draw the extended depth lines no matter how wrong they are.

    • Please review the exercise instructions (https://drawabox.com/lesson/1/roughperspective) and re-do this exercise with points I mentioned above in mind.

    • I also suggest adding more variation in box shapes (like having more thin rectangles, etc.) to help you understand how depth lines would look at different distances from the VP.

    Rotated Boxes

    • I think you did a great job conveying an overall spherical shape! You also did a good job keeping the corners of the boxes close together. However, there a few issues that make the shape less readable.

    • The line weights aren't properly used. Some of your boxes have edges that are properly thickened, but some don't. Make sure to prioritize consistency as failing to do so will make your drawings look messier.

    • I think your hatching lines are also looking good, but make sure to only apply them to parts of the face that should be exposed and visible to the viewer. Otherwise, you'll end up confusing the viewers as to which boxes are at the back and which ones are in front. Take a look at this image and take note of how they used line weights and hatching lines (https://d15v304a6xpq4b.cloudfront.net/lesson_images/9a2db6a0.jpg)

    • The boxes generally don't maintain a consistent shape (e.g some become longer/taller rectangles) and the rotations/rotation progression is incosistent. Carefully plotting each corner point with their VPs in mind should help with this. Don't worry about taking too much time as our goal is to execute each line to the best of our abilities (as I mentioned before)

    • I think you made a lot of effort to complete this exercise so no revisions are necessary. This is a great exercise to come back to after a few lessons to see how much your spatial thinking ability has improved. If you plan to do it again, make sure to keep the above points in mind.

    Organic Perspective

    • I like how you challenged yourself with the pathing of your boxes in this exercise! Doing difficult things that may be beyond our current abilities help us grow more! However, some of your trajectory lines aren't very smooth, this might be because of an awkward drawing position or you slowing down your drawing speed. Make sure to properly visualize the line before drawing it.

    • I also like how you draw through all of your boxes. This is good practice!

    • One criticism I have of your work is that most of your don't exhibit a lot of foreshortening. Since you're drawing boxes in 3D space, it's better to draw line pairs with more convergence. You can also change the foreshortening to change how viewers perceive each box which could help convey depth and distance (https://drawabox.com/lesson/1/7/foreshortening).

    • You also have to more variation in your box sizes and spacing. This would serve as practice for drawing boxes with ghosted lines! Experiment with the sizes and spacing to help convey the illusion of depth and distance better.

    • Some of your boxes are still a bit awkward but don't worry about this too much, as you'll get the hang of this as you proceed with the 250 box challenge!

    • You're lacking one page of this exercise. Please do another page of it with the proper corrections. Do three frames instead of four to give you more working space.

    Overall, I think your submissions showed a great deal of growth, especially with your ghosted lines. There are lots of mistakes, but that's normal so you shouldn't be embarrassed of them! Instead, use them as reminders for your further improvement. I'll be more than happy to mark your exercise complete once you've submitted the revisions I asked for! Just a little bit more and you can proceed with the 250-box exercise!

    Next Steps:

    Please reply to this message with the following submissions:

    • One (1) page of the ghosted lines exercise

    • Two (2) pages of the rough perspective exercise

    • One (1) page of the organic perspective exercise

    Read all of the comments I left and review the pages explaining each of those exercises before attempting to do them again. I'll make your lesson as complete once you show an understanding of the instructions and the core goals of each exercise.

    When finished, reply to this critique with your revisions.
    4:29 PM, Thursday July 7th 2022

    Glad to know you're still with us! Thanks for sending the link to your re-submission! One more tip I can give you is to make sure to align the highest/lowest point of your curves to the center line of the funnel! It might help you make more aligned ellipses! Anyway, good luck with your 250 box challenge! Cheers~

    3 users agree
    4:21 PM, Thursday July 7th 2022

    Hi! I'm Junnie! First of all, I'd like to congratulate you on finishing Lesson 1! Congratulations on participating in the Promptathon, as well! Sorry for taking so long but I'll be giving you feedback regarding your work now! I hope you're still willing to continue your art journey with us.

    1. Lines

    Superimposed Lines

    • Great job! I think you executed the exercise very well! I also like how you were able to point out your own mistakes, although it seems you weren't able to act on all of them as you proceeded with the exercise. That's perfectly fine, though, as change doesn't always come overnight!

    • As you had noticed, there's a lot of fraying happening in your lines on both ends. It's a lot more apparent at the end point (which is fine at the start) but there's also quite a lot at the starting point. This tells us that you're not paying as much attention to where you're placing your pen as you should be. Make sure to be mindful with your drawing. You can take as much time as you want when placing down the tip of your pen because what matters the most is you're placing it in the right spot.

    • Your lines are all quite confident and smooth. Not much wobbling (even when zoomed in), which means you're drawing at a good speed! That's excellent!

    • I noticed that most your lines have a pretty consistent arc (it goes up then down) meaning there's a bit of circular motion in your arm movement. This could be natural (in that case, you'd have to retrain your mind), but this could also be because of physical reasons related to your arm movement. I think a lot of people have the misconception that you need to have your wrist and elbows locked when drawing to draw a straight line but that is simply not the case, especially when drawing longer lines. Instead, try to pay attention to how your arm folds and unfolds during a drawing motion. Sometimes, you'll have to make adjustments to your wrist and elbow positions to maintain a straight trajectory and that's perfectly fine (you just need to be intentional with your actions). Since the arcing is pretty big, the problem most likely is with your arm's movement range. Make sure you and your paper is positioned (rotated) such that your arm can make a straight line quickly and comfortably. In my case, I usually try to draw things at a 45 degree angle. This allows me to extend my arm outwards in a quick and controlled manner.

    • Another advice I can give is for you to keep your eyes on the end point instead of the tip of your pen as you're drawing. This is also helpful for ghosted lines.

    • When doing this exercise for your warm-ups, make sure to add more line length variations, as you will have to get used to drawing superimposed lines of different lengths.

    Ghosted Lines and Planes

    • Excellent job on your ghosted lines! You make smooth, confident lines that are quite accurate!

    • Although, I noticed that some of your lines end up undershooting, which is not okay. There are three levels for ghosting (level 1: straight lines; level 2: straight lines that pass through the end point but overshoot; level 3: straight lines that end exactly at the end point). Right now, you're almost at level 2. There's no need to rush to level 3 as you'll naturally reach that point with more practice. What matters is we don't make a habit of undershooting before we've mastered hitting the point accurately!

    • There's so arcing your lines which indicates course correction. Again, accuracy comes over time with practice, so don't worry about that for now!

    • I also think it's great that you didn't repeat any of your lines even if they don't hit the target point. This is very good practice as mistakes serve as reminders for us to keep growing and improving!

    • There's good variety in your line lengths, which will definitely be useful especially during your warm-ups in the future! Keep it up!

    2. Ellipses

    Table of Ellipses

    • Your ellipses are looking really good! You're doing a great job drawing through your ellipses to make consistent, smooth ellipse shapes.

    • You don't have much issues at all when it comes to overlapping but you do have a habit of undershooting upper and lower boundaries. Since you're already drawing smooth ellipse shapes, your next goal is to focus on accuracy which, like ghosted lines, just comes with practice. Try to add more loops to your ghosting steps and clearly trace over the ellipse you visualized while ghosting.

    • I love how much variety there is in your ellipse sizes and degrees. You should continue doing that when you're doing your warm-ups. If I may suggest one thing, I think it's okay to fill your frames even more with smaller ellipses. Make sure to draw all your ellipses (even the smaller ones) with your entire arm, not just your wrist. If you're finding it difficult, try to stretch your arms from time to time to unlock a fuller ranger of motion.

    • Overall, your table of ellipses exercise is excellent!

    Ellipses in Planes

    • Some of your ellipses have a bit of deformation (https://drawabox.com/lesson/1/13/deformed). This is what the TA said about deformation in his critique of my own L1 homework: "This is likely happening because you are too worried about accuracy and are probably slowing down your stroke to compensate. Try and rely a bit more on the muscle memory of the motion you build up while ghosting and almost make your mark without thinking. Although accuracy is our end goal it can't really be forced and tends to come through mileage and consistent practice more than anything."

    • Apart from that, your ellipses are looking real good. Just make sure to practice them in the future with all the points above in mind!

    Ellipses in Funnels

    • Same issues as your previous ellipses, mostly the undershooting of upper and lower boundaries.

    • Some of your ellipses were drawn through too many times. Try to limit yourself to 2-3 loops per ellipse. If you're having a hard time nailing the loop with that restriction, just increase the loops you're making during the ghosting step.

    • I like the variety in your funnel sizes, allowing you to practice even more ellipses of different degrees and rotations.

    • However, a few of your funnels have misalignment (https://drawabox.com/lesson/1/14/notaligned). This is especially apparent in the bottom funnel. Try to be more mindful of this as you visualize the ellipse you're trying to draw while ghosting. Also, be careful where you place the peak/trough of your curve because it will influence how your ellipses look. Make sure to align them at the center line of the funnel!

    3. Boxes

    Plotted Perspective

    • Fantastic work! Your homework is very clean and well-executed.

    • I like the added line weight and the shading you did! They make your work a lot more easier to understand!

    • I also like how you made sure to draw a variety of boxes of different distances from the vanishing points, and tried different vanishing point/horizon line configurations! Variety will help you become more familiar with how boxes look.

    Rough Perspective

    • There's a bit more wobble in some of your lines here, especially with the shorter ones. Make sure to practice drawing shorter lines using the same techniques you use for longer lines!

    • Regarding your estimations, most of them are actually incredibly spot on. Amazing work! There's like one box in the first frame of the first page that lacks extended lines, but that's not really a problem, to be honest. You did a great job displaying your understanding of perspective through your work!

    Rotated Boxes

    • I love how big your boxes are for this one! It's a lot easier to identify what you did great and what needs improvement when drawing things at a bigger scale!

    • I also think you did a great job conveying an overall 3D shape with your boxes here!

    • Your lines are getting a lot more precise but I feel like you're sacrificing some drawing speed (hence some straightness) to do so. Refer to my previous comment regarding ghosted lines.

    • I noticed you had a bit of an issue in the lower-right quadrant. Remember not to repeat your lines even if they're wrong!

    • The boxes generally don't maintain a consistent shape (e.g some become longer/taller rectangles). Carefully plotting each corner point with their VPs in mind should help with this. Planning your entire piece (either by quadrant or as a whole) and placing imaginary divisions on your paper might also help you create a more consistent and symmetrical piece.

    • Some of the boxes don't look rotates as their lines seemingly converge at the same vanishing point as adjacent boxes (https://drawabox.com/lesson/1/17/notrotating). In particular, I think this is most apparent in the middle-horizontal row of boxes of your homework.

    • This is a great exercise to come back to after a few lessons to see how much your spatial thinking ability has improved. If you plan to do it again, I suggest adding more line weight to visible edges (of each box, instead of the overall sphere shape) by ghosting as it will be a good exercise similar to the superimposed lines exercise. Also, feel free to use a ruler for your hatching lines!

    Organic Perspective

    • Using superimposed lines to thicken boxes in front to simulate depth was genius! Good job!

    • Great variety in your pathings but I think your box sizes could use more variation (especially since you can use that to convey distance).

    • Box spacing is another thing you can make use of to create the illusion of distance!

    • Great job varying your use of foreshortening throughout the exercise.

    • Some of your boxes look a bit awkward but don't worry about this too much, as you'll get the hang of this as you proceed with the 250 box challenge!

    Overall, your submission displayed your great understanding of the lesson very well. Your lines and ellipses are all pretty good, but still have some room for improvement! It only goes up from here so make sure to keep doing your best in all of the following lessons, exercises, and challenges!

    Note: I'm not sure if you're aware but Drawabox has a Discord serve where you can hang out with the rest of us students. There's also a channel dedicated to getting community critiques. I will be posting a link to your work there so this feedback can get some agrees and you can get your lesson badge. You can join the server by clicking the following link: https://discord.gg/drawabox I hope to see you around!

    Next Steps:

    You can proceed to the 250 box challenge!

    Make sure to use the skills and exercises you learned during Lesson 1 as warm-up before you draw! Comfy suggests around 15 minutes of warm-up before each drawing session. Don't forget to keep all the points I mentioned above in mind while doing your exercises. Always be intentional when drawing!

    This community member feels the lesson should be marked as complete, and 3 others agree. The student has earned their completion badge for this lesson and should feel confident in moving onto the next lesson.
    1 users agree
    8:03 AM, Monday July 4th 2022

    Hi! I'm Junnie! First of all, I'd like to congratulate you on finishing Lesson 1! I'll be giving you feedback regarding your work.

    1. Lines

    Superimposed Lines

    • I'll assume that the second picture in the Imgur album is actually the first page you did because it has a lot more fraying at the starting point compared to the first picture. In that case, I think it's great that you were able to spot your mistakes and fix them as you went along the lesson. Remember to always be mindful of where you place your pen before drawing anything. Fraying at the end point is perfectly fine at the beginning, and will definitely get better with practice.

    • I noticed that a lot of your lines are pretty straight (no wobble) but there seems to be some waving which indicates that you're focusing on trying to follow the original line instead of drawing a straight line. Moving forward, make sure to prioritize straight, confident lines over accuracy and precision since those are easier to fix through practice.

    • Your lines generally arc upward then downward, showing a more circular motion (a lot more apparent in your longer lines). There could be a few reasons why this is but I'm guessing that it's because you're either relying more on your elbow for drawing, or your arm motion is limited by your drawing posture. Try to rotate your paper to an angle that allows you to fully extend your arm freely. In my case, this is at around a 45 degree angle (which allows me to draw straighter lines by moving my arm away from my body). Also, I think a lot of people have the misconception that you need to have your wrist and elbows locked when drawing to draw a straight line but that is simply not the case, especially when drawing longer lines. Instead, try to pay attention to how your arm folds and unfolds during a drawing motion. Sometimes, you'll have to make adjustments to your wrist and elbow positions to maintain a straight trajectory and that's perfectly fine (you just need to be intentional with your actions).

    • Another advice I can give is for you to keep your eyes on the end point instead of the tip of your pen as you're drawing. This is also helpful for ghosted lines.

    • Overall, you did a great job with this exercise! In the future, I suggest adding lines that have even more curvature, and also more variety to your line lengths (especially shorter ones) since you would also have to get used to drawing shorter lines using your arms.

    Ghosted Lines and Planes

    • There's a LOT more wobble in your lines compared to your previous exercise, meaning you probably slowed down your drawing speed. This could happen when you're focusing more on hitting the desired end point, which shouldn't be our priority at our current level. Remember that there are three different levels for ghosting (level 1: straight lines; level 2: straight lines that pass through the end point but overshoot; level 3: straight lines that end exactly at the end point). Right now, you're at level 1. There's no need to rush to level 3 as you'll naturally reach that point with more practice.

    • I noticed you repeated some lines in your ghosted plane exercise whenever they don't hit the end point. Try to avoid doing this in your future work as these will serve as reminders of what not to do. It's better to have our mistakes be seen than to hide them, since mistakes are part of the learning process.

    • There wasn't a lot of variety in line length in your ghosted lines exercise but you were able to add more in your ghosted planes. Great job!

    2. Ellipses

    Table of Ellipses

    • Your ellipses look good! You're doing a great job drawing through your ellipses and making consistent, smooth ellipse shapes.

    • There's some overlapping between your ellipses but otherwise you're doing an excellent job drawing the ellipses within boundaries.

    • Some of your ellipses have a bit of deformation (https://drawabox.com/lesson/1/13/deformed). This is what the TA said about deformation in his critique of my own L1 homework: "This is likely happening because you are too worried about accuracy and are probably slowing down your stroke to compensate. Try and rely a bit more on the muscle memory of the motion you build up while ghosting and almost make your mark without thinking. Although accuracy is our end goal it can't really be forced and tends to come through mileage and consistent practice more than anything."

    • There are also a couple of ellipses that seem to have been drawn through more than 2 times. Remember to limit yourself to around 2-3 loops. You can add more loops to your ghosting movement and focus on executing each ellipse to your fullest ability.

    • Overall, I think your homework demonstrates a good understanding of the exercise. In particular, I love how much variation you added to your ellipses, and how much you filled in each frame. Practicing drawing even smaller ellipses with your arms is important in the long run.

    Ellipses in Planes

    • The ellipses here are a lot more smooth than those in the previous exercise, but some still have deformation. In addition, undershooting and overshooting is a lot more apparent here. This is perfectly fine as our focus should be on smooth, confident ellipses before accuracy.

    • Remember that you need to hit all 4 edges of the plane you're drawing in. You can adjust the degree and rotation of your ellipses to achieve this. Add more loops to your ghosting movement like what was mentioned in the note about deformation above.

    Ellipses in Funnels

    • Great job! Your ellipses here are a lot smoother!

    • I also like the variety in your funnel sizes, allowing you to practice even more ellipses of different degrees and rotations.

    • However, a couple of your funnels have misalignment (https://drawabox.com/lesson/1/14/notaligned). Try to be more mindful of this as you visualize the ellipse you're trying to draw while ghosting.

    3. Boxes

    Plotted Perspective

    • Great boxes! I think they're very well-executed and clean!

    • I like the added line weight and the shading you did, but I can see some lines overshooting their supposed end points. Although these are minor mistakes, these could also indicate a bit of rushing. Don't be afraid to take your time doing each exercise!

    • Some line pairs aren't completely parallel to each other but apart from that, I think your homework demonstrates a good understanding of the exercise.

    Rough Perspective

    • Some of your ghosted lines here are quite smooth but a few still have the wobble issues I mentioned before. Try to draw your lines faster to prevent this (even if they overshoot or miss your target).

    • A lot of your boxes lack extended lines. Make sure to draw the extended depth lines no matter how wrong they are. These boxes, in particular, have depth lines that do not converge towards the VP at all which might indicate some guessing (https://drawabox.com/lesson/1/16/guessing). Please review the rules of 1-point perspective and re-do this exercise with points I mentioned above in mind.

    • I also suggest adding more variation in box shapes (like having more thin rectangles, etc.) to help you understand how depth lines would look at different distances from the VP.

    Rotated Boxes

    • I like how clean the overall image is so great job on that! You also did a good job keeping the corners of the boxes close together. However, there are a couple of mistakes that hindered your ability to convey the spherical shape we try to build with the boxes. I'll break them down in the following points.

    • Your initial four boxes are not equidistant from the center. What I mean by this is that they're not at equal distances from the center point. Their placement is important because they will serve as landmarks and reference points for all of your boxes. For example, since you will be drawing two boxes to the left and right of the center box, you can use the initial reference boxes to estimate box sizes to help you create a more symmetrical image.

    • Some of the boxes on the upper-left quadrant are not drawn through (the back face isn't visible/the non-visible edges aren't drawn).

    • The boxes generally don't maintain a consistent shape (e.g some become longer/taller rectangles). Carefully plotting each corner point with their VPs in mind should help with this.

    • Some of the boxes don't look rotates as their lines seemingly converge at the same vanishing point as adjacent boxes. Take a look at the example here to see what that looks like (https://drawabox.com/lesson/1/17/notrotating). In particular, I think this is most apparent in the middle-horizontal row of boxes of your homework.

    • I think you made a lot of effort to complete this exercise so no revisions are necessary. This is a great exercise to come back to after a few lessons to see how much your spatial thinking ability has improved. If you plan to do it again, I suggest adding more line weight to visible edges (of each box, instead of the overall shape) by ghosting as it will be a good exercise similar to the superimposed lines exercise.

    Organic Perspective

    • I like the variety of boxes you drew in this exercise! It's good practice to draw boxes of different lengths, widths and heights to familiar yourself with them.

    • I also like how you experimented with your pathing a lot in the different frames!

    • One criticism I have of your work is that most of your boxes are isometric (their line pairs are almost perfectly parallel to each other). Since you're drawing boxes in 3D space, it's better to draw line pairs with more convergence. Don't worry about this too much, though, as you'll get the hang of this as you proceed with the 250 box challenge!

    Overall, I think this was a pretty good submission that showed your growth and conveyed a good deal of understanding for each exercise. Again, make sure that you're doing each exercise to the best of your abilities to keep improving. I included instructions for the rough perspective exercise. I'm going to mark this submission as complete once you reply with your updated work for that exercise!

    Next Steps:

    Please review the homework page and video for the rough perspective exercise (https://drawabox.com/lesson/1/roughperspective) and re-do the exercise with all the things I mentioned above in mind. Reply to this review with a link to your revised work! Just a little bit more and you'll be able to move on from Lesson 1!

    When finished, reply to this critique with your revisions.
    3 users agree
    7:44 AM, Sunday July 3rd 2022

    Hi! I'm Junnie! First, congratulations on finishing Lesson 1! I'll be giving you feedback regarding your work.

    Note: I appreciate that you switched over to pen and paper instead of continuing with digital. Some people have a harder time giving back feedback when the work is done digitally, so using ink will not only benefit you, but also the people who will be evaluating your work in the future!

    I also noticed that you're using ink on seemingly rough paper (perhaps on a sketchpad?). Be aware that paper made for dry media can suck up more ink. Apart from that, fineliner tips get damaged easier when used with textured paper (as opposed to smooth paper; e.g. typewriting A4 paper).

    1. Lines

    Superimposed Lines

    • Based on the superimposed lines exercise you did digitally and on paper, I think you're off to a great start.

    • The lines are really smooth but there seems to be some wavering and course correction happening especially with longer lines. I suggest drawing a bit faster and keeping your eye on the end point instead of following the movement of your hand along the original line.

    • There's some fraying present (mostly towards the end of the line) which is perfectly normal in the beginning. There's some minor fraying at the starting point but I can tell you're making the effort to place your pen properly before drawing the line (which is great!)

    • When doing this exercise as a warmup (in the future), I suggest adding more length variation to your straight lines (right now you only have three) and curved lines (which will become more common as you progress through the course)

    Ghosted Lines and Planes

    • I understand that you decided to do the ghosted lines exercise by making interconnected polygons. And while the lesson page does say it's up to you how you'd like to fill the page, I do suggest doing something similar to what is shown on the lesson pages (https://drawabox.com/lesson/1/ghostedlines) in the future. It's also easier for the evaluators since we can compare your work to the work of others (and our own work, too).

    • Looking at the lines zoomed-in, I can tell that you already have a pretty good grasp of ghosting. Most of your lines (there are still some with wavering/kinks but I assume those are just slips) are straight, confident and accurate with only a bit of overshooting. The next goal is for you to limit the overshooting so I suggest including the pen lifting timing in your ghosting step. Assuming you keep your line drawing speed consistent, you can just use the lift timing you practiced from the ghosting step during the actual drawing step and you should end up with lines with less overshooting!

    • I also suggest adding more variation in your line lengths by making bigger planes so you can get used to ghosting longer lines.

    • Overall, I think you did a spectacular job with ghosting!

    2. Ellipses

    Table of Ellipses

    • Your ellipses are looking great! You're doing a good job drawing through your ellipses and making consistent, smooth ellipse shapes.

    • You also do an excellent job drawing the ellipses to fit their boundaries. There are some that don't hit the boundaries, but you can just work on that by adding more precision to your ghosting movement.

    • However, I think you can still add some more variation to your ellipse degrees (at the moment, you only have around 2 or 3).

    • There are some frames that don't follow the instructions (incosistent minor axis angle) but I can tell you've put in a lot of effort on this exercise so there's no need for revisions.

    • Try to full in as much of the spaces left in the frames with ellipses. It would be perfect for drawing smaller ellipses, which, as must as possible, should still be drawn using your entire arm (not just your wrist).

    Ellipses in Planes

    • I see you used your polygons from the ghosted lines exercise to do this exercise, as well. I think this is fine for personal warm-ups in the future but, as I said earlier, for homework submissions, it would ideal for you to strictly follow the instructions included in the homework explanation page/video.

    • Compared to your table exercise, more of the ellipses in this exercise have some deformation (https://drawabox.com/lesson/1/13/deformed). This is what the TA said about deformation in his critique of my own L1 homework: "This is likely happening because you are too worried about accuracy and are probably slowing down your stroke to compensate. Try and rely a bit more on the muscle memory of the motion you build up while ghosting and almost make your mark without thinking. Although accuracy is our end goal it can't really be forced and tends to come through mileage and consistent practice more than anything."

    Ellipses in Funnels

    • You still did a great job making smooth ellipse shapes but the same issues from your ellipses in planes are present

    • Try to add more variation to 1) the size of the funnels and 2) the distance between the two curves forming the funnel, so you can practice more varied ellipse sizes.

    • Overall, compared to your lines, there's still a lot more room for improvement when it comes to your ellipses' shape consistency and accuracy, so do your best to keep practicing these in your warm-ups.

    3. Boxes

    Plotted Perspective

    • Good job on this exercise! Very clean and well executed.

    • For the sake of clarity, I suggest adding more line weight to the visible box edges (lines that are in view) and adding shading to a designated box face in case you decide to do this again in the future as warm-up

    • Although your boxes are all well-constructed, there is a LOT of distortion happening because of your vanishing point placement. You can see the explanation for distortion here: https://drawabox.com/lesson/1/7/distortion. I suggest placing your vanishing points much farther apart to simulate real-life boxes as it's very rare for you to draw things in distorted perspective in your works.

    Rough Perspective

    • Compared to your ghosted lines exercise, your lines here are a lot less accurate. Try to think of what could be causing that difference so you address it in the future.

    • No matter how bad you miss the mark, try not to repeat your lines (I can see a couple when zoomed-in) as these mistakes will serve as reminders for you to avoid making the same mistakes in the future. They could also be a good benchmark for you to see how much you've improved as you keep doing these exercises as warm-ups.

    • Needless to say, your point placements and estimations are excellent! A lot of them are pretty spot-on but there's still some room for improvement, which would most likely be addressed through practice.

    • I suggest adding more variation in box shapes (like having more thin rectangles, etc.)

    Rotated Boxes

    • The shading you added really helped make the boxes a lot more visible, which is great! I think you did a good job portraying the boxes' 3D-ness!

    • However, the overall shape failed to convey a sphere which is mostly due to the inconsistent box dimensions. Keep in mind that your boxes shouldn't be changing shape (well, in the 3D sense) and should just be rotating by following different sets of vanishing points.

    • Upon closer look, I think you skipped drawing the initial 4 boxes that represent the fully rotated view of the box. Try to follow the instructions of the homework as accurately as possible. In this case, those initial 4 boxes could have helped you space your boxes more evenly!

    • You're lacking two boxes in the upper left and right corners of the sphere, and four more boxes in the bottom left and right corners. I assume these were intentional to compensate for the overrotation of the surrounding boxes. In the future, I think it would be best to still try to complete the entire exercise regardless of how bad the result might be!

    • Your lines, especially the shorter ones, seem to have more wobble than usual. Make sure that you're always following the 4 steps in the ghosting exercise, no matter how short the line is. Try to make use of your full arm for shorter lines, too.

    • I think you made a lot of effort to complete this exercise so no revisions are necessary. This is a great exercise to come back to after a few lessons to see how much your spatial thinking ability has improved. If you plan to do it again, I suggest adding more line weight to visible edges by ghosting as it will be a good exercise similar to the superimposed lines exercise.

    Organic Perspective

    • Same issues as the lines in your rotated boxes exercise, but apart from those, I think you did an excellent job with this exercise. I particularly like the looping pattern you created for the first page!

    • As usual, try to add more variation in the pathing and also the box shapes when you do this exercise again in the future. Try to have around 3 frames per page as this will give you more chances to experiment with pathing and sizes. Also try to play with box sizes some more to convey depth better.

    • You showed in this exercise that your box constructions are already good but could still use some more work, which is what the 250 box challenge is for!

    Overall, this was a solid submission! Your lines seem to grow less consistent as you proceeded with the lesson, which might indicate rushing. Try to make sure that you're doing each exercise to the best of your abilities. I think you understand most of the concepts these lessons are trying to convey but I do suggest trying to stick to the instructions for all of your future submissions for the reasons I stated above. I'm going to mark this as complete and good luck with the 250 box challenge. Keep up the good work!

    Next Steps:

    You can proceed to the 250 boxes challenge! Make sure to warm up before each drawing session using the exercises and skills you learned from lesson 1. Keep the pointers I included above in mind while doing so and I'm sure you'll get even better than you already are.

    This community member feels the lesson should be marked as complete, and 3 others agree. The student has earned their completion badge for this lesson and should feel confident in moving onto the next lesson.
    5:37 PM, Saturday July 2nd 2022

    Thank you for the detailed feedback, Rob! I'm always thankful for all the wonderful TAs here in DAB! I hope you have a nice day!

    2 users agree
    2:18 PM, Sunday June 26th 2022

    1. Lines

    Superimposed Lines:

    • Good job adding a lot of variation to the lines! Although, I noticed that there are lot of lines at different angles. Don't forget that it's better to focus on practicing how to make a straight line in one direction than it is to practice making lines in different directions (you should be rotating the page to draw lines in different directions) so you can master straight lines faster.

    • There are signs of wobbling in some of your lines; try to draw a bit faster.

    • Fraying is present in both pages, and while fraying at the end point is perfectly normal at the start, fraying at the starting point (as seen in page 1) means that you're not taking the time to place your pen in the right spot before starting to draw.

    Ghosted Lines:

    • Good variation in line lengths

    • Much less wobbling compared to the previous exercise, but in exchange, arcing is a lot more apparent. Remember that there are three different levels for ghosting (level 1: straight lines; level 2: straight lines that pass through the end point but overshoot; level 3: straight lines that end exactly at the end point). There's no need to rush through them so you should just try to focus on straight, confident lines (that don't arc to try to hit the end point).

    Ghosted Planes:

    • Same problem as before (arcing). You might be focusing too much on trying to hit the end point. It's okay to make mistakes, at first, we're aiming for confident lines rather than precise lines.

    • The arcing could also be a result of drawing with your wrist/elbow. Try to make use of your arm's full range of motion even when drawing shorter lines.

    2. Ellipses

    Table of Ellipses:

    • There's some wobbling, but, overall, your ellipses are nice and smooth.

    • Great job avoiding overlapping ellipses but some of your ellipses undershoot/overshoot their supposed boundaries. In particular, a lot of your ellipses seem to undershoot their bottom boundary, possibly indicating that you're rushing your ellipses a bit. Try to ghost your ellipses a bit more to get more confidence in hitting the boundaries.

    Ellipses in Planes:

    • Same issues as above.

    • I think you did a good job trying to hit the boundaries but some of your ellipses aren't true ellipses (they should have two equal halves when divided at the minor axis). Focus on creating an ellipse that touches any point on each plane edge (you can rotate your page to do this easier) instead of trying to hit midpoints you drew during the ghosted planes exercise

    Funnels:

    • There's still some wobbling present in the ellipses, but, overall, you still did great making them smooth

    • Some overshooting and undershooting like what was mentioned above

    • A lot of your ellipses are not aligned with the other ellipses from the same funnel. (See: https://drawabox.com/lesson/1/14/notaligned)

    • Try to re-do this exercise and submit it as a reply.

    3. Boxes

    Plotted Perspective:

    • This exercise was completed correctly. Adding weight to the visible edges would make the boxes a lot more visible, but otherwise, great job.

    Rough Perspective:

    • Mostly following the horizontal/vertical rule for your lines.

    • Your lines have a lot more wobble than before. Try to draw them faster. Refer to the notes for your ghosted lines exercise.

    • There's a box in page 2 that doesn't have the corrected lines, but other than that, you're good.

    • Try to end your extended lines at the horizon for better clarity

    Rotated Boxes:

    • The boxes are a bit hard to see because the line weight of your internal edges are similar to the external (visible) ones. Use the ghosting method to add additional weight to the lines visible to the viewer

    • Try to place your box corners closer to each other https://d15v304a6xpq4b.cloudfront.net/lesson_images/9a16c189.jpg

    • The box placements are also a bit off because the quadrants aren't symmetrical. Don't forget that you can use your previously drawn boxes/quadrants as reference when drawing the next one.

    • Apart from the issues mentioned, you did a great job conveying an overall 3D shape.

    Organic Perspective:

    • Excellent work. I like how you added so much variety to your path directions. You did well conveying the depth present in each frame.

    • Your lines still have the issues mentioned above, but they're a lot cleaner than they were in your rough perspective exercise.

    Next Steps:

    Make sure to make it a habit to do some of these exercises as your warm-up. Focus on the points for improvement mentioned above.

    You should proceed to the 250 boxes challenge now. It would help you improve your lines as you go along!

    This community member feels the lesson should be marked as complete, and 2 others agree. The student has earned their completion badge for this lesson and should feel confident in moving onto the next lesson.
The recommendation below is an advertisement. Most of the links here are part of Amazon's affiliate program (unless otherwise stated), which helps support this website. It's also more than that - it's a hand-picked recommendation of something I've used myself. If you're interested, here is a full list.
The Science of Deciding What You Should Draw

The Science of Deciding What You Should Draw

Right from when students hit the 50% rule early on in Lesson 0, they ask the same question - "What am I supposed to draw?"

It's not magic. We're made to think that when someone just whips off interesting things to draw, that they're gifted in a way that we are not. The problem isn't that we don't have ideas - it's that the ideas we have are so vague, they feel like nothing at all. In this course, we're going to look at how we can explore, pursue, and develop those fuzzy notions into something more concrete.

This website uses cookies. You can read more about what we do with them, read our privacy policy.