View Full Submission View Parent Comment
12:33 AM, Saturday April 9th 2022

Thanks for letting me know, and I apologize for taking up extra time. Going forward I will not submit any partial revisions.

Thank you for reinforcing the importance of building correct silhouettes instead of adding arbitrary contour lines. I will keep that in mind. For the revisions, should I start over with four new insects or finish the remaining three?

1:26 AM, Saturday April 9th 2022

You can just finish the remaining three.

11:22 PM, Friday April 22nd 2022

Hello! I finished my revisions:

https://imgur.com/a/wGXaPbP

Thank you for critiquing.

7:34 PM, Monday April 25th 2022

Overall you've definitely improved, both compared to before, and across this set of revisions. Your spider - specifically the way you've shaped your additional masses, you're doing a much better job there of thinking about how to design their silhouettes, where to place your inward curves, and so on.

I have just a couple things to call out:

  • I only really saw this on the first page, but be weary of overusing contour lines. Generally speaking, for additional masses there's not a lot for these kinds of contour lines, the ones that sit on the surface of a single form, to do, and worse it can encourage us to feel that if we get the shape wrong, that we can still somehow "fix" it after the fact. This in turn can shift our focus from thinking about how to design that shape, to just trying to fix it afterwards. Unfortunately those contour lines don't actually address the problem. Of course, contour lines that define the intersection between different forms (like what we use in the sausage method) are totally different - though they're suitable for instances where the forms interpenetrate, rather than where one form wraps around the other.

  • In situations like your spider's abdomen, where you did end up cutting back across the initial ellipse you'd laid down, leaving part of out outside of the resulting form, I expect this may have been the result of simply having a looser ellipse to start. If that happens, be sure to treat the outermost perimeter of that ellipse as being the edge of the form you're drawing. Alternatively you may feel that it doesn't match your reference closely enough - that's not a problem. It's better to stick with the form as you've drawn it and continue building upon it, rather than to try and contradict or alter it afterwards. Remember that the reference is merely a source of information. It defines the direction in which we take our constructions, but there will be deviations from it as we make little unintentional mistakes. Do not risk the solidity of your structure to correct such issues.

Anyway, I'll go ahead and mark this lesson as complete. You're headed in the right direction, and are making good progress. You'll also be able to continue developing your approach/understanding as you apply the same principles in the next lesson.

Next Steps:

Move onto lesson 5.

This critique marks this lesson as complete.
View more comments in this thread
The recommendation below is an advertisement. Most of the links here are part of Amazon's affiliate program (unless otherwise stated), which helps support this website. It's also more than that - it's a hand-picked recommendation of something I've used myself. If you're interested, here is a full list.
PureRef

PureRef

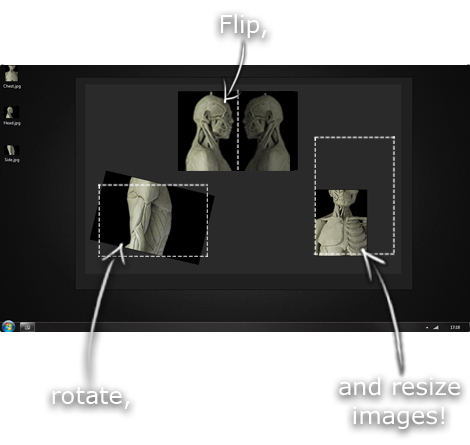
This is another one of those things that aren't sold through Amazon, so I don't get a commission on it - but it's just too good to leave out. PureRef is a fantastic piece of software that is both Windows and Mac compatible. It's used for collecting reference and compiling them into a moodboard. You can move them around freely, have them automatically arranged, zoom in/out and even scale/flip/rotate images as you please. If needed, you can also add little text notes.

When starting on a project, I'll often open it up and start dragging reference images off the internet onto the board. When I'm done, I'll save out a '.pur' file, which embeds all the images. They can get pretty big, but are way more convenient than hauling around folders full of separate images.

Did I mention you can get it for free? The developer allows you to pay whatever amount you want for it. They recommend $5, but they'll allow you to take it for nothing. Really though, with software this versatile and polished, you really should throw them a few bucks if you pick it up. It's more than worth it.

This website uses cookies. You can read more about what we do with them, read our privacy policy.