Lesson 4: Applying Construction to Insects and Arachnids

9:33 PM, Saturday July 3rd 2021

Lesson 4 - Album on Imgur

Direct Link: https://i.imgur.com/c3UpG2d.jpg

Discover the magic of the internet at Imgur, a community powered enterta...

Here's lesson 4

I had some trouble using the sausage form for the legs, so I tried experimenting with various methods, like with balls and tubes. It's still kinda hard for me to make them appear bending in the right way/perspective.

0 users agree
2:42 AM, Monday July 5th 2021

Starting with your organic forms with contour lines, I think the main thing here is that you may want to slow down a little. "Slowing down" can happen in a few ways. For example, there's slowing down in the sense of investing more time in the planning and preparation phases of the ghosting method (which of course should be used for all of these marks). This will help you maintain greater overall control of your contour lines, getting them to fit more snugly within the sausage form's silhouette, so you can actually capture the illusion that the lines are running along the object's surface.

Then there's slowing down when actually executing your marks - this is a little trickier because drawing "slowly" is often what students think of as meaning to draw more carefully and hesitantly. One should still, as always, execute their marks confidently, but slowing the pace down a little while maintaining a confident execution can help you to achieve the specific characteristics of simple sausages (as mentioned in the instructions) a bit more easily. Remember that we're aiming to keep the ends circular in shape (you often tend to stretch them out), and equal in size. From there, we also want the midsection to maintain a consistent width, not pinching or swelling.

Moving onto your insect constructions, I can see that you are making a notable effort to build up each one from simple to complex. There are however a number of recommendations I can make to help you achieve better results, and to feel more comfortable as you work through these drawings.

First and foremost, it's great that you're drawing several insects per page, but this can sometimes result in us forcing our drawings to fit within a more limited space - perhaps giving them less room than they really need. This hinders us because it limits our brains' capacity for spatial reasoning, while also interfering with how comfortable it is to draw with our whole arm. Both of these can result in clumsier drawings, and you may be finding that with some of the especially small ones, things just don't feel right. Of course, with mileage and experience, drawing smaller will get easier - but in the interest of dealing with one problem at a time (or fewer problems at once), we prioritize giving each drawing as much room as it requires.

We do this by focusing on the first drawing, letting it occupy however much of the page as feels natural. Then when it's done, we assess whether there's enough room for another. If there is, you should certainly add another. If there isn't however, it's perfectly okay to end up with just one drawing on a page.

Second, I'm noticing a tendency to break your drawings into two distinct phases. You seem to approach the initial masses more faintly and loosely, not quite committing to them or treating them as though they're actual solid masses. Once you're more comfortable with it, you then draw later forms with darker lines on top. This is not the approach I want you to be using in this course. Every drawing we do here is focused not on creating a pretty end result, but rather they're all exercises in spatial reasoning. We're effectively playing with forms - we construct forms in the world, we make them intersect, connect, wrap around one another, etc. and build up to a more complex result. Every single form is solid, like a piece of marble introduced to the world - so they should all be drawn as such - nothing should be left faint or half-formed because you're not sure you want to commit to it. You commit to everything.

You can see this kind of approach embodied in the two demonstrations at the top of the informal demos page - specifically the shrimp and lobster. Note how every single element I add, every mark, is made with clear intent. I use the ghosting method for every stroke, I'm focusing on every form I construct, and how they relate to one another in space.

This tendency to make your initial masses feel less solid/real also has a real impact on your viewer's ability to buy into the illusion you're creating. Because we're drawing on a flat piece of paper, we have a lot of freedom to make whatever marks we choose - it just so happens that the majority of those marks will contradict the illusion you're trying to create and remind the viewer that they're just looking at a series of lines on a flat piece of paper. In order to avoid this and stick only to the marks that reinforce the illusion we're creating, we can force ourselves to adhere to certain rules as we build up our constructions. Rules that respect the solidity of our construction.

For example - once you've put a form down on the page, do not attempt to alter its silhouette. Its silhouette is just a shape on the page which represents the form we're drawing, but its connection to that form is entirely based on its current shape. If you change that shape, you won't alter the form it represents - you'll just break the connection, leaving yourself with a flat shape. We can see this most easily in this example of what happens when we cut back into the silhouette of a form.

You do this a lot, though in a bunch of small places, because you aren't treating those initial marks as defining solid forms - even though that's how the viewer will interpret them. So we see it in places like those marked out here. The same issue can also arise when extending out the silhouette of a form you've already drawn - really anything where you're adding flat shapes, or partial shapes (which aren't their own fully enclosed silhouettes) and not considering how they exist in 3D space, and how they relate to the existing structures.

Instead, whenever we want to build upon our construction or change something, we can do so by introducing new 3D forms to the structure, and by establishing how those forms either connect or relate to what's already present in our 3D scene. We can do this either by defining the intersection between them with contour lines (like in lesson 2's form intersections exercise), or by wrapping the silhouette of the new form around the existing structure as shown here.

You can see this in practice in this beetle horn demo, as well as in this ant head demo. This is all part of accepting that everything we draw is 3D, and therefore needs to be treated as such in order for the viewer to believe in that lie.

As a side note - remember that when we're talking about the detail phase of a drawing, we're not talking about just arbitrarily decorating it and making it look nice. I think that's a bit of a misconception you end up with, and it's actually a lot harder to work with because there's no clear point when we've decorated enough. It's a subjective, unclear goal to pursue. What we're doing in this course can be broken into two distinct sections - construction and texture - and they both focus on the same concept. With construction we're communicating to the viewer what they need to know to understand how they might manipulate this object with their hands, were it in front of them. With texture, we're communicating to the viewer what they need to know to understand what it'd feel like to run their fingers over the object's various surfaces. Both of these focus on communicating three dimensional information. Both sections have specific jobs to accomplish, and none of it has to do with making the drawing look nice.

As a rule, reserve your areas of filled solid black for cast shadows only. Whenever you add such a filled shape, you need to be thinking about how the specific design of that shape implies the presence of a textural form that you're trying to capture. In this course, leave form shading out (as discussed back in Lesson 2), and don't worry about capturing any local colour - like where the surface itself is black whether it's an insect's eyes, spots, patterns, etc. You wouldn't attempt to capture any other colours, like green, red, blue, yellow, etc. so there's no reason to make black or dark areas a special case. Whenever the viewer looks at your drawing and sees an area filled with black, their brain will first try to understand it as a cast shadow, and when they realize it doesn't make sense that way, they'll move onto figuring out what else it might be. Leaning into the viewer's first guess will help you communicate with them more clearly.

The last thing I wanted to call out was about your leg constructions .I noticed that you seem to have employed a lot of different strategies for capturing the legs of your insects (and of course, this is something you called out yourself). It's not uncommon for students to be aware of the sausage method as introduced here, but to decide that the legs they're looking at don't actually seem to look like a chain of sausages, so they use some other strategy. The key to keep in mind here is that the sausage method is not about capturing the legs precisely as they are - it is about laying in a base structure or armature that captures both the solidity and the gestural flow of a limb in equal measure, where the majority of other techniques lean too far to one side, either looking solid and stiff or gestural but flat. Once in place, we can then build on top of this base structure with more additional forms as shown here, here, in this ant leg, and even here in the context of a dog's leg (because this technique is still to be used throughout the next lesson as well). Just make sure you start out with the sausages, precisely as the steps are laid out in that diagram - don't throw the technique out just because it doesn't immediately look like what you're trying to construct.

Also, when it comes to making the sausage forms themselves, I understand that it's difficult - but something being challenging is not enough of a reason to go find alternative approaches. Some things simply come with practice, persistence, and mileage. If you try to find another approach, then you're simply going to avoid getting that practice in.

Now, I've pointed out a number of things you need to work at, so I'm going to assign some revisions below to give you the chance to do so. I strongly recommend you try to follow the general process/markmaking/mindset you see exhibited in the shrimp/lobster demos I linked from the informal demos page. Apply those principles to your insect drawings, and you should see better results by merely changing how you approach the problems.

Next Steps:

Please submit the following:

  • 1 page of organic forms with contour curves

  • 4 pages of insect constructions

When finished, reply to this critique with your revisions.
9:38 PM, Sunday July 11th 2021

Hello. Thank you for the feedback. Here are my revisions: https://imgur.com/a/ij2M6sF

I tried to incorporate your feedback as much as possible, but I did find myself getting into the habit of "sketching" again at my last drawing of the scorpion. I think in general I have that habit because I have trouble controlling line weight. I'm not sure if this is a matter of not having enough experience with fineliners, or if the fineliner I'm using isn't of good quality.

I've tried using the sausage form for all my drawing, but I do notice that often I make them way too thick. I think it's because they're insects (and thus small) that I often have trouble judging how thick I should make them in relation to perspective and foreshortening.

1:23 AM, Monday July 12th 2021

As a whole I think this is definitely moving in the right direction, and I can see that you have indeed been trying to apply a lot of the points I raised. As such, I am going to mark this lesson as complete, but I have a couple things for you to keep an eye on as you move forwards:

  • Remember that the sausage method requires you to define the joint between the segments with a contour line. This helps to define how the different sausage segments relate to one another in 3D space.

  • The reason you're running into trouble controlling your line weight is because you're actually overusing it (where you do attempt to use it). You're ending up arbitrarily reinforcing whole chunks of linework with additional weight but not for any concrete purpose. Instead limit yourself to going back over very limited, localized areas where there are specific overlaps between forms that you'd line to clarify. Use the ghosting method so you can be sure to execute those marks confidently (even if it does sacrifice accuracy, that wll improve with practice), and refrain from tracing over your existing linework, as tracing causes students to focus more on how the lines exist on the page, rather than how they represent edges moving through 3D space. You can see this more limited use of line weight in this example of two overlapping leaves.

  • Also, keep your use of line weight very subtle - don't create huge obvious sections of very thick lines. Line weight is meant to be more of a whisper to the viewer's subconscious, not an obvious shout. Sometimes we're prone to confusing line weight with cast shadows, but they are totally separate things. Cast shadows can be as broad/thick as we want them to be - they're actually shapes rather than line - but they cannot simply cling to the silhouette of a form, and also must be cast from one form onto the surface of another, being subject to a single consistent light source in the scene. All filled shapes of black should be cast shadows in your drawing - so for example, where you've got those sections you filled in with black in your scorpion's tail, as well as on its head below the pedipalps, this should be avoided because the viewer's brain will try to understand them as cast shadows, until it becomes clear that they don't make sense as such. By that point, you've already somewhat lost the viewer. So refrain from just filling areas in with solid black - always design your cast shadow shapes specifically, thinking about how they relate to the form casting them.

So! As promised, I'll go ahead and mark this lesson as complete.

Next Steps:

Move onto lesson 5.

This critique marks this lesson as complete.
The recommendation below is an advertisement. Most of the links here are part of Amazon's affiliate program (unless otherwise stated), which helps support this website. It's also more than that - it's a hand-picked recommendation of something I've used myself. If you're interested, here is a full list.
PureRef

PureRef

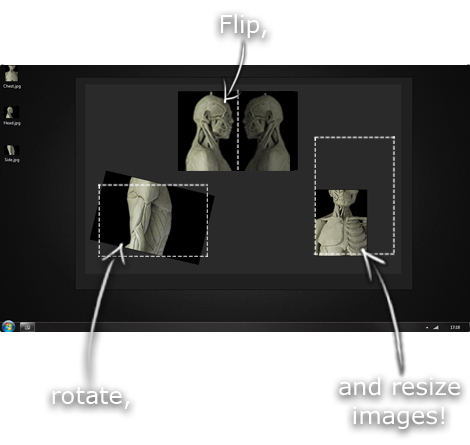
This is another one of those things that aren't sold through Amazon, so I don't get a commission on it - but it's just too good to leave out. PureRef is a fantastic piece of software that is both Windows and Mac compatible. It's used for collecting reference and compiling them into a moodboard. You can move them around freely, have them automatically arranged, zoom in/out and even scale/flip/rotate images as you please. If needed, you can also add little text notes.

When starting on a project, I'll often open it up and start dragging reference images off the internet onto the board. When I'm done, I'll save out a '.pur' file, which embeds all the images. They can get pretty big, but are way more convenient than hauling around folders full of separate images.

Did I mention you can get it for free? The developer allows you to pay whatever amount you want for it. They recommend $5, but they'll allow you to take it for nothing. Really though, with software this versatile and polished, you really should throw them a few bucks if you pick it up. It's more than worth it.

This website uses cookies. You can read more about what we do with them, read our privacy policy.