Lesson 1: Lines, Ellipses and Boxes

12:54 AM, Friday June 5th 2020

Drawabox Lesson #1 - Album on Imgur

Direct Link: https://i.imgur.com/dCvWGfO.jpg

Discover the magic of the internet at Imgur, a community powered enterta...

Hi All,

I haven't drawn a thing in 30+ years, so why not give it a go? Any feedback is welcome as I have no idea what I'm doing. I have been practicing my lines, though I've noticed I tend to curve up and down in the middle of a long line, most likely due to not using my shoulder like that in decades. 

Cheers,

DrReverendJ

0 users agree
2:45 AM, Friday June 5th 2020

Lines

Your straight superimposed lines are looking good, they're confident and you're taking the time to line your pen up with the starting point, which minimises fraying. The curved lines however are slightly less confident, so make sure that you're not focusing too much on accuracy - confidence is more important at this stage.

Next, as you noted, your ghosted lines and planes are exhibiting some arcing but are otherwise confident and well executed. This page should give you some strategies for trying to combat this moving forward.

Ellipses

One thing that is very clearly present across your entire ellipse section is that you're drawing them far too slowly, which is causing a lot of wobbling in the lines. It's particularly evident on the ends of your ellipses or when they're approaching a boundary, so make sure that you're drawing fast enough that your brain doesn't get a say in the matter. Confidence is not the same as speed, but as a beginner, speed can help you fake it till you make it.

Across the set, you've done a good job of conscientiously drawing through your ellipses twice and in your tables of ellipses, you've done a pretty good job getting them tight up against one another. Similarly, you've done a good job of keeping your ellipses within the confines of your planes but remember that this kind of accuracy should never come at the expense of confidence. Keep in mind, an inaccurate but confident ellipse or line can generally be salvaged, there's nothing that can be done for a wobbly one.

Finally, your funnels are actually managing to get a pretty good alignment to the minor axis, though things do get a little skewed on the left hand side of the middle funnel, it's just something to keep practicing in your warm-ups.

Boxes

Starting with your plotted perspective here, you seem to have gone straight for hard mode and might've missed the instruction that this one was to be completed with a ruler. The intention of course being to introduce students that might not be too familiar with linear perspective how to plot things out in a structured way before teaching them to freehand them.

Next your rough perspective is off to a pretty good start. You've done a fairly good job of keeping the horizontals parallel and verticals perpendicular to the horizon line. Your line confidence definitely took a hit here and it seems like you got overwhelmed with the task you were set. Oftentimes, students consider a ghosted line as one unit of effort, an ellipse as one unit of effort and therefore boxes to be one unit of effort. But this is incorrect, it's actually 12 units of effort - one for each line that you draw. So make sure that you're putting the time and planning into each of the lines you draw of your box.

You've done a pretty good job keeping things together in your rotated boxes, though things do get a little further apart towards the ends, which unfortunately makes it harder to place each consecutive box in the exercise. You've managed a good degree of rotation on the first, inner layer of the boxes, however as you've progressed to the second layer, you've tended to following the vanishing point of the previous box, rather than sliding the vanishing point along the horizon line as shown in these notes. That said, these last two exercises are designed as a kind of introduction to the problems you'll face in the 250 box challenge.

Finally, your organic perspective compositions are creating a nice sense of space and scale with the variation in the size of your boxes. Similarly to the rough perspective, your line confidence here has taken a bit of a hit, so just make sure you're taking your time to plan, ghost, and execute confidently. Lastly, the boxes themselves are showing significant amounts of distortion and divergence in places, but again, this is something you will tackle in the box challenge.

Next Steps:

Before you move on, I would like to see:

  • One more page of tables of ellipses

  • One more page of ellipses in planes

Focus on getting your ellipses smooth and confident. It's okay if they pop out of their bounds a little as long as you're aiming both for confidence and getting your ellipses in roughly the right place.

When finished, reply to this critique with your revisions.
11:57 PM, Thursday June 11th 2020

Hi,

Thanks for the feedback, just as any FYI for the first 2 pt. perspective, I didn't actually have a ruler, I think I had to use part of a cardboard box to make straight lines, so this homework I invested in some 2500 BC technology. I completed the extra assignments and part of me wants to say "FU" to ellipses. They're terrible and I know it, and I think I'm doing something mechanically wrong in drawing them. It feels like my shoulder locks when I try to make a circular motion and that why, especially with the circles, they get all wobbly. So any insight would be helpful. When I do a single ellipse or circle its not too bad, but as soon as I try to do a second, I make it about half way through and it all falls apart. I'm under the impression that my brain goes off autopilot, but if I go too fast it's a disaster. As an example, one of the boxes which has three lines of circles, I did the first one at my normal speed, then increased it to 1.5 and 2x speed on the next two (fastest on top) and they get worse. My personal thought is that I haven't drawn in decades and it'll just take a while to get good at them, but I also don't want to get in a bad habit now, so any suggestions would be helpful.

https://imgur.com/9Oydr4p

Cheers,

DrReverendJ

9:51 AM, Friday June 12th 2020

Honestly, despite your difficulties, you do seem to be getting a better handle on your ellipses in terms of confidence. They're looking much smoother and whilst you're not quite getting them to touch the four sides of the plane, this just means you may need to aim for slightly larger ellipses.

In terms of the motion of your shoulder, you might find this video useful. With regards to being unable to draw one ellipse after another, this could be that you need to kind of pause and "reset" the muscle memory from the previous ellipse before ghosting out the next one. Ellipses are definitely one of those things that feels weird for quite a while, so keep pushing, you do seem to be getting it.

I noticed your tables of ellipses revision wasn't included in the album but I'm not particularly concerned given the level of improvement present in the ellipses in planes.

Next Steps:

Keep practicing your ellipses in your warm-ups and feel free to move onto the 250 box challenge.

This critique marks this lesson as complete.
12:45 PM, Friday June 12th 2020

Hi,

Thanks for the suggestions and the link. Sorry about not including the other picture, still figuring out how imgur works, but I think you're spot on with pausing between drawing each ciricle or ellipse. Just a quick question,  do I do the 250 box challange before lesson 2 or do I do it in conjuction with lesson 2? 
View more comments in this thread
The recommendation below is an advertisement. Most of the links here are part of Amazon's affiliate program (unless otherwise stated), which helps support this website. It's also more than that - it's a hand-picked recommendation of something I've used myself. If you're interested, here is a full list.
PureRef

PureRef

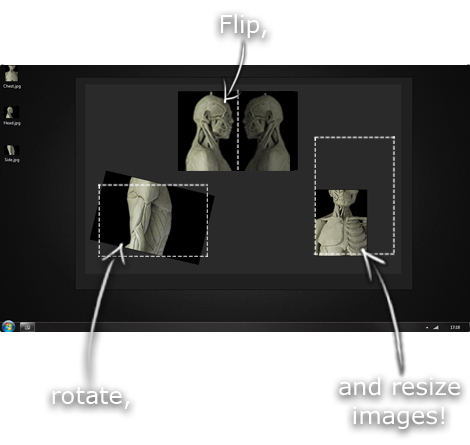
This is another one of those things that aren't sold through Amazon, so I don't get a commission on it - but it's just too good to leave out. PureRef is a fantastic piece of software that is both Windows and Mac compatible. It's used for collecting reference and compiling them into a moodboard. You can move them around freely, have them automatically arranged, zoom in/out and even scale/flip/rotate images as you please. If needed, you can also add little text notes.

When starting on a project, I'll often open it up and start dragging reference images off the internet onto the board. When I'm done, I'll save out a '.pur' file, which embeds all the images. They can get pretty big, but are way more convenient than hauling around folders full of separate images.

Did I mention you can get it for free? The developer allows you to pay whatever amount you want for it. They recommend $5, but they'll allow you to take it for nothing. Really though, with software this versatile and polished, you really should throw them a few bucks if you pick it up. It's more than worth it.

This website uses cookies. You can read more about what we do with them, read our privacy policy.