Lesson 4: Applying Construction to Insects and Arachnids

1:26 AM, Tuesday August 17th 2021

Lesson 4 – Revision – Drawabox Challenger

Drawabox Challenger: https://drawaboxchallenger.wordpress.com/lesson4/

Humorolethalis Sergius Lobster Humorolethalis Sergius Shrimp Lobster Lad...

Hello Drawabox staff,

This is my submission for Lesson 4.

With the ladybugs, I had to warm up with drawing the shape, hence the many ellipses not part of the body.

Regards,

Manolito Mystique

0 users agree
4:45 AM, Wednesday August 18th 2021

Starting with the organic forms with contour lines, you're generally doing pretty well here, though I really do have to stress the importance of not altering the exercise - just stick to a simple line (the arrowhead is fine) for the minor axis line. Don't draw a whole 2D arrow for it. Furthermore, while you're generally keeping close to the characteristics of simple sausages as mentioned in the instructions, you do sometimes allow your sausages to get wider through their midsections. Always aim to stick to a consistent width and ends of equal size.

Moving onto the insect constructions, while overall you're moving in the right direction here, there actually are a number of things I can point out to adjust your approach that should help you get more out of these exercises.

You mentioned in your submission that the ladybugs required warming up - but it actually gives me a pretty good opportunity to stress one of the most important things I share with students in this lesson. I'll explain it in greater depth, but at its core, it's about these drawings really just being exercises in spatial reasoning. The goal isn't focused on achieving a nice reproduction of the reference image in the end, it's actually about building up solid structures, and using the reference as a source of information in terms of what we're constructing. So the whole "warmup" thing isn't relevant here, and it actually hurts what we're meant to be getting out of the exercise.

Because we're drawing on a flat piece of paper, we have a lot of freedom to make whatever marks we choose - it just so happens that the majority of those marks will contradict the illusion you're trying to create and remind the viewer that they're just looking at a series of lines on a flat piece of paper. In order to avoid this and stick only to the marks that reinforce the illusion we're creating, we can force ourselves to adhere to certain rules as we build up our constructions. Rules that respect the solidity of our construction.

For example - once you've put a form down on the page, do not attempt to alter its silhouette. Its silhouette is just a shape on the page which represents the form we're drawing, but its connection to that form is entirely based on its current shape. If you change that shape, you won't alter the form it represents - you'll just break the connection, leaving yourself with a flat shape. We can see this most easily in this example of what happens when we cut back into the silhouette of a form.

So we can see that in your ladybugs - basically your "warmups" served to introduce solid ball forms into the scene, which you then tried to ignore/replace/alter. We can also see this in some of the other drawings, like this housefly. Note that where you did it on the wings is fine, because the wings are already flat (which is why we also use that approach when dealing with leaves and petals, as explained here).

Instead, whenever we want to build upon our construction or change something, we can do so by introducing new 3D forms to the structure, and by establishing how those forms either connect or relate to what's already present in our 3D scene. We can do this either by defining the intersection between them with contour lines (like in lesson 2's form intersections exercise), or by wrapping the silhouette of the new form around the existing structure as shown here.

You can see this in practice in this beetle horn demo, as well as in this ant head demo. This is all part of accepting that everything we draw is 3D, and therefore needs to be treated as such in order for the viewer to believe in that lie.

You can also find more complete examples of this kind of approach - that is, respecting everything added to a drawing as being its own solid, three dimensional structures - in the shrimp and the lobster demonstrations on the informal demos page.

I did notice similar issues in some other drawings where it just didn't really feel like the earlier components of your drawing didn't really feel like they were treated as being solid elements. For example, in this one, those initial masses just look kind of sloppy/halfhearted. Make sure you're drawing through them two full times before lifting your pen, and that you're simply always thinking of them as balls, not just loose circles on a flat page.

Moving forward, I noticed that you seem to have employed a lot of different strategies for capturing the legs of your insects. It's not uncommon for students to be aware of the sausage method as introduced here, but to decide that the legs they're looking at don't actually seem to look like a chain of sausages, so they use some other strategy. The key to keep in mind here is that the sausage method is not about capturing the legs precisely as they are - it is about laying in a base structure or armature that captures both the solidity and the gestural flow of a limb in equal measure, where the majority of other techniques lean too far to one side, either looking solid and stiff or gestural but flat. Once in place, we can then build on top of this base structure with more additional forms as shown here, here, in this ant leg, and even here in the context of a dog's leg (because this technique is still to be used throughout the next lesson as well). Just make sure you start out with the sausages, precisely as the steps are laid out in that diagram - don't throw the technique out just because it doesn't immediately look like what you're trying to construct.

Lastly, when getting into the detail phase of a drawing, it's best not to look at that as a chance to focus on decorating your drawing. What we're doing in this course can be broken into two distinct sections - construction and texture - and they both focus on the same concept. With construction we're communicating to the viewer what they need to know to understand how they might manipulate this object with their hands, were it in front of them. With texture, we're communicating to the viewer what they need to know to understand what it'd feel like to run their fingers over the object's various surfaces. Both of these focus on communicating three dimensional information. Both sections have specific jobs to accomplish, and none of it has to do with making the drawing look nice.

So - remember that form shading isn't something we're going to be incorporating into these exercises, and that it's best to reserve your filled areas of solid black only for capturing the shadows that imply the presence of your textural forms.

While overall I think you are doing a good job, I do feel that having you do a few more drawings to demonstrate your understanding of these principles will be well worth it. You'll find those pages assigned below.

Next Steps:

Please submit 2 more drawings of insect drawings. Pay special attention to the approach demonstrated in the shrimp and lobster demos, and try to apply the same way of thinking to your own.

When finished, reply to this critique with your revisions.
2:59 PM, Sunday August 29th 2021

Dear Uncomfortable,

Here is my revision.

https://drawaboxchallenger.wordpress.com/lesson4/

I really looked into your correct addition principle. I think it rather worked with constructing the body of the weevil. I used intersections for the legs of both the weezil and the hornet, because the addition approach to a sausage to construct a leg I find more difficult (possibly because they are so small), which I attempted on the back-right leg of the weevil (because I drew the leg too slim). The goal to sustain the impression of the insect being 3D I believe I have improved (by mainly using intersection lines).

Regards,

Manolito Mystique

11:43 PM, Sunday August 29th 2021

Looking at your revisions, I don't feel you've fully grasped my original critique. There are two main issues that stand out here to me.

Firstly, the point about working additively, and ensuring that every single addition to the construction is its own separate, independent, three dimensional form being built onto the existing structure. The approach you're using here seems to primarily be a matter of continuing to extend off the silhouettes of forms you'd already constructed, then to use contour lines to try and go back in and make those elements more three dimensional after the fact - for example here where you extended the thorax of the weevil to build out to the legs. There are also smaller areas where you take shortcuts of extending your forms' silhouettes more directly, like you did here in the weevil's leg and here in the wasp's abdomen, both cutting into the underlying mass in small ways for the segmentation and extending it for the stinger.

In general, you're still allowing yourself to treat what you're doing here as drawing on a flat page, and are taking many shortcuts that can only be taken when treating it as a drawing. You need to respect every element you add to the page as being a solid mass - even that initial mass for the wasp's abdomen. If it were a solid piece of marble in the world, you wouldn't be able to cut into its silhouette, or to simply stretch out its tip. You'd have to think about how you were adding new solid forms onto it for every new addition.

As I shared in my last critique, take a look at the specific manner in which the shrimp and the lobster informal demos were handled - in fact, it would be a good idea for you to follow along with these, step by step.

The second issue that stands out to me is that in my previous critique I called out the fact that you were not employing the sausage method. Here I'm not seeing any attempt to correct the issue I raised there, so please go back and reread that section of the critique.

Next Steps:

Please submit:

  • Your draw-along for the shrimp and lobster demos

  • 2 additional pages of insect constructions

And be sure to go through the demonstrations/diagrams from my original critique again.

When finished, reply to this critique with your revisions.
5:54 PM, Tuesday January 18th 2022

Hello everyone,

Here is my revision.

Kind regards.

View more comments in this thread
The recommendation below is an advertisement. Most of the links here are part of Amazon's affiliate program (unless otherwise stated), which helps support this website. It's also more than that - it's a hand-picked recommendation of something I've used myself. If you're interested, here is a full list.
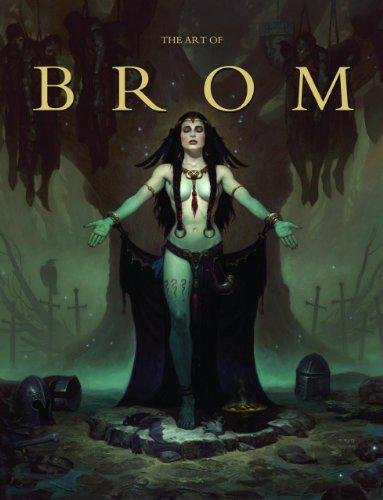
The Art of Brom

The Art of Brom

Here we're getting into the subjective - Gerald Brom is one of my favourite artists (and a pretty fantastic novelist!). That said, if I recommended art books just for the beautiful images contained therein, my list of recommendations would be miles long.

The reason this book is close to my heart is because of its introduction, where Brom goes explains in detail just how he went from being an army brat to one of the most highly respected dark fantasy artists in the world today. I believe that one's work is flavoured by their life's experiences, and discovering the roots from which other artists hail can help give one perspective on their own beginnings, and perhaps their eventual destination as well.

This website uses cookies. You can read more about what we do with them, read our privacy policy.