Lesson 4: Applying Construction to Insects and Arachnids

7:50 AM, Monday April 26th 2021

Imgur: The magic of the Internet

Imgur: https://i.imgur.com/59TK306?third_party=1#_=_.jpg

Find, rate and share the best memes and images. Discover the magic of th...

Hi there!

I'm back into studying after a 7 month break due to work commitments, so I'm hoping im not too rusty!

Also I drew majority of this lesson's homework on a3 paper, but only have access to an a4 scanner--- so excuse any areas that are cut off or any double scans!

Thanks so much!

0 users agree
11:41 PM, Tuesday April 27th 2021

So there's a bit of a mixed bag here. As a whole, I'm going to point out a bunch of mistakes in your approach, but I will tell you now that I am not really worried at all. You've shown enough that suggests to me that with a little bit of redirection in terms of how you're tackling these drawings and what you're focusing on, you'll be back on track and doing great in no time.

Starting with the organic forms with contour lines, you're doing a good job of sticking fairly close to the characteristics of simple sausages (but you should reread what that's about to be sure to follow it more directly), as explained in the instructions. But there are two main areas where you're encountering issues:

  • Firstly, you need to be drawing through each and every ellipse free-handed in this course two full times before lifting your pen, as explained here.

  • Secondly, the assignment asked for organic forms with contour curves. Sometimes I get students doing one page of ellipses, one page of curves, and I don't bother calling it out, but in this case you ended up not doing the one that was assigned at all. Read the instructions more carefully!

Moving onto your insect constructions, the first thing I want to point out is that once you finished up with the construction phase of your drawing and got into detail, I think the goals you had for what "detail" really entails are a little bit off from what this course is really about. Right now, it seems like you're more focused on "decoration", attempting to make your drawings feel.. well, just nicer-looking.

What we're doing in this course can be broken into two distinct sections - construction and texture - and they both focus on the same concept. With construction we're communicating to the viewer what they need to know to understand how they might manipulate this object with their hands, were it in front of them. With texture, we're communicating to the viewer what they need to know to understand what it'd feel like to run their fingers over the object's various surfaces. Both of these focus on communicating three dimensional information. Both sections have specific jobs to accomplish, and none of it has to do with making the drawing look nice.

Texture specifically, as discussed back in Lesson 2, is all about capturing cast shadow shapes. No shading, no capturing local colour/patterns (like if something has a black surface, don't worry about it - it's not like we're capturing things that are red, yellow, blue, pink, etc. - just treat everything like it's the same flat white and focus instead on information that pertains to the actual 3D forms that are present, whether large or small).

The other point I wanted to raise comes down to how you're approaching the constructions themselves - specifically the freedom with which you're allowing yourself to draw forms, then draw new ones on top of them. Because we're drawing on a flat piece of paper, we have a lot of freedom to make whatever marks we choose - it just so happens that the majority of those marks will contradict the illusion you're trying to create and remind the viewer that they're just looking at a series of lines on a flat piece of paper. In order to avoid this and stick only to the marks that reinforce the illusion we're creating, we can force ourselves to adhere to certain rules as we build up our constructions. Rules that respect the solidity of our construction.

For example - once you've put a form down on the page, do not attempt to alter its silhouette. Its silhouette is just a shape on the page which represents the form we're drawing, but its connection to that form is entirely based on its current shape. If you change that shape, you won't alter the form it represents - you'll just break the connection, leaving yourself with a flat shape. We can see this most easily in this example of what happens when we cut back into the silhouette of a form.

Sometimes you do this very intentionally, but there are other cases - mainly where you go back over your drawings with a darker line to kind of create a distinction between an underdrawing and your "real drawing" where it has the same effect, redrawing the existing silhouette by tracing. Remember that line weight itself is a tool that has a specific purpose - to clarify overlaps between forms in localized areas. We add line weight using the ghosting method and drawing confidently, just as we would when making our initial marks. Your drawings should definitely not be separated into these kinds of phases where part of the drawing ought to be erased or removed - at least, not for the purposes of the exercises we're doing in this lesson.

Getting back to the whole no-altering-silhouette thing: instead, whenever we want to build upon our construction or change something, we can do so by introducing new 3D forms to the structure, and by establishing how those forms either connect or relate to what's already present in our 3D scene. We can do this either by defining the intersection between them with contour lines (like in lesson 2's form intersections exercise), or by wrapping the silhouette of the new form around the existing structure as shown here.

You can see this in practice in this beetle horn demo, as well as in this ant head demo.

This is all part of accepting that everything we draw is 3D, and therefore needs to be treated as such in order for the viewer to believe in that lie.

So, I've given you two major things to shift in your overall approach. With that, I'll assign some revisions below so you can apply them and demonstrate that you understand.

Next Steps:

Please submit the following:

  • 1 page of organic forms with contour curves

  • 3 pages of insect constructions

When finished, reply to this critique with your revisions.
8:31 AM, Thursday April 29th 2021

Hello!

After reading through your critique and the mentioned demos, I've tried my hand at the revisions. Please let me know how I've fared. Thanks so much!

https://imgur.com/a/fqTqxHR

5:36 PM, Thursday April 29th 2021

Looking at your revisions, there are a number of issues I addressed previously that are still present, giving me the impression that you may not have read through my critique as carefully as you should have. While I am sure this is not intentional, there are a lot of distinct points I raised that simply haven't been corrected, as shown here

A and B: You're still altering the silhouettes of your forms after they've been constructed. Every single addition to your construction should be through the introduction of a new, complete, solid, 3D form. You also cannot redefine/alter forms you've already drawn to make small tweaks in order to make them match your reference better. Treat the things you've drawn as though they're 3D, and they'll appear 3D to others. As soon as you treat them like they're just lines on the page, you'll remind the viewers of that fact as well.

C and D: You're still misusing line weight. The biggest issue here is that your use of line weight is basically resulting in you redrawing the silhouettes of your forms. Do not apply line weight so excessively - keep it limited to localized areas, and make sure you're using the same ghosting method to execute those marks. Don't trace hesitantly back along the length of your existing lines.

Additionally, I can see that you're trying to use the sausage method, although you end up redrawing the silhouettes of those sausages as well. Instead, draw the sausages larger, while maintaining the characteristics of simple sausages, and then build up new forms on top of them that wrap around those structures as shown here and here. You can also see this in action in this ant leg demo and this dog leg demo. The main issue I'm seeing stems from the fact that you're making the sausage structures so skinny that they don't actually play any role, you end up redefining their silhouettes anyway by engulfing them inside a totally different shape/form.

Lastly, I noticed a couple things to point out for your organic forms with contour curves:

  • You seem to be placing contour ellipses on both ends of your forms, which suggests to me that you're not really aware or considering what they're actually supposed to represent. This exercise is just like the one with contour ellipses, except we're not drawing as though we have x-ray vision. So, while there's a full ellipse wrapping around the form for every contour line, for most of them we can only see a partial curve. It is only on the tips that face the viewer that we can actually see a whole ellipse - therefore you need to consider which end faces the viewer, and draw an ellipse there, rather than just putting an ellipse on each tip. Here are some examples of configurations where one end is fully visible to the viewer, both ends are, or no ends are.

  • You're still not drawing through the ellipses you do draw. I raised this issue previously.

  • Keep working on sticking to the characteristics of simple sausages - you're close, but you tend to have ends that are more stretched out rather than having them remain entirely circular, and you've got many that get a little wider through their midsection.

  • As explained here, the degree of your contour lines should be shifting wider as we slide along the length of the sausage, away from the viewer. This is also explained in the Lesson 1 ellipses video, using props to explain why this occurs.

You have a lot of things to address, and I think you may be rushing a little and not quite giving yourself enough time to absorb what is being conveyed to you in the critique. As such, I'm going to ask that you complete the revisions that were assigned previously again, and that you submit them no sooner than one week from now.

Next Steps:

Please redo the revisions that were assigned previously, and submit them no sooner than 1 week from now.

When finished, reply to this critique with your revisions.
4:17 AM, Thursday May 13th 2021

Hello!

So I went back over both critiques, and rewatched some demos to try again. I couldn't complete a drawing nor a pager of organic forms without mistakes. I started getting very in my own head about getting everything correct, and grinding on pages (which I realise isn't the point). Whilst I realise the pages I'm submitting contain errors, I'd rather get feedback to see if what I'm doing is actually improving and how far I am from understanding what's being taught.

Thank you!

https://imgur.com/a/2mzT2hU

View more comments in this thread
The recommendation below is an advertisement. Most of the links here are part of Amazon's affiliate program (unless otherwise stated), which helps support this website. It's also more than that - it's a hand-picked recommendation of something I've used myself. If you're interested, here is a full list.
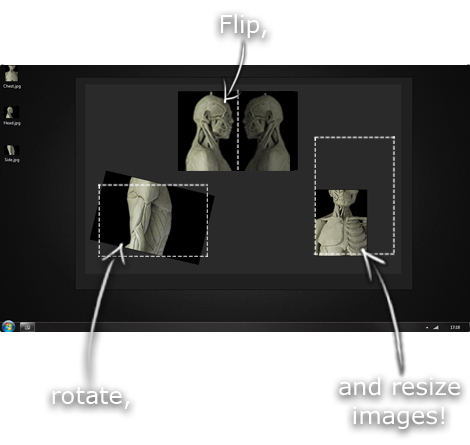
PureRef

PureRef

This is another one of those things that aren't sold through Amazon, so I don't get a commission on it - but it's just too good to leave out. PureRef is a fantastic piece of software that is both Windows and Mac compatible. It's used for collecting reference and compiling them into a moodboard. You can move them around freely, have them automatically arranged, zoom in/out and even scale/flip/rotate images as you please. If needed, you can also add little text notes.

When starting on a project, I'll often open it up and start dragging reference images off the internet onto the board. When I'm done, I'll save out a '.pur' file, which embeds all the images. They can get pretty big, but are way more convenient than hauling around folders full of separate images.

Did I mention you can get it for free? The developer allows you to pay whatever amount you want for it. They recommend $5, but they'll allow you to take it for nothing. Really though, with software this versatile and polished, you really should throw them a few bucks if you pick it up. It's more than worth it.

This website uses cookies. You can read more about what we do with them, read our privacy policy.