Lesson 1: Lines, Ellipses and Boxes

3:05 PM, Monday September 7th 2020

Drawabox Lesson 1 - Album on Imgur

Imgur: https://imgur.com/gallery/zAMYecT

Discover the magic of the internet at Imgur, a community powered enterta...

Hi, thank you so much in advance.

Any critique is very much welcome, I've recently just started drawing and DAB is a great tool for beginers like me.

The quality appears not to be great on Imgur, however I tried to zoom in and it gets much more clear.

Kind regards,

Delfim

0 users agree
4:03 PM, Monday September 7th 2020

Hey! I’ll be looking through this~

Starting with your superimposed lines, these are looking good. They’re smooth, properly lined up at the start, and of a consistent trajectory. They improve nicely by page 2, especially the arcing ones, though they’re still, occasionally, a little wobbly, which is expected. So long as you keep working on them, being mindful of our priorities (confidence > accuracy), they’re sure to improve. The ghosted lines/planes look quite solid, as well, and I’m pleased to see that you’ve properly plotted out the start/end points of the non-diagonal center lines of the planes- not all students do.

Moving on to your ellipses, the table of ellipses exercise looks good. There’s a few issues, like them starting off a little stiff, before stabilizing, and their tails being a little too visible, but they’re minor, and easily fixed. For the former, try spending a little longer on the ghosting phase, and for the latter, see if you can lift your pen off the page at the end of your rotations. The ellipses in planes exercise looks solid. They’re occasionally a little uneven, but rather than a focus on accuracy, this seems to be as a result of a lack of ghosting (or, to put it another way, you committing to the mark before you feel ready to), so I’d recommend upping that time on this exercise, as well. Finally, the funnels exercise looks nice, the minor axis cutting most ellipses into two equal, symmetrical halves, but I notice that you haven’t paid too much attention to their degrees. You’ll recall that they should either remain consistent, or increase as they move away from the center- not decrease.

Finally, we’ll look at the box section. The plotted perspective exercise looks quite good- nicely done. The rough perspective exercise, on the other hand, is a bit of a mixed bag. Don’t panic, though, this is not uncommon! To start off, line quality takes a bit of a hit here, though it really shouldn’t. Though the big picture is different, what you’re doing is exactly the same as what you did in the lines section: drawing a line from point A to point B- that’s your unit of work, and it’s the same regardless of context. If it can be confident there, it can be confident here, too. Secondly, though you’ve been mindful of all 3 sets of lines (of which 2 should be at infinity, and 1 should converge towards the vanishing point), there’s still the occasional error- the former is at times not fully parallel/perpendicular to the horizon, and the latter seemingly makes no effort to converge at times. This is fixed by spending a little longer on the planning phase, and really considering, and reconsidering, each point, before committing to it. Don’t feel obligated to stick to your original guess. If you find it to be unsatisfactory, ignore it, and add another. Finally, recall that, because of the rules of 1 point perspective, your boxes behave in predictable ways. Specifically, their near/far planes are of the exact same shape, but not size. This can serve as a useful hint, because, if they don’t, you know that there’s been a mistake somewhere. The rotated boxes exercise looks solid. The line quality is a little off here, too (and in the next exercise, as well!), and the boxes don’t quite rotate, and their gaps aren’t quite narrow, but that’s all fine. All we’re looking for here is an attempt that has been seen through to the end, and has been done to the best of your ability. This will do for now. The text time you attempt it, however, try to keep your gaps narrow, so that you may make better use of the neighboring edges of your boxes, and their shared vanishing points, and see if you can be a little more mindful of where said vanishing points are, so that the boxes may rotate as necessary. Finally, the organic perspective exercise looks decent. There’s a slight foreshortening issue (you’ll recall that dramatic foreshortening implies an object of a huge scale, or one that’s really close to us, and, as such, has no place in this exercise), but that’s alright. The boxes look solid, they properly follow the flow line, and increase in size as they do so, properly conveying the illusion. Ideally, you’d be a little more subtle in regards to your line-weight, but even that is alright, as there’ll be plenty of time to practice it in the box challenge. Speaking of, feel free to head on to it!

Next Steps:

250 Box Challenge

This critique marks this lesson as complete.
8:27 PM, Monday September 7th 2020

This is so good! Thank you very much for taking the time to do such a thorough feedback.

I'm going to keep this close and check it often so I fully understand my mistakes and the ways to correct it.

Really appreciated.

Also, I've checked your 250 box challenge submission and your boxes look incredible! Insipiring.

Thank you.

Delfim

The recommendation below is an advertisement. Most of the links here are part of Amazon's affiliate program (unless otherwise stated), which helps support this website. It's also more than that - it's a hand-picked recommendation of something I've used myself. If you're interested, here is a full list.
PureRef

PureRef

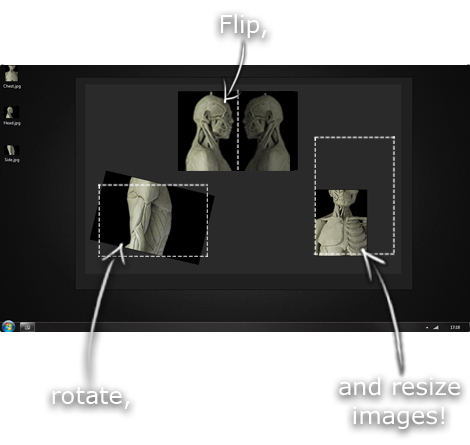
This is another one of those things that aren't sold through Amazon, so I don't get a commission on it - but it's just too good to leave out. PureRef is a fantastic piece of software that is both Windows and Mac compatible. It's used for collecting reference and compiling them into a moodboard. You can move them around freely, have them automatically arranged, zoom in/out and even scale/flip/rotate images as you please. If needed, you can also add little text notes.

When starting on a project, I'll often open it up and start dragging reference images off the internet onto the board. When I'm done, I'll save out a '.pur' file, which embeds all the images. They can get pretty big, but are way more convenient than hauling around folders full of separate images.

Did I mention you can get it for free? The developer allows you to pay whatever amount you want for it. They recommend $5, but they'll allow you to take it for nothing. Really though, with software this versatile and polished, you really should throw them a few bucks if you pick it up. It's more than worth it.

This website uses cookies. You can read more about what we do with them, read our privacy policy.