View Full Submission View Parent Comment
2 users agree
5:00 AM, Saturday December 11th 2021

Hey Juan, I'll be handling the critique for your 250 box challenge, but first of all let me congratulate upon completing it as it certainly requires time and patience.

-So let's start by addressing your linework, your additional lines tend to come out very messy there were a number of factors that didn't help you, but I think the most important is space, you had a tendency to draw relatively small boxes, and keep in mind that this makes it harder to ghost through your lines and to draw from the shoulder.

-When adding lineweight keep in mind that you want to ghost through each superimposed lines and to add only one, as we want to keep it as subtle as we can.

-There were numerous cases where you added lineweight to the internal edges of your boxes, the initial lines that form your Y shape for example, you only want to add lineweight to the lines that represent the silhouette of the box.

-As a final note regarding your linework, keep in mind that you also want to ghost through your hatching lines, they have to be as smooth as possible because they're sitting on top of a completely flat surface.

Now let's address the boxes construction.

-You had a tendency to extend your lines in the wrong direction, take a look at this diagram, ultimately what you want to keep in mind, is that you should extend your lines starting from the initial Y and extend them towards the direction they are pointing to. If you see a set of parallel lines that are diverging, it is very likely that you have extended your lines in the wrong direction

-Keep an eye for diverging lines, as shown here.

The key things we want to remember from this exercise are that our lines should always converge as a set not in pairs, never diverge from the vanishing point and due to perspective they won't be completely parallel.

Next Steps:

I'll ask you to draw 30 more boxes, keep all of the things mentioned above in mind.

When finished, reply to this critique with your revisions.
1:45 AM, Sunday December 4th 2022

Hello, Beckerito, and many thanks for you feedback. Sorry because of the delay, I take so long to answer because of some reasons, including the fact I have to study in college, I did not see your critique until mid-july, and even then, I tried to do first a remake of the 1 lesson exercises, that I post on september. But, we are no longer waiting and I could finally do the 30 extra boxes based on your points.

https://imgur.com/a/egXraPA

6:00 PM, Tuesday December 6th 2022

Okay don't worry and thanks for replying back.

So starting with the line work you are doing fine, there are some instances where I noticed that you were repeating your lines. If a mark goes wrong it is better to leave it like that instead of drawing it over again, as this helps to develop the patience that you'll need in future lessons.

When it comes to your convergence and the use of the error checking method you are doing well, with practice you'll become more consistent, there are only a few instances where your lines diverge. One thing that can help with this is to start thinking about the relationship between each set of lines and the angles they form respective to their vanishing point , this relationship is shown here https://imgur.com/8PqQLE0 , you can see that the inner pair of lines will be always quite similar and the outer pair can vary a lot depending on the location of the vanishing point, the further away you place it and the closer to parallel they will become.

Lastly I want you to keep experimenting with all kinds of rates of foreshortening, orientation and angles for your boxes.If you have trouble coming up with new orientations for your boxes you can take a look at this diagram https://imgur.com/Kqg6uMX which you can use as reference.

We get the most out of these challenges by experimenting a lot, as it helps us to form a better and more grounded understanding of the concepts we are exploring here, so don't forget to keep nurturing this habit in your future assignments

Okay I'll go ahead and mark this challenge as complete, make sure to keep practicing this exercise and to apply the error checking method consistently according to the instructions on the website and the feedback that I've given you here.

Good luck in the next lesson

Next Steps:

Lesson 2

This community member feels the lesson should be marked as complete, and 2 others agree. The student has earned their completion badge for this lesson and should feel confident in moving onto the next lesson.
The recommendation below is an advertisement. Most of the links here are part of Amazon's affiliate program (unless otherwise stated), which helps support this website. It's also more than that - it's a hand-picked recommendation of something I've used myself. If you're interested, here is a full list.
PureRef

PureRef

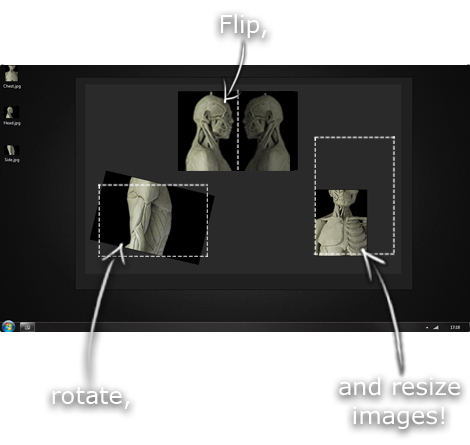
This is another one of those things that aren't sold through Amazon, so I don't get a commission on it - but it's just too good to leave out. PureRef is a fantastic piece of software that is both Windows and Mac compatible. It's used for collecting reference and compiling them into a moodboard. You can move them around freely, have them automatically arranged, zoom in/out and even scale/flip/rotate images as you please. If needed, you can also add little text notes.

When starting on a project, I'll often open it up and start dragging reference images off the internet onto the board. When I'm done, I'll save out a '.pur' file, which embeds all the images. They can get pretty big, but are way more convenient than hauling around folders full of separate images.

Did I mention you can get it for free? The developer allows you to pay whatever amount you want for it. They recommend $5, but they'll allow you to take it for nothing. Really though, with software this versatile and polished, you really should throw them a few bucks if you pick it up. It's more than worth it.

This website uses cookies. You can read more about what we do with them, read our privacy policy.