Lesson 6: Applying Construction to Everyday Objects

3:56 PM, Tuesday June 29th 2021

6.1. Applying Construction to Everyday Objects - Google Drive

6.1. Applying Construction to Everyday Objects - Google Drive: https://drive.google.com/drive/folders/1FtFevzR-V_HqfzUx1S71UoOS5I4VdlYV?usp=sharing

width=device-width,initial-scale=1,minimum-scale=1,maximum-scale=3,user-...

Hello,

Here's my submission for Lesson 6. I've included the references I used in the hopes that it would help with the critique. Still working on paying more attention to the ref picture, hope I made some improvement.

I also stubbornly wanted to use french curves, because they were new for me and I wanted to learn how to use them. But that made me completely overlook this - https://drawabox.com/lesson/6/1/curves . So in retrospect it was a probably a bad idea xD

Thank you ^^

1 users agree
6:57 PM, Tuesday June 29th 2021

Before I get started, I wanted to mention that there's nothing wrong with wanting to use french curves here, and there's no reason that it would somehow interfere with the point about curves from the lesson. We still benefit from taking the time to plan and lay out our intent for a given curve, even if we're going to use a tool to execute it. The only difference is that we don't end up freehanding - we've still planned the mark out appropriately beforehand.

Looking at the form intersections, these are definitely moving in the right direction, and I'm quite pleased with how you're making explicit choices in terms of which intersections to draw, and then executing them without hesitation. When it comes to the intersections themselves, a number of them are indeed correct, though there are some cases where we can see some improvement. Thinking through the intersections comes down a lot to looking at each of the different surfaces of each form that make contact.

I've drawn on top of your work here. With each of the intersections I analyzed, I draw little arrows that define the way in which each surface behaves in different directions. So for a cylinder's midsection, it's a curved surface wrapping around, and a straight surface along its length. Conversely, a box is going to have a straight surface no matter how you run along its surface. Furthermore, these things will generally experience sharp turns/changes when we hit an edge between different surfaces - but if we don't hit an actual edge in the existing surfaces, then if we need to transition from a straight to a curving intersection, then that transition is going to be more gradual and smooth.

Continuing onto your object constructions, there's one thing that jumps out at me right off the bat. In the lesson, where it says you can use a ballpoint pen for your linework, it does specifically state that you should not be switching pens, and that you should use the same kind of pen throughout the entire process. That means that if you choose to work in blue ballpoint, then that is what you should be using for the whole drawing - construction and all. As with the rest of this course, I want to strongly discourage students from attempting to go back over their work with a sort of "cleanup pass".

I understand that when applying all the subdivision in the constructions that is required, you can definitely end up with a pretty dense forest of lines that can be difficult to parse visually. Tracing back over those lines however tends to encourage students to focus on how the lines themselves sit on the flat page, rather than how the marks they're drawing are meant to capture an edge that moves through all three dimensions of space.

It really is just a matter of practice to get used to being able to understand the construction you've put together. While line weight is an excellent tool to help clarify how different forms overlap one another in space (and is meant to be focused in the specific localized areas where those overlaps occur rather than tracing back over the entire silhouette of a form), line weight also is meant to be kept very subtle - which is why you'd still just go back over those key areas with the same pen, not a different and thicker one.

Setting that missed instruction aside, you are generally moving in the right direction with this lesson. There's a mixture of results here - in some of your drawings you've gone to considerably greater lengths to subdivide things and find more specific, precise positioning for whatever elements you'd want to add, whereas in other cases there's considerably more approximation and eyeballing of such things.

This lesson is really meant to be an introduction to just how much one might need to subdivide to pin down these kinds of constructions. So, you're doing fine for now, but as you move forwards and especially in Lesson 7, you will want to make a point of subdividing as much as is needed, and avoid any kind of approximation altogether. So for example, looking at the camera construction, you would definitely want to use construction to more specifically determine the location of each button and knob, then build out a box for the larger knobs and construct it inside, rather than jumping straight into the large arbitrary cylinder. I can see that for the big knob along the top you didn't opt to construct that cylindrical structure around a minor axis line either, which would have helped in keeping your ellipses aligned to one another - though of course, constructing it inside of a box would have been even better.

Conversely, what you did with the viewfinder on that same construction is much more thorough and specific, and yielded a more solid end result. That is the principle you want to use across the board - and it does indeed circle back to what you mentioned about the curves. As I mentioned, you certainly could have followed through the steps of planning those curves out with straighter lines before executing them with a french curve. Regardless of what tools you use, don't skip steps.

Another area where this kind of issue stands out is with the game controller. You constructed a solid blue box structure, but when you drew the actual handles of the controller, you did not follow that structure. You opted instead to use that underlying scaffolding as a loose suggestion. These constructional drawing exercises require that we maintain tight, specific relationships between our phases of construction. So you wouldn't leave arbitrary gaps between those phases, as you've done here.

Anyway, as a whole you're still moving in the right direction, so I will certainly mark this lesson as complete. Just make sure that when you move forwards, you do not skip steps, or leave arbitrary and loose relationships between the phases of construction. Subdivide as much as is necessary - this will indeed be demanding on your patience, but many students find that the drawings in these last few lessons are much more demanding than those tackled in earlier lessons, and that they will likely take you a number of hours each.

Remember - your main responsibility here is not to produce work at a particular level of quality or at a particular speed. Your responsibility is to give each construction as much time as it requires. You by no means have to complete a single drawing in one sitting, or in one day. You can split it across as many sessions as you need, as long as you're working towards meeting that singular responsibility.

Next Steps:

Move onto the 25 wheel challenge, which is a prerequisite for lesson 7.

This critique marks this lesson as complete.
8:25 AM, Thursday July 1st 2021

Hello Uncomfortable-sensei

Thank you for clarifying the use of French curves, I thought I misunderstood their use in the homework.

Secondly, yeh I did drop the ball on the pens for not paying proper attention to the instructions. Will remember to stick to one pen if the same requirements apply to future lessons (and read things properly too).

Finally, thank you for all the notes, will go back to my homework and analyze them with your critique.

Have a great rest of the week :3

The recommendation below is an advertisement. Most of the links here are part of Amazon's affiliate program (unless otherwise stated), which helps support this website. It's also more than that - it's a hand-picked recommendation of something I've used myself. If you're interested, here is a full list.
PureRef

PureRef

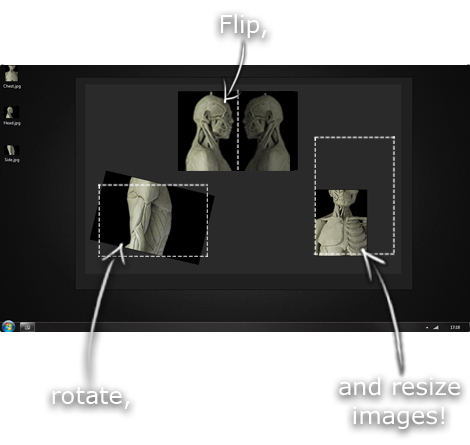
This is another one of those things that aren't sold through Amazon, so I don't get a commission on it - but it's just too good to leave out. PureRef is a fantastic piece of software that is both Windows and Mac compatible. It's used for collecting reference and compiling them into a moodboard. You can move them around freely, have them automatically arranged, zoom in/out and even scale/flip/rotate images as you please. If needed, you can also add little text notes.

When starting on a project, I'll often open it up and start dragging reference images off the internet onto the board. When I'm done, I'll save out a '.pur' file, which embeds all the images. They can get pretty big, but are way more convenient than hauling around folders full of separate images.

Did I mention you can get it for free? The developer allows you to pay whatever amount you want for it. They recommend $5, but they'll allow you to take it for nothing. Really though, with software this versatile and polished, you really should throw them a few bucks if you pick it up. It's more than worth it.

This website uses cookies. You can read more about what we do with them, read our privacy policy.