


6:02 PM, Friday July 10th 2020
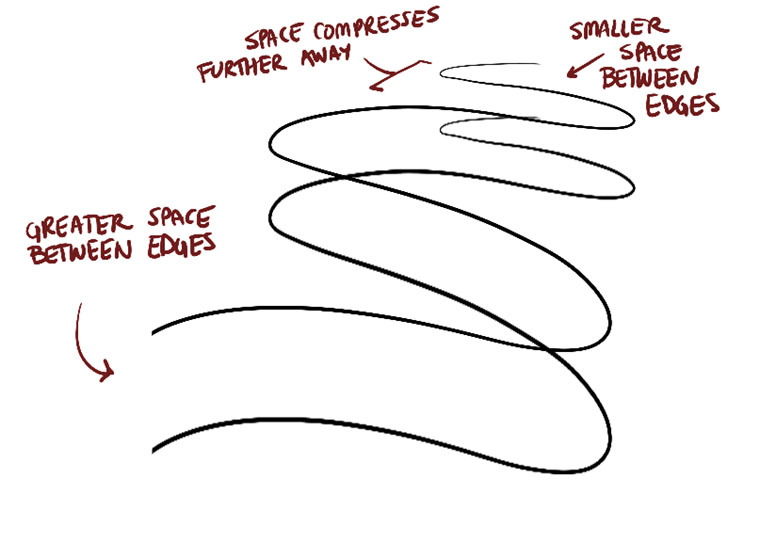
Starting with your arrows, you're doing a good job of capturing how the arrows flow smoothly through 3D space. One thing to keep considering however is how perspective is applied to the spacing between those zigzags in the ribbon - there are a number of cases where those gaps either don't compress at all, or don't compress at the same rate at which the ribbon gets narrower, resulting in an inconsistent application of foreshortening. You can see this demonstrated in this diagram.
For your organic forms with contour lines, there are a couple significant issues that stand out:
-
You're not really sticking to the characteristics of simple sausage forms as described here in the instructions. Where I'm looking for specifically sausages that match the description of two equally sized spheres connected by a tube of consistent width, yours tend to get wider through their midsections, tend to have ends of somewhat different sizes, as well as ends that are more stretched out rather than maintaining a circular/spherical curvature. As a whole, I recommend that you try to slow down your stroke a little bit (while of course trying to avoid hesitation and maintain the confidence of the drawing motion). As soon as your line starts to wobble, you may need to increase your speed again, but test whether or not you can manage to slow the speed at which you draw the mark in order to regain some control over the shape you end up drawing. And of course, apply the ghosting method here.
-
The ghosting method should of course play a significant role in all your mark making, and right now while you're drawing your contour ellipses and contour curves with a great deal of confidence which helps to maintain more even shapes, it is making it challenging for you to have those marks fall snugly between the edges of the sausage form. The concept of contour lines is all about creating the illusion that the line runs along the surface of this 3D form, and we can only achieve that if the contour line itself is not floating loosely within the form's silhouette. You have some varying success here and there, but this is definitely something you're still struggling with. Remember that the use of the ghosting method means rotating the page, so as to find a comfortable angle of approach for each mark - this may help.
-
When it comes to making those contour curves wrap around the forms believably, you do tend to have some more success when overshooting your curves more, though you're not doing this consistently. If you're unsure of what I mean, take a look at this section.
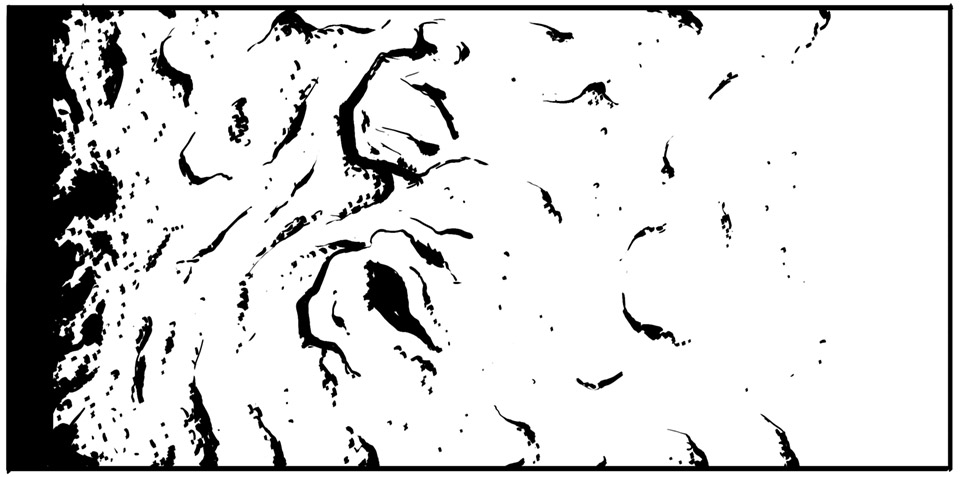
You've got a good start on your texture analyses - you're clearly starting to think more in terms of the shadow shapes that are being cast by the textural forms present in your textures, although you are still - to varying degrees - relying on outlining them in the first place in order to really establish your understanding of where they exist, before you put down your shadow shapes. This is most prominent in the reptile scales, and when you get furthest out to the far right, where things get more sparse, you seem to be a bit more arbitrary and random in terms of which marks you do decide to draw, and which you choose not to.
Take a look at these notes. The bottom section of the diagram there shows precisely how to think about which shadows will stick around longest as we move out towards the right side of the gradient. Specifically, the cast shadows caught where multiple forms meet one another are those that will last the longest, as it's hardest for the light to penetrate those areas. The shadows cast further out in the open however are much easier to be blasted away by the light source.
Lastly, I don't think you understand what you're supposed to be doing with that solid black bar on the left side. We're basically creating two solid blocks, one on either side of the gradient. One full black, one full white. The point is to make the transition from one to the other seamless, so that we cannot identify where the black bar ends and where the texture begins. We can see quite clearly in your attempts where this border lies - you can see an example of that border being obscured here from the demonstration.
Now, as I said - you've got an excellent start to this exercise. I don't expect students to have any prior experience with texture, and I fully expect there to be struggles along the way. All this exercise is meant to represent is a first exposure to the challenges involved in playing with textures like this, and as far as that is concerned, you're making good headway. This continues to be apparent throughout your dissections where you push that experimentation further, demonstrating continued progress as you play with a wide variety of textures. The heavy reliance on outlining your textural forms (rather than jumping straight into shadow shapes) is still present, especially when dealing with textures that have more discrete, individual forms (like scales), so do be sure to set those outlines aside altogether for now, but I definitely see progress on this front as well throughout.
Moving onto your form intersections, you're largely doing a good job in terms of drawing these forms such that they feel cohesive and consistent within the same space, though I can see a few places where you're running into the issue where the far ends of your forms (especially your cylinders, but on occasion your boxes) tend to end up larger than the closer end. This basically occurs when you allow the sets of parallel lines to diverge as they move away from the viewer, which in turn occurs if you're not constantly thinking about how these lines ought to be converging towards some shared vanishing point (even if that vanishing point is extremely far off). It's very easy to ignore it altogether and just try to draw the lines so they come off as parallel on the page, but that will consistently put you at greater risk of having the lines diverge instead. Always be aware of the desire for those lines to converge, even if it's ever so slightly.
Aside from that, you've got an excellent start on your intersections - this are, similarly to the texture exercises, an early introduction to thinking about how our forms relate to one another in 3D space, and how to define those relationships, and you're doing great. We will of course continue to explore these throughout the entirety of this course.
Lastly, your organic intersections are looking pretty good. You're doing a great job of capturing how your forms interact with one another in 3D space, rather than as flat shapes stacked on a flat page, and are capturing a strong illusion of gravity in how they slump and sag over one another. You're also making progress in terms of understanding how those cast shadows are projected onto the surfaces beneath a given form - there are a few places where you don't quite let the shadows stop clinging to the silhouette of the form that casts them, but I'm seeing a lot of improvement on this front as the idea starts to click in your head.
All in all, you are doing well, but I very much want to make sure the issues with the organic forms with contour lines get sorted out. As such, I'll be asking you to do those again. Please be sure to take more time with each individual sausage form, and read through the instructions for this exercise carefully.
Next Steps:
Please complete the following:
-
1 page of organic forms with contour ellipses
-
1 page of organic forms with contour curves.
Be sure to use the ghosting method for each and every mark you draw for these.


