250 Cylinder Challenge
9:42 PM, Saturday September 26th 2020
all I have to say is fucking finally :D

Alrighty! So starting with your cylinders around arbitrary minor axes, you've largely done a pretty good job. Excellent, smooth, confident ellipses, pretty good execution of your straight edges as well, and you've been quite patient and conscientious in checking your alignments after the fact.
I have just one minor point to bring to your attention.
This would generally be easier to diagnose if there were a wider variety of different foreshortenings in the set (some with shallower foreshortening, some with more dramatic foreshortening), but most of these are roughly the same. Make sure that whenever you're dealing with an exercise with quite so much repetition, that you want to work in as much variety as you can.
Anyway, the issue I wanted to talk about focuses on the relationship between the shift in scale from the closer ellipse to the farther one, and the shift in degree from one to the other. You're pretty mindful of applying that shift in degree all across the board, and that's great - but there's actually something that I leave students to pick up on their own that you don't appear to have fully grasped here.
It's the fact that those two kinds of shift - scale and degree - are tied together, and are both facets of foreshortening. When we've got a more significant scale shift, like all normal perspective that we're familiar with, it means that the far end is much farther away than the closer end, implying a longer cylinder. Similarly, when we have a more dramatic shift in the degree, with the far end being much wider than the closer end, it tells us the same thing - the cylinder is longer.
If we look at cylinder 115 (I specifically tried to look for a cylinder with very minimal scale shift), you'll find that the scale shift tells us that the cylinder is on the shorter end, but the degree shift tells us it's on the longer end. This inconsistency doesn't seem like much in this case, but as we push those differences to be more dramatic, it starts to jump out to the viewer as something being wrong - even if they can't necessarily pinpoint what it is.
Just something to keep in mind - aside from that you've done a great job through this section.
Continuing onto the cylinders in boxes, you've largely done a pretty good job here, in terms of being careful and patient in applying your line extensions in the right ways. The thing about this exercise is that it actually focuses more on your ability to draw a particular kind of box, and uses the cylinders themselves as an extension of the sort of error checking method we use in the box challenge.
The line extensions in the box challenge work to tell us about how far off we are from having lines that converge consistently, and show us how to adjust our approach to improve. By adding ellipses/cylinders to our boxes, we're able to also check how close we are to two opposite faces of our box being proportionally square (the same height/width in 3D space). Basically the line extensions we get from the ellipses themselves would only logically line up with the box's own vanishing points if that ellipse represents a circle in 3D space. If it represents a circle, then the plane enclosing it represents a square.
Therefore by doing this, by doing the line extensions, and by gradually improving our convergences for all the lines, we improve our ability to construct our boxes to have two opposite faces that are proportionally square. This is particularly useful in the next lesson.
As a whole you've progressed quite well at this, and overall if we ignore all the extensions, with the naked eye most of your boxes end up having pretty solid proportions, especially towards the end.
So! All in all, your work is coming along well. I'll go ahead and mark this challenge as complete. Keep up the good work.
Next Steps:
Feel free to move onto lesson 6.

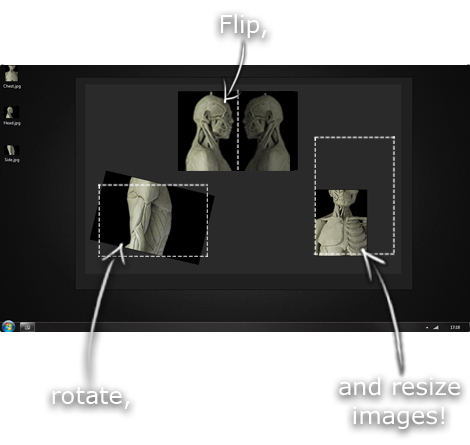
This is another one of those things that aren't sold through Amazon, so I don't get a commission on it - but it's just too good to leave out. PureRef is a fantastic piece of software that is both Windows and Mac compatible. It's used for collecting reference and compiling them into a moodboard. You can move them around freely, have them automatically arranged, zoom in/out and even scale/flip/rotate images as you please. If needed, you can also add little text notes.
When starting on a project, I'll often open it up and start dragging reference images off the internet onto the board. When I'm done, I'll save out a '.pur' file, which embeds all the images. They can get pretty big, but are way more convenient than hauling around folders full of separate images.
Did I mention you can get it for free? The developer allows you to pay whatever amount you want for it. They recommend $5, but they'll allow you to take it for nothing. Really though, with software this versatile and polished, you really should throw them a few bucks if you pick it up. It's more than worth it.
This website uses cookies. You can read more about what we do with them, read our privacy policy.