View Full Submission View Parent Comment
12:58 AM, Thursday February 10th 2022
edited at 1:17 AM, Feb 10th 2022

Tofu's tagged me in for the explanation, and fortunately this should be a quick one. Basically by referencing this section of the instructions, he was pointing out that the spacing between your arrow's zigzagging sections (the negative space in between the ribbon itself) was either remaining the same, or inconsistently jumping back and forth between big and small gaps. Instead, those gaps should be getting smaller and smaller as we look farther back in space.

I've marked those gaps out on your work here to add some more clarity to the concept.

As for the bulging, here's what he meant.

edited at 1:17 AM, Feb 10th 2022
11:54 AM, Saturday February 12th 2022

Thanks Uncomfortable. I just realized that when it comes to constructing the second identical curve all the problems that have been mentioned come up because I think about making consistent spaces, making sure the lines overlap and then at the same time trying to take into account perspective which then leads to the inconsistent spaces, bulging e.t.c which affect the 3d feel of the arrows. So my question is there another way other than the instructions provided to approach drawing the second curve or is matter of getting that mileage through practice?

4:56 PM, Tuesday February 15th 2022

Unfortunately it largely comes down to practice and mileage, although there are two main factors that play the biggest role:

  • While drawing with confidence is always very important, that doesn't strictly mean drawing as fast as you can. We do draw more quickly earlier on because that's the easiest way to understand what it means to draw confidently, but once that is solidified, we can often ease back and reduce that execution speed (right up to the point that the confidence wavers) to regain some control. This of course is a threshold you'll continually be testing, and that will continue to lower as you get more comfortable with the idea of drawing confidently.

  • Drawing the marks from your shoulder helps as well - if you're at all familiar with working with digital tools, drawing from the shoulder is similar to using "stabilization" features in many drawing softwares, where it kind of evens out a lot of the places we might make sharper, more jerking motions, resulting in a generally smoother stroke with fewer erratic changes.

The recommendation below is an advertisement. Most of the links here are part of Amazon's affiliate program (unless otherwise stated), which helps support this website. It's also more than that - it's a hand-picked recommendation of something I've used myself. If you're interested, here is a full list.
PureRef

PureRef

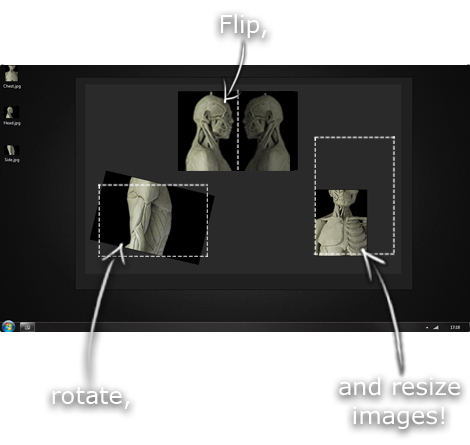
This is another one of those things that aren't sold through Amazon, so I don't get a commission on it - but it's just too good to leave out. PureRef is a fantastic piece of software that is both Windows and Mac compatible. It's used for collecting reference and compiling them into a moodboard. You can move them around freely, have them automatically arranged, zoom in/out and even scale/flip/rotate images as you please. If needed, you can also add little text notes.

When starting on a project, I'll often open it up and start dragging reference images off the internet onto the board. When I'm done, I'll save out a '.pur' file, which embeds all the images. They can get pretty big, but are way more convenient than hauling around folders full of separate images.

Did I mention you can get it for free? The developer allows you to pay whatever amount you want for it. They recommend $5, but they'll allow you to take it for nothing. Really though, with software this versatile and polished, you really should throw them a few bucks if you pick it up. It's more than worth it.

This website uses cookies. You can read more about what we do with them, read our privacy policy.