Lesson 1: Lines, Ellipses and Boxes

3:59 PM, Tuesday February 23rd 2021

Lesson 1: Homework - Album on Imgur

Direct Link: https://i.imgur.com/KdVGpBn.jpg

Discover the magic of the internet at Imgur, a community powered enterta...

Hi everybody, Jackie Chan here????,

I already noticed, that the backpart of the boxes in the Rotated Boxes exercise don't really form a ball, but if you have any tips for me apart from that I would be happy to hear them.

2 users agree
2:05 PM, Monday April 5th 2021

Hi Jackie Chan (that already feels weird to say), I'm gonna go over your submission.

Starting out by your lines, you are showing a great deal of ghosting and preparation on the super imposed lines exercise, some of them started fraying on both ends (principally the more organic ones), remember to be careful on where you start your lines, since is one of the few things we have control on once we put the pen down on paper to make a mark. here is this issue explained on the lesson.

I'm seeing that your ghosted lines are a little wobbly in general, also a lot of the woblyness is at the start and end of your lines- One very big that applies to every mark we put down in this course (normal lines, ellipses, organic lines, etc) is that we are always going to prioritize confidence over accuracy. You can see this in the principles of mark making and the reason behind it is that if we want to do constructions on the future, we need to have solid and confident line quality, and also, don't worry about being accurate, it will come with practice and millage. However, all we can do to assure a confident mark is before we actually put it down on paper, its on the ghosting stage; Here comes the importance of taking your time ghosting all of your lines, since is in this stage that we have control over how confident the lines will come out!

Moving on to your ellipses, It seems like your focus was on making them accurate over making them look confident and smooth. The same I talked about lines applies here, prioritize making confident ellipses and accuracy will come with time and practice, right now although they fit on most of the exercises you did, they look a little wobbly, so remember to take your time ghosting them and just go through them twice! A big example of this can be easily seen on your ghosted planes with ellipses, where you are deforming a lot of them so they can fit in their planes, though this also happened in your table of ellipses and a lot on your funnels. In this last on, remember to vary the degree of your ellipses as they move aways from the center.

All this said, it's not like you did all this exercises wrong, this is the most common mistake that beginners make, the important thing is that you learn from it so you don't fall on this same mistakes moving forward!

On to your boxes, I wanna first address the line quality-related-issues so we can then move on with the box-related-issues. A very common mistake in this lesson is that, as beginners get to this section of the lesson, they get a little overwhelmed by all the content and forgot about ghosting their lines. This happened especially on your rough perspective, but again, don't worry, just remember to always ghost your lines- If you can make confident lines, you can make confident boxes! Though, I'm

Other that that, you are doing a good job on the rough perspective exercise, and a especially great job on your rotated boxes. Now, you are asking why they are not really rotating on the back, for what I'm seeing it looks like you are not tapering enough the back of your boxes, remember that this exercise is not done with perfect boxes, but with ones that are slightly smaller on the back.

On your organic perspective exercise it looks like you are correcting a lot of your lines, try to fight this urge since it makes everything more messy, and remember to stick to your mistakes!

So, you did a solid work on this lesson, remember to prioritize confidence over accuracy from now on. I'm gonna go ahead and mark this lesson as completed! Welcome to Draw a Box and keep it up!

Next Steps:

Feel free to move on to the 250 box challenge.

This community member feels the lesson should be marked as complete, and 2 others agree. The student has earned their completion badge for this lesson and should feel confident in moving onto the next lesson.
1:12 PM, Monday April 12th 2021

Hi Weijak,

thanks for your detailed evaluation. I appreciate your tips and I'll keep them in mind.

2:12 AM, Tuesday April 13th 2021

I'm glad you found it useful!

The recommendation below is an advertisement. Most of the links here are part of Amazon's affiliate program (unless otherwise stated), which helps support this website. It's also more than that - it's a hand-picked recommendation of something I've used myself. If you're interested, here is a full list.
PureRef

PureRef

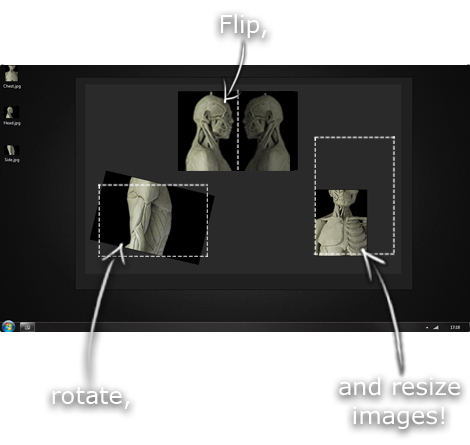
This is another one of those things that aren't sold through Amazon, so I don't get a commission on it - but it's just too good to leave out. PureRef is a fantastic piece of software that is both Windows and Mac compatible. It's used for collecting reference and compiling them into a moodboard. You can move them around freely, have them automatically arranged, zoom in/out and even scale/flip/rotate images as you please. If needed, you can also add little text notes.

When starting on a project, I'll often open it up and start dragging reference images off the internet onto the board. When I'm done, I'll save out a '.pur' file, which embeds all the images. They can get pretty big, but are way more convenient than hauling around folders full of separate images.

Did I mention you can get it for free? The developer allows you to pay whatever amount you want for it. They recommend $5, but they'll allow you to take it for nothing. Really though, with software this versatile and polished, you really should throw them a few bucks if you pick it up. It's more than worth it.

This website uses cookies. You can read more about what we do with them, read our privacy policy.