Lesson 1: Lines, Ellipses and Boxes

12:13 AM, Tuesday February 18th 2020

drawabox lesson 1 - Imgur

Imgur: https://imgur.com/gallery/B302qC7

Discover the magic of the internet at Imgur, a community powered enterta...

Hullo,

Here is my submission for lesson 1. This was such a journey. I feel like this lesson greatly helped my understanding of perspective. Thank you so much for this website/forum. I am looking forward to reading your critique!!

Best,

-Eric

0 users agree
1:43 AM, Wednesday February 19th 2020

Hey Eric! Welcome to Drawabox. I'm sluggy, one of the TAs. It is genuinely such a pleasure to be able to help other people improve and I'm glad it's been working for you! Let's go on over this submission. :)

Lines

Really great start here! Your straight superimposed lines are looking pretty good and while your curved superimposed lines have quite a bit of wobble, you avoid fraying at both ends, which is indication of a thoughtful mark. You can iron this wobble out with the ghosting technique and while you'll be sacrificing a bit of accuracy, you want to focus on flow first. After you're accomplishing a smooth mark, you can begin honing your accuracy.

Your ghosted lines look solid. No consistent wobble and you're pretty accurate at hitting your end points. From here, continue using the ghosting technique to make sure you're hitting the endpoint without over- or under-shooting. This will be important for strengthening the illusion of 3D form later.

Ellipses

Nice work on these. The mark is decently smooth, but I'm noticing a little bit of a wobble on a few, and I would recommend working on your control so you can get your ellipses sitting snugly together in their planes, tables, and funnels. You can accomplish this by using the ghosting technique on these marks in the same way you use them on your lines and drawing through each one a few more times. After you've achieved a smooth mark, you can then work on your accuracy. Just like with your lines, flow first, then accuracy. It is perfectly okay to work on these two elements of mark-making in turn.

As for your funnels, your ellipses have certainly improved, but as you're drawing, you want to use the minor axis as your reference point. Your ellipses should be aligned with and bisected by this initial line. In quite a few instances, you have your ellipses aligned more with each other than this line.

Rough Perspective

Great work on this one in terms of perspective. You keep your parallel lines horizontal with the horizon and your vertical lines perpendicular, which helps eliminate unnecessary guesswork. Likewise, your depth lines are fairly accurate and your sense of 3D is coming along quite nicely.

Small side note: While in terms of line work and perspective, you did a good job here, this is a good example of how over or undershooting your end point may have the effect of weakening the illusion of 3D form.

Rotated Boxes

Really really solid work here. Your gaps are consistently sizsed, you get a pretty standard rotation, and your linework is clean and readable. I will note that your hatchmarks muddy up the image a little bit, since they don't all follow the inner-facing faces of the boxes, but they are still clearly mindfully drawn, which is good to see.

Should you attempt this again, in order to achieve a fuller rotation, you'll want to focus on the VP of the box relative to the VP of the previous box. If you move it along the axes past the previous box's VP enough, you'll get the boxes to rotate rather than simply move back in space. Overall, though, really great work on this challenge.

Organic Perspective

Great work here. While you do have a few convergence errors here and there, that's nothing the 250 box challenge won't help with. When it comes to your lines, try to fight the instinct to go back over mistakes with an additional line. This actually has the effect of drawing the eye rather than covering up the mistake, since it increases line weight. As for the other instances of line weight - I would recommend trying to make all the lines in the box of a consistent line-weight or work towards establishing a hierarchy in your weights, so you can clarify the image.

Next Steps:

Really nice work here! Continue practicing the ghosting technique with your ellipses, so you can get that wobble out. I'm happy to mark this as complete and send you on to the 250 box challenge. Good luck!

This critique marks this lesson as complete.
4:23 PM, Wednesday February 19th 2020

Thank you so much for the thoughtful critique! I will make sure to integrate your advise into my warm ups!!

The recommendation below is an advertisement. Most of the links here are part of Amazon's affiliate program (unless otherwise stated), which helps support this website. It's also more than that - it's a hand-picked recommendation of something I've used myself. If you're interested, here is a full list.
PureRef

PureRef

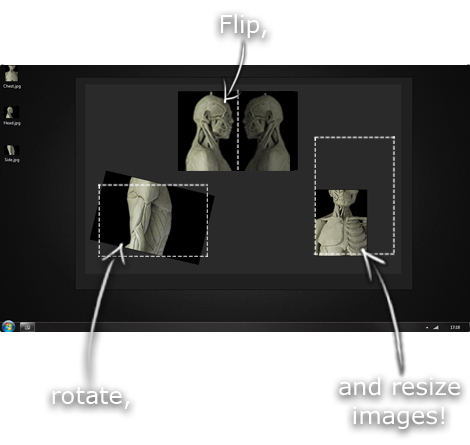
This is another one of those things that aren't sold through Amazon, so I don't get a commission on it - but it's just too good to leave out. PureRef is a fantastic piece of software that is both Windows and Mac compatible. It's used for collecting reference and compiling them into a moodboard. You can move them around freely, have them automatically arranged, zoom in/out and even scale/flip/rotate images as you please. If needed, you can also add little text notes.

When starting on a project, I'll often open it up and start dragging reference images off the internet onto the board. When I'm done, I'll save out a '.pur' file, which embeds all the images. They can get pretty big, but are way more convenient than hauling around folders full of separate images.

Did I mention you can get it for free? The developer allows you to pay whatever amount you want for it. They recommend $5, but they'll allow you to take it for nothing. Really though, with software this versatile and polished, you really should throw them a few bucks if you pick it up. It's more than worth it.

This website uses cookies. You can read more about what we do with them, read our privacy policy.