250 Box Challenge
4:09 PM, Friday July 15th 2022
Thank tou in advance for critic
And I usually didn't care about the catching but I do now

Helll Darklight, I'm your local Mushroom enthusiast and today I'm going to be reviewing your work, I hope that my feedback aids you in the next steps of your drawabox journey.
Firstly I would like to congratulate you on finishing 250 boxes! Now let's continue, shall we?
Lines
You're making great use of the ghosting method and your lines look confident, straight and smoothly drawn. Good job!
Your hatching is haphazardly done at the start of the challenge but after around 40 boxes you start going the extra mile to carefully add it in, it definitely adds to your boxes and makes them feel much more finished, along with being great extra practice.
It's good to see you adding lineweight around the silhouette of your boxes at around 60 boxes in, but you seem to drop this at around 140 boxes. Not only does this mean your boxes aren't as elevated as they could have been, but it means you lose out on lots of practice for superimposed lines.
On the boxes that you do add lineweight there's a couple of things to improve, the first is by making it more subtle and keeping in mind that when adding lineweight to taper the line into the one underneath, to seamlessly integrate it into the silhouette of the box. The second is to add only a single line for lineweight. Remember to keep practicing this and you'll continue improving.
Convergences
When it comes to your box constructions there's not much to point out as you've done really well and your convergences improve as you move through the challenge. There's always a thing or two to improve though, so here are a few things I believe will make your boxes better:
The way we can improve upon this is by keeping in mind that all of our lines should converge as a set, and that inner lines will usually be very almost parallel to the outer Y unless the box is quite long.
But in short this particular mistake happens when one of the 3 vanishing points pulls one of more of the box's corners outside the field of view, causing distortion even if the box is technically correctly constructed because realistically the human eye would never see a box this way.
To fix this you must keep in mind the rate of foreshortening of your boxes
It would've been nice if you varied the foreshortening rate of your boxes throughout the challenge, many of your boxes are in similar perspective and most of them have their vanishing points inside the page, it would have been nice to see some more boxes with subtle convergences from you.
Varying the range of box sizes and shapes, while you attempt some different box shapes such as flat boxes and rectangular boxes it'd be nice to see some more long and rectangular boxes from you, most of your boxes are square like.
Extension Lines
Nothing to say here, you've extended your lines correctly. But sometimes you forgot to extend back corners like in box 118, 223 and 209.
Final Thoughts
Some of your lines are extremely difficult to see, try to take better pictures, scan your pages, or invest in getting colored ballpoint pens with darker ink such as red, blue and green.
Overall, you've done really well in this challenge and have shown noticeable improvement. I believe that you're ready for the advanced box exercises, as well as Lesson 2.
I'll be marking this lesson as complete.
Next Steps:
Don't forget to add these exercises to your pool of warm ups.
Move on to Lesson 2.
THANK YOU SO MUCH FOR THE CRITIQUE I WILL KEEP YOUR THIS IN MIND

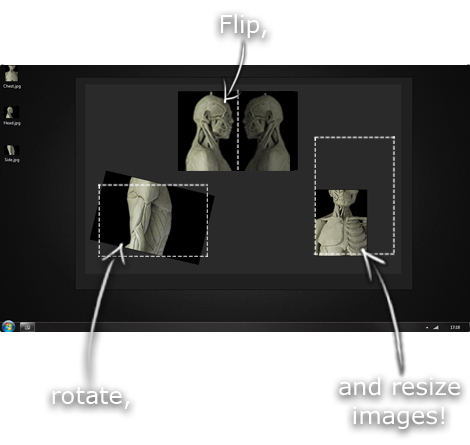
This is another one of those things that aren't sold through Amazon, so I don't get a commission on it - but it's just too good to leave out. PureRef is a fantastic piece of software that is both Windows and Mac compatible. It's used for collecting reference and compiling them into a moodboard. You can move them around freely, have them automatically arranged, zoom in/out and even scale/flip/rotate images as you please. If needed, you can also add little text notes.
When starting on a project, I'll often open it up and start dragging reference images off the internet onto the board. When I'm done, I'll save out a '.pur' file, which embeds all the images. They can get pretty big, but are way more convenient than hauling around folders full of separate images.
Did I mention you can get it for free? The developer allows you to pay whatever amount you want for it. They recommend $5, but they'll allow you to take it for nothing. Really though, with software this versatile and polished, you really should throw them a few bucks if you pick it up. It's more than worth it.
This website uses cookies. You can read more about what we do with them, read our privacy policy.