


Lesson 1: Lines, Ellipses and Boxes
3:01 PM, Saturday October 31st 2020

For drawing I used Stabilo point 88 fine 0,4 fine-liners
Hey, what's up? It is critique time :)
Let's go right into it starting with super imposed lines. I can see very clearly that you start at one side and diverge towards another, but the diverging starts somewhat early on the long ones with clear archs and a very slight wobble.
The longer ones seem to do that as you don't fully use your shoulder and you might be throwing your elbow into the mix as well. Keep the wrist in place and on paper. You can keep your lower arm on the paper too, but the elbow? Has to be off the ground. If you float above the paper, your wrist can get injured. I personally keep about half of my lower arm on the paper for resting. This works well in my experience.
Going towards ghosted lines, i see arching and attempts at going to the dot. For now, don't do that. Right now confidence and straight line is most important. Over time you will hit it more spot on as your lines get better. So for now, overshooting is totally fine.
Keep on ghosting until you are very confident in making the mark and then do it! To fight more against the natural arch you seem to have, consciously arch into the opposite direction to counter it and the line will become more straight.
I see that you used ghosted planes for ellipses in planes and will be talking about them separately.
Here i see still arching, but! Also more straight lines, meaning improvement!
Onto The ellipses section of lesson 1.
Tables of ellipses, the first ellipse i see is only done once but quickly see you draw through them 2 to 3 times. Most of them don't touch the top and some not the bottom. Some also go teensy tinsy bit into each other but not by much. Also for ellipses it is important to keep ghosting and make the mark when you're ready, but here in addition, you also want to touch the top, bottom and the sides of the ellipse or border. Keep ghosting till you see you are able to touch them. No rushing needed. Over time when you do it, they also will get tighter and more in bound.
Ellipses in planes has the same problem where some don't touch a side or more sides. Be sure you hit all of them and the make the mark!
With the funnels, you greatly improved when it comes to the tightness of ellipses. And more is in bound too! Ellipses slowly grow wider on all of them except the middle top and bottom one. Keep an eye out on how wider they are getting and that they always touch the previous ellipse. It's also important that each ellipse is cut in half by the minor ellipse. If you want the angle of it right so that it's cut in half you can also look at the less important major axis. It can (if there is one) give you a hint if the angle you have is right or not. But always keep checking at the minor axis if you did it right.
And the final section, Boxes. Starting with plotted perspective. There is not really anything wrong with these, looking hella solid.
With the rough perspective, most mistakes have been said already on how to tackle them. I do like to mention that with 1 point perspective and with this exercise,
width lines should be parallel to horizon and height lines perpendicular to horizon. Over time, just like the other things in this lesson you will get more accurate at hitting the vanishing point.
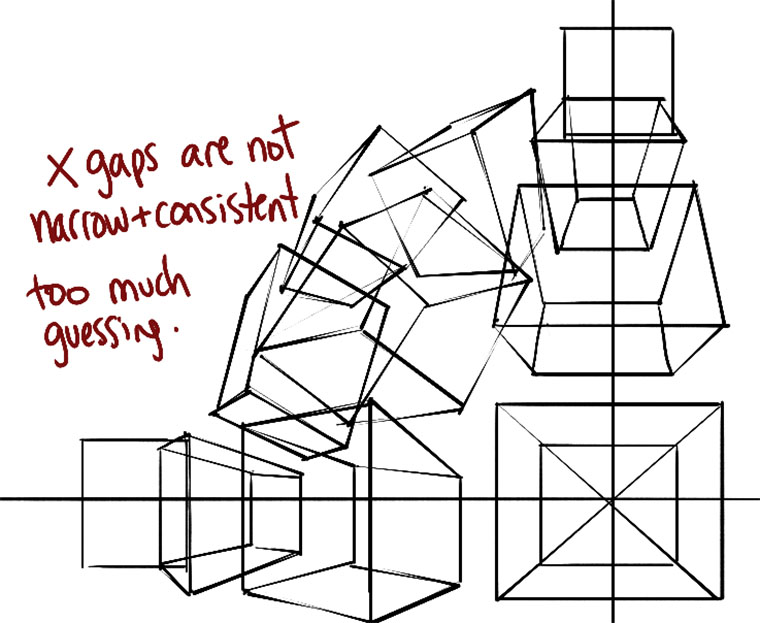
Now, for what i think is the most difficult part of lesson 1 rotated boxes
And well, despite the varying sizes of boxes and some aren't really narrow and consistent
you did in fact make them rotate! And to add on the rotate part, it is completely okay to rotate your paper if you didn't do that already yet. Some boxes look like the paper wasn't rotated. I'm getting this feeling since these are very elongated Rotating the paper itself makes things a whole lot easier to do if something is very difficult to nail in a particular angle.
And finally the last part, organic perspective.
This box looks like there was an attempt at adding line weight but it ended up a bit messy If you want to add line weight to make things look like they're overlapping, go over that one specific part and not the whole box. For the line itself, act like it's a new line a keep ghosting until you're ready for the mark. A few boxes also have what looks to be a correction line. Mistakes happen and if they happen, no matter how absolutely infuriating they can be, let the go and move on to the next one.(I still have trouble with that one sometimes but i'm sure you can get rid of them faster than i can!)
To sum things up, Lines have arch bit over the period that is lesson 1, the arch got a bit less with more straight lines. Even if the progress was little, it is better than what you started with. With ellipses, you sure had a difficult time but at the funnels they got really tight and only the snuggly fit had to be there. For the boxes you did a solid job, especially with the rotation of the boxes!
I think i's safe to say you're ready for the 250 box challenge
Next Steps:
You had difficulties with straight lines and at the end you had a few correction lines but those will be definitely be ironed out when you are going to face the *250 box challenge *
Best of luck!
Ty for the critique!
What I personally noticed while working on this was that I'm still unsure whether I'm using my shoulder properly or if my elbow is doing to much of the work, that as well as me getting pretty impatient at times.
I'll definitely try to work on that as well as the points you noted.

These are my favourite sketchbooks, hands down. Move aside Moleskine, you overpriced gimmick. These sketchbooks are made by entertainment industry professionals down in Los Angeles, with concept artists in mind. They have a wide variety of sketchbooks, such as toned sketchbooks that let you work both towards light and towards dark values, as well as books where every second sheet is a semitransparent vellum.
This website uses cookies. You can read more about what we do with them, read our privacy policy.


