Uncomfortable in the post "Lesson 1: Lines, Ellipses and Boxes (Patreon Critique Thread)"
2019-07-17 21:19
Just pokin' in to sign off on this submission, and wanted to say that your second half of the table of ellipses shows considerable improvement over the first. You've got much better control, and while your ellipses remain evenly shaped and confidently drawn, they're also much more accurate.
Uncomfortable in the post "While I don't have the time to do live demos, with pen-and-paper of all the exercises, the raccoon living in my apartment that does. ScyllaStew is livestreaming *everything* as she works through Drawabox, and uploading it all to YouTube."
2019-07-17 21:16
Hah! Yes, and I snagged her entirely through drawabox. Build a website, and the honeys will come.
Uncomfortable in the post "Lesson 3: Applying Construction to Plants (Patreon Critique Thread)"
2019-07-17 21:13
Nope, definitely not too soon!
Your arrows are definitely flowing quite nicely through the page, and are demonstrating a good sense of flow, and this carries over quite well into your leaves. You're not getting caught up in the idea of these leaves being objects with a clear beginning and end, that occupy a specific amount of space. Instead you're very fluidly conveying how they move through that space, and how they represent the various forces that push through them, like the currents of wind.
Your branches are moving in the right direction, although there are a few issues that I'd like to address:
-
First off, definitely aim to keep your branch the same width throughout its length - avoid any swelling or pinching, as this added complexity will undermine the illusion of solidity that we're after. If you need that sort of thing, you can always come back over it and add additional forms (like constructing a ball around a section of the branch to give it some extra volume).
-
One of the core aspects of this exercise is to be able to create a longer curve using a series of smaller segments that flow together seamlessly. We achieve this by having them overlap - it seems that you misunderstood the instructions, as you've got a lot of segments that simply meet, but don't actually overlap one another very much. We have the first segment flow halfway towards the next ellipse, then use that last bit of the segment as a "runway" for the next one.
Now, as far as your actual plant constructions go, these are coming along very well. you're continuing to capture the fluidity of the leaves and petals, and are building further phases of complexity into it with full respect for the underlying scaffolding. I have just one concern with how you're approaching things, and that has to do with actual detail.
When adding detail, you're doing a mixture of capturing the various smaller shadows that are cast by the forms in the construction, and actually trying to capture the form shading of those individual forms. As explained here in lesson 2, we specifically make a point not to add any kind of shading to our drawings throughout these lessons. Now, this is mostly because of the fact that it can serve as a crutch for those who are still struggling to construct solid forms - which is obviously not an issue for you at the moment - but there is another reason as well.
To put it simply, the tools we're using (the fineliners, which put down solid black marks and not much else) simply don't work well with shading. The medium itself forces us to work in solid black or solid white, and what you're doing here is trying to use them more like pencils. Rather than trying to make the pens something they're not, it's better to lean into their strengths.
In this, we focus on the actual texture of the objects (which are made up of small-scale forms that sit along the surfaces, casting little shadows as we've discussed before). We avoid any kind of hatching, which is used when we try to do shading for shadings' sake, and instead only create those kinds of dark-to-light transitions where we actually want to communicate the texture itself. In this sense, we use it as a tool to communicate information about the object and its surfaces. If we've not nothing to communicate, then we don't waste marks on it.
Aside form that one point, your constructions are great. I'm very pleased with how you're purposefully drawing through every single form - establishing how they all sit in space and relate to one another - and doing so with full confidence with no attempt to hide anything or focus on the end result. In the end, your drawings still come out very well structured and organized with excellent use of line weight and cast shadow - though I believe this would be even stronger if the shading were removed.
So! I'll go ahead and mark this lesson as complete. You're doing a great job, and just have a couple things to work on and a bit of a change in strategy when it comes to detail. Feel free to move onto lesson 4.
Uncomfortable in the post "Lesson 2: Contour Lines, Texture and Construction (Patreon Critique Thread)"
2019-07-17 20:25
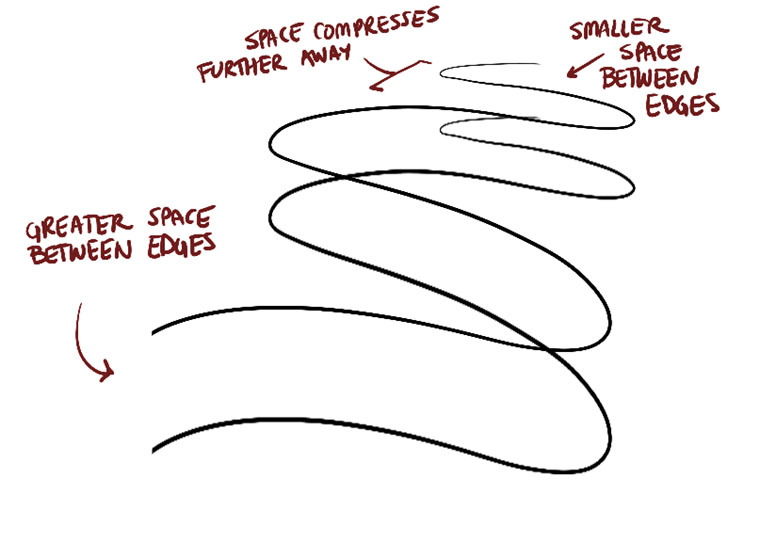
You're definitely doing a pretty solid job with the arrows' main focus, although I definitely noticed a consistent tendency to get a little sloppy with the actual arrowheads themselves. Remember that they're just triangles in 3D space - find the center of the ribbon's end, then project that out into space to find the tip of your arrow head. Also when you practice these in the future, try and play more with arrows that move through the depth of the scene (you've got a lot that move from side to side across the page but only one that attempted to move towards the viewer. For that one (big one on the right side of the first page), one thing to keep in mind is that as we look farther away, the spacing between the zigzagging lengths of the arrow will get closer together, as space itself gets compressed. I demonstrate this further in this section.
Your organic forms with contour ellipses and curves are generally looking pretty good. There are just two things I want to point out:
-
You're keeping your sausage forms pretty simple, which is great - just one little hitch. The ends often tend to be kind of elongated - rather than spheres, they've been stretched out, resulting in that roundedness taking up more of the sausage's length. I explain what we're looking for in these forms in this diagram - you've hit most of the points, just missed that one minor thing.
-
It doesn't look like you're necessarily allowing the degree of your ellipses to shift much through the length of the forms. Give these notes a read, as they describe why the degree of the ellipses/curves should change to reflect the change in orientation of that cross-section relative to the viewer.
Honestly you're doing a pretty solid job with your texture analyses. You're definitely thinking more about relying on shadow shapes rather than line. As you continue to work on this, try to think about the actual little textural forms that exist along the surface of your object and how every shadow you mark down on the page is actually being cast by one form or another. Attaching the marks you put down to the forms that produce them will help you continue to develop your grasp of how those shadows can be manipulated and conveyed in a convincing manner.
Also, I added these notes to the exercise just this past weekend, so I expect you didn't have a chance to see them. They're definitely relevant to this topic, and are worth reading.
Your textural experimentation extends quite nicely into the dissections - you're definitely leveraging good observational skills and exhibiting a great deal of patience and focus. As you continue to learn to leverage those shadows, and control the density of your textures, you should be able to gradually shift towards conveying an appropriate amount of visual information without necessarily having to go quite so heavy with each individual texture - but for now this is a great point to be at, as the first step is always to be able to identify and carry over the large swathes of detail and information little bits at a time.
Your form intersections demonstrate a pretty good grasp of 3D space and how these forms exist and relate to one another within it. I did want to mention however that in the instructions I specifically ask students to avoid forms that are overly stretched in any one dimension, instead sticking to those that are more equilateral. It seems you missed that bit, as you've got a lot of longer cylinders here, which bring the additional complexity of further foreshortening into the mix, especially in the last page. Additional challenges can easily distract us from the core focus of a given exercise, causing us to gain less from it. Still, great work on the other pages.
Lastly, your organic intersections are similarly coming along well. They're conveying a good grasp of how these forms slump and sag against one anotherm and how they can find a state of equilibrium in a believable three dimensional manner without having to cut into each other, or give the impression of just being flat shapes pasted on top of one another.
Your use of cast shadows here is pretty good, though you definitely do need a little extra use of line weight to help reinforce some of the other silhouettes and clarify what's going on as far as overlapping forms go.
Anyway, you're doing a pretty good job overall. I'll go ahead and mark this lesson as complete, so feel free to move onto lesson 3.
Uncomfortable in the post "Lesson 3: Applying Construction to Plants (Patreon Critique Thread)"
2019-07-17 19:59
Starting off with your arrows, these are generally pretty well done, though you do have a tendency to stick within a fairly limited range as far as scale goes, especially when it comes to perspective. Don't be afraid to let the arrows get really large as they come towards the viewer.
While your arrows have a pretty good sense of overall flow and fluid movement, your leaves do feel a little more stiff. This isn't an uncommon issue, and usually comes from being more focused on how the leaf exists as a solid, real object in the world with a beginning and an end. We end up focusing too much on how it occupies a specific space, and not enough on capturing how it actually flows and moves through that space. When you're drawing the flow line itself as your first step, focus on drawing it confidently, like it represents the wind and air that actually pushes through the leaf. Adding a little arrow head on the end of the flow line can help with this as well, as it can relate us back to the idea of conveying an abstract force/movement rather than part of a static object. And of course, always draw this from the shoulder, as this is where we get the best fluidity.
While your branches are a little stiff as well, they're actually pretty well done. You've done a pretty good job of getting the idea of compound lines flowing seamlessly from one to the next and creating the illusion that they're all part of a single continuous stroke. You'll continue to improve on the matters of flow and smoothness with practice, so keep heading in this direction.
There is definitely improvement in a number of areas throughout your plant constructions, along with a few issues remaining fairly consistent throughout. When you start out, you seem to be very much focused on each individual line as it sits on the page itself, rather than thinking about the forms you're constructing within 3D space. As a result, they end up feeling quite flat and don't really convey the illusion of form. As you work through the set, you do get better at this, and start conveying the relationships between forms in that space more convincingly.
One thing that jumps out at me is how you handled the more complex, wavy edges of the petals of the flower on the top left of this page. When adding any kind of edge detail like this, it's important that you both avoid continuous wavy lines (remember back to lesson 1's rules for markmaking, specifically this one). Additionally, make sure that you don't go back and forth overtop of the previous phase of construction - you always want to build off that earlier phase, having each individual line come off that earlier shape and return to it (rather than flowing back and forth overtop of it, as though it doesn't really exist). I explain this further in these notes.
Another concern I have is that you do have a tendency to draw quite small, packing several different drawings into one page and leaving a lot of empty space between them. There's really no need for this, and it actually does some harm. These constructions are spatial problems, and in order to think through them at their best, our brains require a lot of room to maneuver. Giving your brain a good deal of space to think through these challenges will help improve your results, and help you learn more from the process. Additionally, drawing larger will help to engage your full arm, pushing you to draw from the shoulder, rather than cramping up in a tight space.
When drawing the flow line of a leaf, I'm noticing that you consistently have the line stop short of where you intend to place the tip of your actual leaf or petal. This flow line should strive to extend all the way to its tip instead, as it governs just how that surface is going to move through space in its entirety.
And one last thing - when drawing anything that is cylindrical, and depends on having circles in 3D space that are aligned to a single axis, be sure to construct them around a minor axis line. Flower pots are an excellent example that would benefit from this, as they're made up of a series of ellipses that all need to follow the same alignment. It'll also help with creating inset ellipses - an ellipse inside of an ellipse, just a little smaller, which allows us to create the illusion of a rim or thickness to the lip of a flower pot. That thickness is something you seem to have left out most of the time.
Before I mark this lesson as complete, I'd like you to do 3 more plant drawings. Dedicate a page to each one, and focus on drawing large and confidently, engaging your whole arm and pushing the idea of the flow of your lines rather than allowing them to stiffen up.
Uncomfortable in the post "While I don't have the time to do live demos, with pen-and-paper of all the exercises, the raccoon living in my apartment that does. ScyllaStew is livestreaming *everything* as she works through Drawabox, and uploading it all to YouTube."
2019-07-17 19:14
A few people have been doing this sort of thing - it's 100% okay with me to show the website on stream, as long as you're crediting the source.
Just make sure that streaming/recording it all doesn't mess with your ability to push forward confidently. That kind of attention can definitely cause people to stiffen up or become overly self conscious.
Uncomfortable in the post "While I don't have the time to do live demos, with pen-and-paper of all the exercises, the raccoon living in my apartment that does. ScyllaStew is livestreaming *everything* as she works through Drawabox, and uploading it all to YouTube."
2019-07-17 17:43
There are definitely some pretty wild grips out there, and I've had similar reactions to a few. You're right though - as long as it works (and doesn't cramp the muscles with an overly strenuous grip, and so on), it's generally fine.
After a bit of searching, I did find the grip you were describing - it seems she was mostly using it while writing, and was supporting her pen against her thumb pad in a more normal fashion while drawing.
Uncomfortable in the post "While I don't have the time to do live demos, with pen-and-paper of all the exercises, the raccoon living in my apartment that does. ScyllaStew is livestreaming *everything* as she works through Drawabox, and uploading it all to YouTube."
2019-07-17 17:32
Oh? What about it seems off to you?
Uncomfortable in the post "While I don't have the time to do live demos, with pen-and-paper of all the exercises, the raccoon living in my apartment that does. ScyllaStew is livestreaming *everything* as she works through Drawabox, and uploading it all to YouTube."
2019-07-17 14:06
So /u/ScyllaStew recently moved in with me. She'll be attending art school here in the fall, but in the mean time she's got a good chunk of time to dedicate to Drawabox, and she's streaming/recording all of it!
She streams on Twitch every Tuesday, Wednesday and Thursday at 3PM ADT (that's an hour ahead of east coast, four hours ahead of west coast) if you want to drop by, and then cuts up the videos by lesson/exercise for YouTube.
The videos definitely are long, so this isn't for everybody. The main focus is to provide a realtime demonstration of all the exercises. She also reads out the instructions in full, in case that's something you feel you need - but all the content is timestamped so you can skip it if you don't.
As she works through it all, I'm also adding timestamped links to the bottom of each relevant lesson page and exercise. Here's hoping this provides some added value for the community, and gives a healthier, more measured idea of how one should be pacing themselves as they work through each exercise.
Uncomfortable in the post "Lesson 1: Lines, Ellipses and Boxes (Patreon Critique Thread)"
2019-07-16 15:52
No worries - folks are welcome to submit as soon as they've pledged, but it looks like Patreon was just a little delayed in actually notifying me. I'll send out the messages right away.
Uncomfortable in the post "Lesson 1: Lines, Ellipses and Boxes (Patreon Critique Thread)"
2019-07-16 15:26
Hey! Looks like I don't currently have you down as being eligible for private critiques. If you are a supporter of Drawabox on patreon, be sure to check your patreon inbox as I'll have sent out a message to grab your reddit username and do some other basic housekeeping.
If not, you're welcome to submit your work directly to the subreddit to be reviewed by the community or to the discord server.
Uncomfortable in the post "250 Cylinder Challenge (Patreon Critique Thread)"
2019-07-15 20:27
There's definitely a good deal of improvement over the set in terms of how you're constructing your cylinders (both on those constructed around arbitrary minor axes and those constructed within boxes) but there are a few issues I'd like to point out. Some are related to the kinds of errors that come up in your construction, and others have to do with the line quality itself.
Starting with the line quality, there is definitely a certain unevenness to your ellipses and a stiffness to your lines that suggests that you may be falling out of practice with your use of the ghosting method, and that you may not be drawing from the shoulder for many of these strokes. Remember that these are not techniques that are reserved just for those lesson 1 exercises - they should be used with every mark you put down. We take a complex task (putting a smooth, precise mark on the page) and break it into a series of smaller, more easily handled challenges:
-
First we think about the mark we need to put down and determine its nature. Where does it start, where does it end, what space does it fill, and so on. We also find a comfortable angle from which to approach it. While in this phase, that is all we think about.
-
Then we make physical preparations to draw it, going through the motion as needed to develop the necessary muscle memory. We're telling our arm how we want it to move, and what we want it to accomplish.
-
Finally we execute the mark with a single confident motion. At this point we have committed ourselves - our only responsibility at this point is maintaining a consistent trajectory. The second our pen touches the page, there is nothing we can do to improve our accuracy - all we can do is push through and ensure our line remains smooth.
Based on these steps, when correctly following the ghosting method it's impossible to end up with a wobbly line - just one that misses its mark. And that's a much more manageable problem in the long run, so always remember to apply the ghosting method across the board.
For the individual boxes you were using as containers for your cylinders-in-boxes, there were a couple other issues I noticed:
-
Give this simplification of 1/2/3 point perspective and when to use which from lesson 1 a read, and keep it in mind. In a lot of cases you are following those principles, but I think you do have a tendency to let your lines just run parallel (towards an infinitely far vanishing point) when it isn't necessarily the best choice for a certain set of lines. If, for example, we've got a corner of a box pointing straight at the viewer, then you will want to have some visible convergence for all three sets of lines.
-
I noticed that when your cylinders got longer (resulting in longer boxes) you had a tendency to focus on the convergence of a given set of parallel lines in pairs, rather than how all four converged together. This resulted in different vanishing points for each plane, rather than one shared one for all four parallel lines.
Overall you definitely still do have a lot of room for improving upon your boxes' convergences. Make sure that when you're drawing a line as part of a box, that you think about how it is actually going to converge with all the other lines it is meant to run parallel to, including those that haven't yet been drawn. Think about how all of their orientation needs to be set in order to meet at that single vanishing point. Don't jump in thinking about how the lines meet at corners, or how they define a plane. And of course, don't forget about these notes.
Generally setting aside the box containers themselves and the quality of the lines, the actual construction of the cylinders is generally coming along well. The only recommendation I have there is that you should avoid a lot of the extremely exaggeratedly long cylinders you threw in there. They have a tendency of incorporating a lot of foreshortening, which becomes very distracting when trying to focus on learning how to construct a cylinder and mind the minor axes and degrees of its ellipses. It also makes it more likely that you're going to draw a lot of those tiny arms from your wrist or elbow rather than from your shoulder.
I'll go ahead and mark this challenge as complete, but you definitely should continue to practice your freely rotated boxes as part of your regular warmup routines, along with the exercises from lessons 1 and 2 (as I hope you have been doing up til now). Feel free to move onto lesson 6.
Uncomfortable in the post "Lesson 2: Contour Lines, Texture and Construction (Patreon Critique Thread)"
2019-07-15 19:14
All in all, you've done a pretty good job. I'll go through them exercise by exercise and touch upon any areas that could use improvement.
To start with, your arrows are very well done. They flow quite nicely through all three dimensions of space. You're also not afraid to have the zigzagging lengths of the arrow's ribbon grow closer and closer as we move farther away, even overlapping beyond a certain point. This conveys an excellent sense of the depth of the scene.
Your organic forms with contour ellipses are generally coming along well, save for a couple minor issues to be aware of:
-
Your ellipses are roughly maintaining the same degree. As explained here, they should be shifting towards wider/narrower degrees along the length of the form, as their orientation relative to the viewer changes.
-
You're doing a pretty good job of sticking to simple sausages, with a few very minor deviations here and there. Sometimes you've got ends of different sizes, sometimes the ends are a little more elongated (stretching the tapering/curving portion over a longer distance), and sometimes you've got a little pinching towards the midsection. Don't worry about it too much, just keep this in mind an give these notes a read.
These points also apply to your organic forms with contour curves. I also noticed that your contour curves were a little less accurate - they had a greater tendency to fall outside of the silhouette of the organic form, where your contour ellipses were more consistent in sitting snugly between the edges of the form. Keep working on that - continuing to practice proper use of the ghosting method in this context, along with drawing from your shoulder, will help.
It's completely normal to find the texture exercises difficult - these are not meant to be a test of your skill, but rather an introduction to the concept. You have however definitely made some important strides in the right direction. You're definitely starting to think about how the marks we put down are shadows, and there are visible signs that while you're still to a point thinking in terms of line, you are trying to toss that aside in favour of expressing these complex textures entirely with more flexible shadows as explained in these recently added notes. Give them a read, as they should help solidify part of what you're already pushing.
It's fair to say that your use of texture definitely feels a lot more natural in your dissections - I expect this is because the exercise forces you to think more in terms of form and construction, how you're going to tack on little textural forms to the underlying sausage. Either way, you're definitely continuing to develop in the right direction here.
Finally, both your form intersections and organic intersections are looking good. They both convey a strong grasp of how these forms sit in 3D space and how they relate to one another. Neither feel like individual, flat drawings pasted on top of each other - their specific interactions in three dimensions are clear and believable.
I have just one small recommendation - your sausage forms had a tendency to wobble at times, so keep working on keeping them as simple, smooth and confident as possible.
I'll go ahead and mark this lesson as complete. Feel free to move onto lesson 3.
Uncomfortable in the post "Lesson 4: Applying Construction to Insects and Arachnids (Patreon Critique Thread)"
2019-07-15 13:20
Looks like your last submission (the revisions on lesson 3) were submitted 8 days ago on July 7th, so you'll have to hold onto this submission and resubmit it no sooner than July 21st. It occurs to me that the wording about the 2 week rule may have been a bit confusing before - basically if revisions are requested, you can submit those immediately, but they'll still 'reset the clock' so to speak. So it's counted compared to the last time your work had to be reviewed.
This is both to ensure that we're not getting swamped with critiques (be they full critiques or revisions) and that students themselves are given a solid amount of time to go through the work without any logical reason to rush.
I will mention that a quick glance at your work shows that it's come along pretty well. I'll have a few things to point out when I actually do my critique, but I expect I will mark it as complete. I still wouldn't recommend moving on until I've done that proper review, of course.
Uncomfortable in the post "Lesson 2: Contour Lines, Texture and Construction (Patreon Critique Thread)"
2019-07-14 16:20
Yeah, trees are a particular pain in the ass and require the kind of development of your understanding of construction that will come from tackling simpler stuff. In general, going for the complex stuff is less beneficial than focusing on simpler constructions because it distracts us from the core principles. Wouldn't hurt to try it out near the end, but don't get frustrated if it still doesn't come out well. All of the lessons from 3-7 tackle construction from a different angle to kind of hammer in similar concepts and make sure that they sink in, so I don't expect you to be a master of handling plants and plant-like things at the end of lesson 3.
Uncomfortable in the post "Lesson 2: Contour Lines, Texture and Construction (Patreon Critique Thread)"
2019-07-14 15:57
Much better! These forms feel considerably more consistent within the same space, and while the boxes aren't perfect, they're looking a lot more solid. I can still see some points where your added line weight stops suddenly rather than blending back into the stroke it's on top of, so keep working on achieving a slight tapering to your strokes (this is in general - that tapering helps make your lines feel more lively rather than being overly uniform, and comes from generally drawing with confidence).
Anyway, I think you've shown a good deal of improvement here, so I'll go ahead and mark this lesson as complete. Feel free to move onto lesson 3.
Uncomfortable in the post "Lesson 3: Applying Construction to Plants (Patreon Critique Thread)"
2019-07-14 15:55
I think your construction here is looking a great deal more conscientious and focused. There's still room for improvement as far as the execution of the individual marks, and there's a bit of stiffness there, so keep pushing yourself to draw with more confidence, and if you catch yourself drawing construction from the wrist or elbow, always push back to the shoulder. These marks, even the small ones, are of the sort that rely heavily on a smooth flow, and the best way to achieve that is from your shoulder.
For the detail/texture, some parts are quite well done (like the little buds on the pistil of the hibiscus), but on that same plant's petals, you ended up focusing on actual form shading (which we don't touch in drawabox). It's easy to get a little confused, but remember that we focus only on conveying detail and texture by capturing the shadows those little textural forms cast on their surroundings. If you can't pin down the form that is actually casting the mark you're about to put down as part of a texture, step back and think about whether or not that is just the natural shading of the form's surface. If it is, leave it out. Thinking about the specific form that casts a given shadow will also help you identify how to best go about drawing it, because it will leverage your understanding of 3D space rather than just focusing on reproducing exactly what you see in two dimensions.
It's also worth mentioning that I added an extra section to the texture analysis notes (the exercise from lesson 2) that may help when dealing with detail and texture: https://drawabox.com/lesson/2/6/notransition
Anyway! Your construction is looking good, so I'll go ahead and mark this lesson as complete. Feel free to move onto lesson 4.
Uncomfortable in the post "Lesson 2: Contour Lines, Texture and Construction (Patreon Critique Thread)"
2019-07-14 15:49
Looking pretty good! Just don't forget that as we look farther back, the space between the zigzagging lengths of ribbon will also compress, causing those gaps to shrink as shown here. Having that spacing be more consistent can hinder the illusion of depth in the scene.
So! Now you're good to move onto lesson 3. As for the challenges, the cylinder challenge should be completed before moving onto lesson 6, and the texture challenge can be done in parallel as you move through all the next lessons, and should not be done all at once. It benefits greatly from being given time to think about what you've learned, so it really should be spread out over a longer period of time.
Uncomfortable in the post "Lesson 2: Contour Lines, Texture and Construction (Patreon Critique Thread)"
2019-07-13 20:21
Starting off with your organic arrows - ohnoes! Looks like you didn't include them. I'm assuming you did complete them and just forgot to include them in the album, but I will want to see them before signing off on this lesson.
Moving onto your organic forms with contour ellipses, you're doing a pretty good job overall, with a couple things to keep in mind:
-
Your ellipses' alignments are generally pretty good, in relation to the central minor axis line.
-
You're showing a good shift in degree over the length of the forms.
-
Your ellipses tend to be kind of uneven - make sure you're drawing from the shoulder and applying the ghosting method. Rotate the page as needed as well in order to find a comfortable angle of approach.
-
Your actual sausage forms aren't quite right. In the exercise instructions I explain that the form should essentially be like two equally sized spheres connected by a tube of consistent width. Yours have a tendency to get just a little bit wider through their length, and the ends are more like spheres that have been stretched, resulting in the roundedness being much more gradual than it should. Always try and aim for spherical-type ends, followed by a consistent width between them.
Same thing about the sausages goes for your contour curves as well, though otherwise these are fairly well drawn. They're a little less confident than they could be, but you're doing a pretty good job of wrapping them around the surface of the form in a convincing manner.
Your texture analyses are definitely moving in the right direction, though there is definitely more room for growth and improvement, which will come with practice. I do have a couple things to point out however:
-
Remember that we're focusing on cast shadows - not form shadows. Form shadows are what you see on a form's surface caused by the form itself, whereas cast shadows are what is projected by other forms by blocking a light source. For the time being, don't worry about the actual form shading.
-
It looks like you got a bit scribbly on your wooden log's study (on the left side). Remember that again, we're just focusing on those cast shadows - meaning you don't have to worry about adding hatching to apply some kind of local colour, or create midtones.
-
On the last one - the pebbles - i think the stippling you used on their surfaces was a good thought, although you didn't necessarily focus enough on what you were actually seeing in your reference as far as the nature of that actual texture. Pebbles do have little pocks in them, along with scratches - but what we're really seeing are the shadows being cast by them, so rather than simple dots we might be more likely to see crescent moon shapes (where the edge of the pock blocks the light on one side, but not on the other). Additionally, as shown here (these are new notes I wrote today), those kinds of shallow pocks would be the first thing to be obliterated as the ambient light increases, since it's not particularly difficult for the light to reach those areas, as opposed to deeper cracks and the spaces where different forms meet.
Honestly your dissections' textures were considerably improved, largely because you didn't get caught up in trying to make up midtones, and instead plunged yourself head-long into the stark black and white of the ink and page.
Lastly, both your form intersections and organic intersections are coming along quite well. They both convey a strong understanding of how these forms exist in and relate to one another in 3D space. Don't forget to draw through your ellipses though - even if they're coming out well, I want all my students to draw through the ellipses they draw for these lessons in order to push the additional muscle memory and keep the confidence of the stroke at the forefront.
I'll go ahead and mark this lesson as complete. Feel free to move onto lesson 3. I forgot! Show me your organic arrows.
Uncomfortable in the post "Lesson 2: Contour Lines, Texture and Construction (Patreon Critique Thread)"
2019-07-13 19:53
Starting with your arrows, they're definitely flowing quite nicely, though there's a couple things I'd like to mention:
-
As your arrow moves farther back into space, keep an eye on the actual spacing between the zigzagging lengths of its ribbon. As explained here, that spacing should shrink with perspective, rather than remaining consistent.
-
The little hatching lines you've added are a little sloppy - with any mark you decide to put down, take the time to actually draw them cleanly, rather than treating some lines as afterthoughts.
One important part of the organic forms with contour ellipses that you missed was the point about sticking to simple sausage forms that are effectively two equally sized spheres connected by a tube of consistent width. You did a much better job of this in your following page with the contour curves, but here you've got different sized ends, pinching through the midsection, etc. There are also some areas where your ellipses aren't quite oriented to align to the central minor axis line correctly, although many are decently done. Lastly, keep an eye on the degree of your ellipses - they should be shifting over the length of the entire form.
As I mentioned, aside from a couple of these where they continue to widen through their length like a stretched ball rather than a sausage form, you've done quite a good job with these. Most follow the definition of a sausage form, and you've done a good job of wrapping each contour line around the form in a confident manner. Keep an eye on your overall accuracy - your lines are confident which is great, though you do have a number of cases where the contour curves end up falling short of one edge of the sausage's silhouette, or where they fall outside of it.
Your texture analyses are definitely moving in the right direction. You're mindful of relying on the shadows the individual textural forms cast on their surroundings. One thing to keep in mind however is that right now when you move towards areas where multiple textural forms meet, the shadows are going to be much deeper, since light has a tougher time penetrating into these areas. That is, compared to the outer edges of those forms that are more open to ambient light. Because of this, as that ambient light increases (as we move towards the sparser end of our density gradient) certain parts of the cast shadows will disappear much more quickly than others. Right now in your texture drawings, you're picking which parts disappear somewhat arbitrarily.
Give these notes a read. I actually took a break from your critique to write them and draw the demo, as it covers issues that many students have encountered. You demonstrate a grasp of many of the overall concepts, though I do feel I touch upon aspects that you may not fully understand just yet.
The same applies to your dissections, though there are also a few other issues I noticed that are worth mentioning:
-
You have a tendency to fill things in with solid black, rather than actually thinking about the solid black areas as being shadows (which wouldn't always fill everything in). This has a tendency of flattening your textures out.
-
There are a few places where you get a bit scribbly and random - remember that every single mark you put down should be informed by the reference images you're studying. Don't go relying on memory, or on techniques that kick you into a sort of auto-pilot, as in doing so you will end up drawing symbolic representations of the textures, rather than accurate depictions of them.
Your form intersections are coming along reasonably well, especially those focusing on boxes. Your spheres do tend to come out kind of squashed though, so you'll want to get used to drawing full circles (rather than narrower ellipses). Lastly, your organic intersections are looking decent. You're getting into the groove of conveying the illusion that these forms exist together in a three dimensional world, slumping and sagging on top of one another. That said, the particular arrangement you've gone for is a bit precarious, with the sausages being laid out more parallel to one another than they reasonably should. Laying them out instead to be more perpendicular to each other would definitely lend to the illusion of overall stability of the set.
Anyway, I'll go ahead and mark this lesson as complete. Feel free to move onto lesson 3, but be sure to keep what I've mentioned here in mind and apply it during your regular warmups.
Uncomfortable in the post "Lesson 3: Applying Construction to Plants (Patreon Critique Thread)"
2019-07-13 18:13
Very nice work overall! You're definitely demonstrating a great deal of confidence behind your linework, along with a fairly strong grasp of the constructional concepts covered in the lesson. There are a few little hitches here and there that I'm going to address, but by and large you're doing very well.
Starting with your arrows, you're clearly comfortable pushing into all three dimensions of space, and you're demonstrating ribbons that flow very fluidly as they explore the full depth of the scene.
This fluidity carries over nicely into your leaves, and I can clearly see that you're quite aware of how the two exercises are very closely related. As such, you're not getting stuck in the trap of trying to approach the leaves like solid, static objects with clear beginning and endings - you're treating them as arrows, as more of a representation of a abstract forces as they move through the world. You're also applying the constructional process fairly well - you're stepping through the steps conscientiously, ensuring to adhere to the scaffolding constructed in previous steps, and avoiding straying from them. Very nicely done.
In your branches, I actually had to look extra carefully to make sure you were actually doing the exercises correctly - in many cases, you managed to keep the compound edges very fluid and seamless, which is fantastic. One suggestion I do have however is to try and push the end of your first stroke further towards the next ellipse (right now you're often only extending it by a small amount - try going halfway to the next ellipse). This provides us with a much larger runway to use when drawing our next stroke, and helps reduce the prevalence of little tails where the paths separate.
Moving onto your plant constructions, these are generally very well done, with just a few things I want to point out:
-
For the mushroom on the right side of this page, watch out for situations where you leave a form open-ended. For example, look at the bottom of the stem - you'll notice that the two edges simply stop. This is something that can easily flatten out part of a construction, so be sure to cap it off with an ellipse as you've done here.
-
Your daisy actually came along quite well (despite those errant shadows) - your petals were flowing very nicely through space. One thing I would recommend however is to take full advantage of all of the room on the page. You placed your flower directly in the center and didn't use a significant portion of the space afforded to you. Giving your brain more room to think through these spatial problems will help a great deal. It will also help you to engage more of your shoulder, which will help keep marks more consistent - for example, with the stem, its width continually tapers and swells, which undermines the illusion. For now, drawing larger will help you to maintain more consistent widths here, and once you're comfortable doing it at a larger scale, you'll be able to apply that to smaller scales more easily.
-
For your pitcher plant, just a minor observation - I noticed a visible jerk in your lines every time you reached an ellipse when drawing the body of the plant. This was especially prominent when you started going down into the turning section. Definitely work on getting those lines to flow more fluidly - and don't forget that rotating the page to find a more comfortable angle of approach is always an option.
-
The last thing I wanted to mention had to do with leaves and petals. When critiquing your leaves exercise, I specifically mentioned that you were doing a great job of stepping through the individual phases of construction, and being sure to adhere to the previous scaffolding while adding more detail. In some of your plant constructions (especially towards the end), you definitely get a lot more relaxed with that, treating the underlying construction more as a series of suggestions. This results in a lot of more complex linework that goes on to answer questions previous marks had already resolved, and in doing so, they provide somewhat different assertions. This results in a drawing with multiple contradictory questions to things like, how does this leaf flow through space, and how far does it extend. As covered back in lesson 2, our drawings are essentially illusions and lies that we're creating, and if we want to maintain the viewer's suspension of disbelief, we need to work to minimize the number of contradictions that come up in our drawings. Things to watch out for include letting your detail lines zigzag continuously around the simpler phase of construction ([like some of the back petals of your hibiscus), situations where you draw a single wavy line that continually changes its trajectory (which breaks this cardinal rule of markmaking), and pushing beyond the bounds you've set out for your elements as you did here (specifically speaking in regards to the big ellipses you laid down initially, then somewhat ignored.
Anyway, all in all you are doing a great job. I'll go ahead and mark this lesson as complete, so feel free to move onto the next one. Just be sure to keep what I've said here in mind.
Uncomfortable in the post "Lesson 2: Contour Lines, Texture and Construction (Patreon Critique Thread)"
2019-07-12 15:16
So your arrows are considerably improved. Your organic forms with contour lines are also looking better, though I certainly see the issues with them pinching through their midsection. When faced with a difficulty like this, it's often to propose switching up your approach as a solution. This does tend to line up with "taking the path of least resistance", allowing yourself to take the road that is easiest rather than the path that is best suited to the task at hand.
If you struggle with something, and the rest of the lesson suggests that your approach is best, keep at it. Your skills will improve, and you will get better.
One thing that does come to mind however is that you should make sure you're drawing these from the shoulder - you may be drawing a little more from the elbow here, making it difficult to achieve a more consistent stroke (and resulting in more awkward pinching).
Your form intersections are definitely still messy and erratic, so that's something you're going to want to work on. I think you're drawing your forms a little too small, resulting in more cramped linework, less room for your brain to think through spatial problems (your boxes' lines are sometimes diverging instead of converging as they move farther from the viewer), and generally you do show signs of being distracted by the problem as a whole when drawing an individual mark, or an individual form. Additionally, when you add line weight, that added weight seems to have a very clear stopping point rather than blending back into the original line. The additional line weight, as with all marks you put down, should be drawn with the ghosting method, resulting in a more confident stroke. That confidence tends to lead to a natural tapering on the ends of the line (where the pen is moving as it makes contact with the page), making it easier to blend into the stroke beneath it. The fact that this tapering is missing suggests that you're drawing too slowly and carefully, or pressing too hard - or likely both.
Your organic intersections are certainly getting there, and I can see improvement between the two pages (assuming the one on the right labelled 2 is indeed the second attempt). The first one is more reminiscent of flat shapes being pasted on top of one another, whereas the second sells the idea that these forms relate to one another in 3D space much better. You kept most of your forms quite simple, which is good, as you should be sticking to basic sausage forms here, but you've got that one in the second attempt that definitely went a bit crazy. There's still room for improvement here, but I'm satisfied with your progress for now.
Before I mark this lesson as complete, I want just one more page of form intersections. Draw your forms bigger, and focus on each individual mark you put down, and each individual form as you're drawing it. Don't get distracted by the whole set, focus on what you're doing at that moment. Additionally, draw the forms bigger and take up more of the page. You've got a lot of empty space.
Uncomfortable in the post "Lesson 1: Lines, Ellipses and Boxes (Patreon Critique Thread)"
2019-07-11 21:06
I've gone ahead and added your submission to the backlog - but I did want to say that I'm surprised you had trouble finding the link. There's no button as shown here at the bottom of the table of contents? Or if you're on mobile, here?
Uncomfortable in the post "Lesson 4: Applying Construction to Insects and Arachnids (Patreon Critique Thread)"
2019-07-11 20:18
Now I want you to take another stab at this lesson. I expect this to take you a while. I expect you to take the time to think through every mark you put down, to observe your references carefully and closely, and not to rush through just to get a critique. I also expect you to be doing things other than drawabox - if you remember back in lesson 0, there is a warning about drawing for fun being mandatory, and how that should occupy 50% of the time you spend drawing. It really doesn't matter how badly you may want to move through this material quickly, or how you may think your situation to be unique or different. It's fundamentally important not only to keep you sane, but to ensure that you continue to have direction as you work through this overly technical slog. And of course, when you are doing the homework, take as many breaks as you need. If you find yourself getting frustrated or impatient, or if you find yourself skipping steps and rushing forward, stop. Take a step back. Maybe put the work away for the night. Either way, the work you submit to me must be the best you are currently capable of - and by definition, you are capable of it.
Before you do the homework again, I'd like you to first read through the lesson 2 pages on thinking in 3D and on constructional drawing. Don't just skim it - read it carefully. Then read through all of lesson 4 again. Only once you've done that, you can work through the lesson 4 homework again, but I want all the drawings to consist only of construction. Take it as far as it will go - so for example, if we're looking at the louse demo, the step before last is where I just about finish dealing purely with construction.
Uncomfortable in the post "Lesson 4: Applying Construction to Insects and Arachnids (Patreon Critique Thread)"
2019-07-11 20:18
As your homework has been submitted a week early (your last submission was on July 4th, so you shouldn't have been submitting any new lessons until July 18th), I was going to tell you to hold onto it for another week. Then I realized that you are DrIsaac on discord, and figured that I should try and give you some guidance right now, rather than having you wait another week. In the future, definitely mind the 2-week-between-submissions rule.
I believe what is holding you back is how you apply your observational skills to a drawing. When drawing along with the various demonstrations, you show a lot more patience and care. It's true that the demonstrations do a lot of the thinking and analysis for you - it identifies the major masses for you, and generally breaks the complex object in front of you into simpler parts. When given that information, you do a considerably better job of actually applying construction itself.
When you're left to do that analysis yourself, you very quickly get overwhelmed by everything you're seeing. You panic, and let go of what you learned from the demonstrations and the rest of the lesson. Furthermore, your focus diminished as you worked through the whole set, and as you mentioned yourself in our brief conversation, you purposely rushed through just to get to the end of the lesson. That of course doesn't really help much, since those drawings don't really convey anything about what you actually understand, and what you don't.
Overall I could piece together that when you draw, you rely a great deal on your memory. That is, you'll look at your reference image, and then try to pull everything you're seeing into your head. Then you go to draw a bunch, and don't look at your reference again for a while. "A while" is a pretty vague measurement of time - it could be thirty seconds, it could be minutes, it could even be just a few seconds - but what matters most is the fact that what you're taking with you when you go to draw marks on your page is all very heavily simplified. In order to take all of that information with you as you looked away from the reference, your brain had to throw away the vast majority of what it had seen. Sometimes when we do this, we'll focus on the things we can ascribe words to. For example, "a leg" or "a head" or "a wing", and then we go and draw what we believe that named element to look like. And of course, it's always very, very wrong, because as human beings, we never evolved to remember that kind of information. To survive, all we had to retain were the absolute basics of what we saw - usually a predator - so we could identify it quickly and escape. Here we are actively fighting against our nature to rewire how our brains work. So yeah, it's not easy, and it's not meant to be easy. There's no surprise that you're frustrated.
You are however allowing that frustration to distract you. Instead of taking a step back and thinking about what your next step should be, you're throwing the entirety of the lesson and everything you've learned up to this point aside, and that simply isn't going to do us any good. The most important thing that you need to accept is that you are not special. The things you're struggling with here are the same things everyone has struggled with. Like I said - we are actively fighting against what we were designed to do as human beings. None of this is natural. If you get caught up on the concept of "talent" or feeling that you are specifically, uniquely unsuited for this task, you give yourself an excuse to regard drawing as some special thing, when it's nothing of the sort. It's no different from any other skill, and developing it is no different than going to school, or going to work and hammering in a nail every day for weeks and months. Just as you can be disciplined in dragging yourself out of bed at 7am to go to a shitty job, you can be disciplined here.
To put it simply: you're making drawing out to be something it's not.
Here are some point-by-point suggestions on what to do:
-
In your work, you gradually shift away from drawing individual forms in a 3D world. You start basically drawing simple flat shapes, and eventually slip into just drawing loosely associated lines. You MUST think about every single form you add to your drawing as it exists in 3D space. As though the page you're drawing on is just a window looking out into a larger world, and where form you add to your drawing is a solid mass in that world.
-
The lesson gives you a sort of step-by-step formula of what to look for, starting with the three major masses (head, thorax, abdomen). Study your reference, and identify where these basic masses are. Then transfer that forms to your drawing, focusing on establishing them as solid and three dimensional. Ensure that every single form is complete - don't stop drawing one when it gets overlapped by another form, as we're focusing on understanding how each form sits in space on its own, and how they relate to one another within that 3D space.
-
When two forms intersect with one another in your drawing, define that intersection with a contour line defining where they meet.
-
Get used to observing your reference directly, and identifying very LIMITED pieces of information. Identify individual forms and transfer them one by one - don't draw what you remember seeing, draw exactly what you see there. The way you're approaching things right now is very cartoony, due to oversimplification. It's not because you haven't got talent, it's because your observational skills are currently not developed.
-
Use the sausage method correctly when constructing legs. As shown here, each sausage is essentially two equally sized spheres connected by a tube of consistent width. That means the ends need to be equal in size, they need to be spherical (don't stretch their roundedness out), and there should be no tapering/pinching/swelling through their length. You did this fairly well in your demos, and very poorly everywhere else. As explained in a previous point, where those sausages intersect with one another, you should be placing a single contour line to define their intersection, right at the joint. When done properly, this is enough to reinforce the illusion of 3D form in both connected sausages, making it entirely unnecessary to add contour lines to their lengths.
-
When drawing contour lines, focus on wrapping them around the form's surface. Looking at your organic forms with contour curves at the beginning, you are wrapping these around believably, but in your other drawings they tend to be very shallow in their curvature. Now, in that particular exercise, there were a few minor issues - you're DEFINITELY pressing too hard with your pen and/or drawing too slowly, resulting in lines that are very uniform rather than flowing smoothly and confidently. You've also got some where the contour lines don't quite fit snugly within the form, though you've got many cases where they do. Overall these exercises are still showing skills that are VASTLY superior to what you exhibit in your actual insect constructions, which just means you're not investing the time, patience nor focus to actually demonstrate what you are currently capable of.
-
You mentioned before that you're focusing on construction rather than detail/texture, but based on your work that's not true. As you push onwards, I see many halfhearted attempts at adding texture and detail, as though that is somehow going to save a weak construction. Adding the lines to these insects' wings, adding fuzz to a moth, etc. None of these things are necessary, and they're all distracting you from focusing on the core construction.
-
Remember that construction is fundamentally all about moving from simple to complex, gradually building up that complexity in successive phases. NEVER draw a form or shape that is more complicated than the scaffolding you've already put down will allow. For example, if we look at the praying-mantis looking thing on the top right of this page, the wings have all kinds of curves that amount to complexity, though there's nothing there to help support it. You jumped in too complex too early.
I hit the 10,000 character limit for reddit posts, so I'm going to include the last bit in a reply to this comment.
Uncomfortable in the post "Lesson 3: Applying Construction to Plants (Patreon Critique Thread)"
2019-07-10 23:27
I suppose you weren't wrong to think of the first one as gesture, as the flow of the spines of those forms can capture a sense of gesture and rhythm, especially when we're talking about the sausage method for drawing legs that comes up in lesson 4 and 5. Even when we don't draw those central minor axis lines, that gestural flow is still reflected in how we push the flow of our lines. So it's less specifically captured by a particular element of the drawing, and more by every aspect of it.
Uncomfortable in the post "Lesson 3: Applying Construction to Plants (Patreon Critique Thread)"
2019-07-10 21:02
I think you have it correct, but let me clarify some of your wording to be sure:
-
In the organic form exercise from lesson 2, we use a minor axis line, to which the ellipses are aligned (that is, all their minor axes align to it). This line can be thought of as a "center" line, but it's best to think of it as a spine, because it cuts through the three dimensional center of the whole form.
-
When I'm constructing with organic forms, especially when I have multiple forms like the head, thorax and abdomen of an insect, drawing a center line - that is, a line that is actually a contour line and runs along the surface of the form (not cutting through its volume but running along its outer skin).
Both can be thought of as center lines, but they accomplish very different things. The first one (minor axis, spine) defines the direction in which that form is flowing, allowing us to construct ellipses that run perpendicular to that. The second one (a contour line, running on the surface) will not help in aligning ellipses, but can help us better understand how we can split the whole construction into two symmetrical halves - like if you were to draw a line down the center of a person's face to divide it in two and better plan out where to position the eyes, mouth, nose, etc.
So yeah, it's good that you asked, as they are fundamentally different things, but it is easy to confuse the two.
Uncomfortable in the post "Lesson 1: Lines, Ellipses and Boxes (Patreon Critique Thread)"
2019-07-10 20:56
/u/steinerscooking:
Just one thing I wanted to add to sluggy's critique - for the rough perspective boxes exercise, you seem to have left out the step of extending your lines back to where they intersect with the horizon line. This is extremely important, as it gives you a better sense of how your estimation of perspective tends to drift, so you know what to work on during the following attempt. Instructions like these are critical, so make sure you read and follow them more closely, especially as you move onto the 250 box challenge.
Additionally, as sluggy mentioned, your weakest point is definitely the confidence of your lines - in the 250 box challenge you will have ample opportunities to ghost and draw many, many lines, so take that chance to work on your use of the ghosting method, to split the markmaking process up into three distinct steps, the last of which is focused entirely on making a smooth, fluid confident stroke.
Uncomfortable in the post "Lesson 3: Applying Construction to Plants (Patreon Critique Thread)"
2019-07-10 20:50
The odd blurry photo aside (probably should have retaken those to ensure your submission was sharp), you're doing a pretty good job overall.
Your arrows flow very nicely through space, conveying a great deal of confidence behind your linework, and a good sense of the full depth of the scene. You carry this over into your leaves section, where I don't really see any signs of the common issues students encounter here. You're maintaining that same fluidity, where some students might get a little too caught up in the tangibility of these leaves - you focus on how they move through space, rather than how they sit in it as a static object. You're conveying the energy that pushes and drives each leaf, the wind and air currents that influence its position at any given moment.
Additionally, you're generally doing a good job of respecting the constructional process - when you add additional edge detail to a leaf, you adhere closely to the scaffolding created by the previous stage, as explained in the instructions. Great work.
Your branches are overall coming along pretty well - though this page is blurry, I can't identify any major tails where segments fail to flow into one another seamlessly. They appear to all be flowing quite nicely from one to the other, creating the illusion of a single, continuous stroke along the entire length of the branch.
There are a couple things I do want to mention in regards to this exercise however:
- Try to ensure that the branch remains a fairly consistent width through the entire length. This will help you maintain a degree of solidity. This is similar to how we keep our organic forms (from the lesson 2 exercise) simple, like two spheres connected by a tube of consistent width. It helps us maintain the illusion of solidity, upon which we can continue to build as needed. Generally you do this nicely, but there were a couple cases where there was some poorly controlled tapering.
The second point is to watch out for the alignment of your ellipses - you've got a few branches where the ellipses don't show any effort of aligning to that central minor axis line, and as such it really hurts the illusion, having cross-sectional slices that don't flow perpendicular to the overall movement of the branch.
Moving onto your plant constructions, you've done fairly well, aside from a few little hitches. Your constructions are continually following the steady constructional process, without too many skipped steps, and you're focusing on developing things from a simple, solid state, gradually developing complexity as you go.
Here are the few issues I noticed:
-
When drawing ellipses - for example as part of a flower pot, especially when you need to inset one ellipse inside of another to create a rim, be sure to draw from your shoulder and apply the ghosting method. These ellipses in particular tended to be poorly controlled, making it difficult to maintain that even inset. I believe this comes largely from drawing those ellipses in particular from your wrist.
-
When using cast shadows (which are an excellent tool for separating forms out and clarifying your construction after the fact), be mindful of where your light source is going to be, and try to be more consistent. In this drawing your shadows seemed to fall on either side of the petals, giving a sense of inconsistency across the board and undermining your overall illusion.
-
Don't cram too many drawings into one page. This is more of a warning than a correction - construction is a spatial problem, and spatial challenges benefit considerably from being given more room to think and to work. It allows our brain to work through them with greater confidence and freedom, while also giving us more room to engage our whole arm. I'm not actually seeing any major negative effects in your drawings from having drawn them so small, but it's still a recommendation I want to make, as there are more subtle ways in which this could be restricting or impacting how you draw.
-
You generally adhere very closely to your construction, though there are a few places where you're a little less inclined to stick to the initial marks you put down. For example, in the top left of this page, we can see where you put down ellipses to define the boundaries to where the petals would reach. You probably put them down rather quickly, and early on decided that they weren't in line with what you wanted for your drawing, so you went on ignoring them. The problem with this is that it results in having statements in your drawing that assert different things. Every single mark we put down is an assertion, or an answer to a question - for example, the ellipses there answered "how far do the petals extend into space?". The ellipses declared one thing, but then the further drawing you did for each petal asserted something else. These kinds of things become contradictions - and if too many contradictions pile up in a drawing, it risks breaking the viewer's suspension of disbelief and damaging the illusion we're working to produce. In this case, it didn't hurt that much - but in principle, it's best to get in the habit of sticking to the answers you've given, and avoiding situations where you have to answer a question twice - even if you're not entirely happy with the direction your past decisions are taking you.
And that's about it! You're doing great, and are showing a solid grasp of construction as a whole. I'm also very pleased with how you apply line weight and organize your drawings after the fact. I'll go ahead and mark this lesson as complete, so feel free to move onto lesson 4.
Uncomfortable in the post "Lesson 2: Contour Lines, Texture and Construction (Patreon Critique Thread)"
2019-07-10 20:34
Very nice work! There are only a couple minor things I'd like to point out, but by and large you've done very well throughout this lesson. Starting with your arrows, they flow very confidently and fluidly through all three dimensions of space, and don't show any signs of getting stuck in the two dimensional slice right at the surface of the page. I'm also very pleased to see that you're both playing with the width of the ribbon as it moves farther away, as well as the spacing in between the zigzagging lengths. This shows a fairly deep grasp of the major concepts of perspective.
Next, for your organic forms with contour lines, you've maintained simple, basic sausages that match the definition of two equal spheres connected by a tube of consistent width (aside from the top right of the contour ellipses page, but we'll ignore that one) - you've clearly been paying careful attention to the instructions. You're also showing a healthy shift in the degrees of your ellipses, keeping the ellipses fairly snug between the edges of the sausage's silhouette, and doing a pretty good job of aligning your ellipses to the central minor axis line. A couple are a little off, but generally you're showing a good sense of how to align them correctly.
Same goes for the contour curves, although some of these are a little sloppier, with a greater tendency to have curves that either spill out of the sausage's silhouette, or float inside of it, rather than remaining snug. Pushing the use of the ghosting method here will help you improve your control and nail this more consistently. Aside from that, it's good to see that you're wrapping the contour curves around nicely, and making good use of overshooting the curves as they hook back around.
You've definitely demonstrated some well developing observational skills with your texture analyses and dissections, and are heading in the right direction. One thing I do want to encourage you to do however is to try and push yourself to lean more on "lost-and-found" lines. That is, if you've got scales for instance, and we ramp up the light that is shining on them, the shadows that help us to define their edges aren't going to shrink uniformly - instead, the shadows where scales meet, where we get deeper cracks and such will persist more while those further out on their own will get blasted out much sooner. What results is a boundary for that scale that gets lost (blasted away by the light), then found again as it reaches a deeper section.
You're definitely not afraid to push the heavy darks of your textures, but I do feel that this will help the way you actually transition from dark to light.
Moving onto the form intersections, these are looking fantastic. You're constructing forms together such that they feel consistent and cohesive within the same scene, and you're demonstrating a solid grasp of how they relate to one another through the intersection lines. And lastly, your organic intersections accomplish a similar task, but this time conveying a very strong illusion that these objects are piling up in a believable, three dimensional manner - slumping and sagging as they find a state of equilibrium while respecting each others' volumes and refraining from actually cutting into one another. These don't feel at all like shapes pasted on top of one another, but rather come off as solid, three dimensional forms.
Overall you're doing very well. Keep up the great work and feel free to move onto lesson 3.
Uncomfortable in the post "Lesson 3: Applying Construction to Plants (Patreon Critique Thread)"
2019-07-10 14:59
Looks like you're currently pledged at $5/month, so you're currently only eligible for lesson 1, 2 and box challenge critiques. Lessons 3 onwards have a minimum of the $10/month tier.
Uncomfortable in the post "Lesson 1: Lines, Ellipses and Boxes (Patreon Critique Thread)"
2019-07-10 13:26
As I was adding your submission to our backlog spreadsheet, I clicked on your link to make sure it was a complete submission - but it looks like the link leads to a 404 error. Could you double check it and fix it if necessary?
Uncomfortable in the post "Lesson 2: Contour Lines, Texture and Construction (Patreon Critique Thread)"
2019-07-10 01:01
The texture stuff covered the dissections as well. As for finishing lesson 3 two days ago, you should not be moving onto the following lesson before getting a critique for the previous one, otherwise you will not be able to apply what you've learned from the critique to the following work, making it a lot less useful. I'd also end up pointlessly repeating the same critiques for things that came up again.
You've got two weeks at minimum to complete this work - if you must, spread it out, and don't forget about the critical warning from lesson 0 about spending half the time you have to dedicate to drawing on drawing "for fun". Or rather, drawing without growth and improvement as the goal.
Uncomfortable in the post "Lesson 1: Lines, Ellipses and Boxes (Patreon Critique Thread)"
2019-07-09 21:51
Very nice work overall, with just a few little things to point out. To start with, it's clear that you really enjoyed drawing the arrows, considering all the extra pages you did. They flowed quite nicely, with just one hitch. I noticed that with the few that zigzagged enough for me to see it, you had a tendency to leave the spacing between those zigzagging lengths of ribbon fairly consistent. As shown here, perspective is going to compress that spacing as it moves farther away from us. Doing so will help convey the idea that the arrow is moving back in space.
Next for your organic forms with contour lines, you're doing a great job of keeping your ellipses confident and evenly shaped, and keeping your contour lines pinched between the edges of the sausage form. You're also keeping your sausages simple and matching the whole two-spheres-connected-by-a-tube-of-consistent-width nicely. There's just one thing missing - the degree of your ellipses and curves doesn't seem to shift at all. As explained here, the degree of those cross-sectional cuts should shift, widening/narrowing as it moves through the length of the form to correspond with the changing of that cross-sectional slice's orientation relative to the viewer.
Moving onto the texture, you've definetely put a great deal of work into this, and to be completely honest, I feel the analyses/studies on the left side of the exercise did the best job of showing the qualities I wanted to see on the right. Remember that the density gradient on the right there is meant to transition from solid black (hence the bar of solid black we put in) to blank. You did the blank side pretty well, but as there's a very clear jump from solid black to what you'd drawn for your texture, that wasn't handled properly.
The key here is to focus on your cast shadows, and you definitely do grasp this to a degree. The fact that cast shadows are flexible and subject to how we choose to play with the lighting applied to the object. We can plunge an object into darkness, causing the shadows to deepen and engulf more of the object, merging into a single continuous shadow shape - and we can also shoot direct light at the object, blasting those shadows away and leaving only those in the deepest cracks where no light can penetrate. This second part, you managed well - but you seemed to be afraid to push your shadows past a certain point, so you weren't able to blend correctly with the solid black bar on the left.
I do also feel that your observation was demonstrated far more strongly in the texture analysis exercise than the dissections. In the dissections you seemed to rely more on drawing from memory, resulting in some of these getting a little overly simplified. Don't forget that our memories are not reliable, and that we must look back at our reference almost constantly, identifying only one or two marks to transfer to our drawing at a time. While doing that, we need to think about which little textural forms exist on the surface of our object that actually result in the casting of those marks (which are, of course, shadows). Being aware of what causes the mark is critical to drawing it in a manner that conveys that textural form's presence without having to outline it directly.
Moving on, your form intersections were very well done. You're demonstrating a very strong grasp of 3D space here, and were able to capture the forms in a manner that makes them feel consistent and cohesive within the same scene. You also handled their intersections fairly well, though you'll continue to improve on that front with further practice. As far as the intersections go, I really only wanted students to try them out here - it is, similarly to the rotated boxes and organic perspective boxes, an introduction to a difficult concept rather than a test.
Lastly, your organic intersections demonstrate a good grasp of how these sausage forms interact with one another, how they sag and slump together as they find a state of equilibrium. You've strongly conveyed the illusion that they exist in three dimensions, and that they are more than just flat shapes pasted on top of one another.
I'll go ahead and mark this lesson as complete. You're doing well, though you have a couple things to keep an eye on. Feel free to move onto lesson 3.
Uncomfortable in the post "Lesson 2: Contour Lines, Texture and Construction (Patreon Critique Thread)"
2019-07-09 21:33
Alrighty, let's step through these one by one.
To start with, you definitely went kind of hard on your organic arrows - that is to say, rather than taking it slow, you jumped straight in and started drawing arrows as complicated as you could. That's not necessarily the best choice - I can definitely see some interesting flow here, but by and large they're so erratic that I feel you may have been distracted more by the focus on making these arrows more complicated.
When doing this exercise, try and focus on long arrows swooping through space in large, fluid arcs. Keep their turns gradual and smooth, rather than sharp and tight. Furthermore, a lot of these were drawn quite small, or at least narrow - try to make them wider, so as to give your brain more room to think through the spatial problem of moving through all three dimensions of space.
For your organic forms with contour ellipses, these are definitely drawn a little sloppily, on two fronts. Firstly, note that in the instructions I describe the sausage forms as being essentially two equally sized spheres connected by a tube of consistent width. Yours don't really maintain a consistent width - they're generally getting wider and narrower, pinching through the midsection, etc. Your ends also tend to be more stretched rather than basic spheres, resulting in that roundedness covering a much greater distance. If you need a visual aid to think about how these should look, this diagram from a later lesson may help.
The other front is that your ellipses definitely do struggle to fall within the bounds of the sausage forms, with a lot of them falling well outside. Remember that this exercise is all about creating the illusion that the contour line rests along the surface of the form - so we can very easily break this illusion by having the contour line fall outside of the silhouette of the form.
Now, I do commend you on the confident, even shapes of the ellipses - this is definitely the most important thing we can follow when drawing the ellipses, but reinforcing them with the ghosting method should help you draw them more accurately within the space they're meant to occupy.
The contour curves are getting a little better, though I can still see the two main issues here as well, just to a lesser degree.
Your textures definitely do have lots of room to grow, but you're moving in the right direction here. I can see you pushing yourself to pay more attention to your reference images, and develop your observational skills further. There still are signs that you're drawing partially from memory (looking away from your drawing for a while and drawing what you remember seeing, rather than moving back and forth, drawing only one or two specific marks before looking back at your reference). I see this especially in the second and third attempts of the texture analysis exercise. This is pretty normal at this stage, though you do need to push yourself to continue focusing on transferring just a little bit of information at a time.
For the density gradients on the far right side of this exercise, I can see you trying to figure out how to move from heavy blacks to sparser marks, though from what I'm seeing, you aren't entirely thinking in terms of cast shadow (though you may have the beginnings of it). You're still focusing very much on patterns, and then reproducing those patterns. Instead, I want you try and set aside any use of line altogether. Line doesn't actually exist - it's something we make up, a tool that is very useful to define the boundaries between forms as we construct them. When we deal with texture however, it becomes more difficult to rely on line because we'd otherwise end up drawing many little lines within a confined space, resulting in a lot of visual noise that can easily distract the viewer and cause us to lose control as we try to guide their eyes.
This is something you're starting to understand and pick up on, but there is another side to it. Since line is no longer an effective tool in this particular context, we instead have to rely on something else. When we look at a reference image, we see a lot of things we initially perceive as lines - but in truth, they are the shadows cast by all of the little forms that exist along the surface of our object. These shadows are much more flexible, and as you've done here, can combine with one another to create large swathes of solid black. Similarly, we can shine direct light at them to blast them away like an overexposed photograph, leaving only the shadows in the deepest cracks where no light can penetrate.
The part you're missing currently is the fact that every single mark you put down is being cast by something. Some form exists that is resulting in the line you perceive - and so when you draw it, you need to be aware of what is casting it. We are effectively drawing around those little forms, rather than outlining and enclosing them (you still end up relying a lot on enclosing things with line, especially with your scales) - so for every mark, think about what you are trying to draw around, what form are you trying to imply is present without drawing it directly?
Moving onto your form intersections, there are a few little hiccups - like drawing elongated cylinders despite being told early on in the instructions not to draw any stretched forms and to keep things fairly equilateral - but by and large you are starting to demonstrate a developing grasp of 3D space. There certainly is a lot of room for improvement, and the more you work in those longer cylinders, the more you get distracted by the challenges of increased foreshortening rather than focusing on the core of the exercise, but you are moving in the right direction and are generally constructing these forms such that they exist together in the same scene in a cohesive manner.
Now, your organic intersections are similarly rough, but I can see signs that you're grasping what this exercise is about. You're showing me that these forms are slumping and sagging against one another, that they're existing together and trying to find a state of equilibrium within three dimensions, rather than being pasted on e on top of the other, ignorant of each others' influence on their own position in space.
Individually, the exercises are indeed moving in the right direction, but each and every one of them imbues a certain sense of... sloppiness. Of being rushed. Some more than others - for example, your texture section is much more patiently done, but your organic forms with contour lines were definitely done far too quickly. Furthermore, I can see the date on that album is from 9 days ago. Given that you completed the box challenge on the 25th of June, if you actually completed lesson 2 in just four days, that would certainly explain things. You may of course have instead worked on the box challenge and lesson 2 in parallel, so I really can't say. Either way, the results do tell me that you did not invest as much time into this lesson as you should have, and that you are very likely capable of much better.
What I ask for in this homework is not perfect work - just work done to the best of your current ability, free from rushing, of sloppiness, and following the instructions as closely as you can. I do not quite see that here.
Before I mark this lesson as complete, I want you to do the following:
-
2 pages of organic arrows
-
2 pages of organic forms with contour ellipses
-
2 pages of organic forms with contour curves
-
1 page of form intersections - keep your forms equilateral (meaning all roughly the same size in all three dimensions, no stretched forms) and try to keep them roughly the same size as well.
-
2 pages of organic intersections (keep these all roughly the same size as well, and stick to the simple sausage form of two equal spheres connected by a tube of consistent width.
Uncomfortable in the post "Lesson 3: Applying Construction to Plants (Patreon Critique Thread)"
2019-07-09 21:01
Your work here is really quite strong. There are a couple minor things that I want to point out just to nudge you back in the right direction, but by and large your results are coming along quite well.
Starting off with your arrows, this is actually where I see an issue that will come up in your actual plant constructions. Overall your arrows flow very nicely through all three dimensions of space, but there is one key little issue: on this page towards the center, we can see the heads of two arrows come into contact. You purposely stopped one arrow's lines where it was overlapped by the other. When it comes to all of our drawings, we're primarily focused on developing a full understanding of how each form we construct sits in 3D space, and how the different forms relate to one another. This requires us to draw each one in its entirety, regardless of overlaps. We can of course use line weight to clarify how certain forms overlap each other, but as far as actually drawing them, be sure to draw each form in its entirety every time. Don't become preoccupied with the actual end result - tidiness is important, but only as an extension of ensuring that every mark we put down serves a purpose. Beyond that, a pretty end result is irrelevant.
Your branches are coming along pretty well. You're doing a pretty decent job of keeping your segments flowing smoothly from one to the next without overt breaks. You've got a few visible tails, so when you draw the next segment, try to use the previous one's end as a sort of runway for your stroke, so the overlapping is intentional and direct. Still, these are very well done and you're moving in the right direction. There's also clear and strong improvement over the set as far as those tails go, and I'm not really seeing any towards the end. Great work.
Your leaves flow very nicely through space, and you're also generally doing a pretty good job of adhering to the previous phase of construction when adding further edge detail. I can see a few places where you zigzag around that initial outside edge rather than sticking right to it as described here but by and large you do demonstrate that you understand that to be the goal. You may just get a little ahead of yourself at times.
Now your plant constructions definitely demonstrate a very strong grasp of 3D space. These drawings definitely are on the small side, which is something that hinders most students as they try and think through the spatial challenges involved, but this doesn't seem to have hampered you much.
The issue I raised with the arrows however - not drawing each and every form in its entirety when it gets overlapped - does become apparent through some of your plant constructions however. Remember that we're not simply drawing 2D renditions of the plants - we are performing exercises to help continue to develop our understanding of 3D space. While yours are already quite strong, you're not here to simply show off what you can do, but rather to continue to develop and grow. As such, make sure you work through the constructional steps in their entirety, and adhere to them - including drawing through every single form - as closely as you can.
Another issue that came up at least once (specifically on the flower at the bottom of this page) was the zigzagging I mentioned in regards to your leaves. There it was a pretty minor thing, but here you definitely drew the outer edges of the flower's petals/opening with a much looser, continuous line rather than adhering more closely to previous stages of construction. To put it simply, you skipped ahead to a much more complicated stage without building up the scaffolding around it. In doing so, you broke one of the major tenets of markmaking. As explained in lesson 1, when you draw a line and its trajectory changes sharply, you should stop and start a new stroke rather than zigzagging back and forth. This ensures that the stroke maintains a singular purpose, and becomes much sharper and clearer, rather than the sort of wavy zigzags that usually end up losing definition after a bit.
The last point I want to mention is that throughout your drawings, you use a lot of hatching lines specifically to shade your drawings. As mentioned back in lesson 2, we don't actually have any interest in shading our drawings. Shading for shading's sake is often a crutch that students fall upon instead of taking the time to apply construction completely and properly. They'll use shading to reinforce the illusion that what they've drawn is 3D, rather than learning how to construct the drawing to do that on its own.
I'm not at all saying that you're using it as a crutch, just that I don't want it to be something you utilize through the drawabox lessons, lest you be distracted by it. Furthermore, we have a tendency to use hatching lines where we could put down other kinds of texture. It's a generic filler pattern that saves us the trouble of having to actually look at our reference carefully and study the various textural forms that exist there along the surfaces to identify the shadows they cast. So as a rule, and for both of these reasons, don't use any hatching lines in the drawings you do for these lessons.
So! With that, I'll go ahead and mark this lesson as complete. You are demonstrating a good grasp of 3D space, you just need to take a little more care to follow the instructions and work specifically in line with the lessons themselves, so you're sure to get the most out of them. That's not to say anything you've done is 'wrong' in the grand scheme of things - they're just not how these lessons are meant to be used.
Uncomfortable in the post "250 Box Challenge (Patreon Critique Thread)"
2019-07-08 20:15
It looks like you've only linked to a single page of your boxes, rather than the whole set. Could you update the link to point to the full album?
Uncomfortable in the post "Lesson 2: Contour Lines, Texture and Construction (Patreon Critique Thread)"
2019-07-08 17:45
What you mentioned about the bamboo leaf basically captures the core of the issue - I'm not saying you should avoid specific types of textures. Drawing texture is about drawing what is actually physically present in your reference images, rather than trying to represent those details and features through symbolic marks. The hatching lines weren't actually present in your texture - those are marks you drew following a pattern of movement because you could get them down more quickly. You identified some general aspect of your texture, and then found a way to draw them quickly and generically, rather than transferring the details actually present in your reference bit by bit, one piece at a time.
That's why I'm telling you not to rely on hatching like that - because it is not the correct way to approach any texture, it's more of a shortcut that yields sub-par results.
Looking at your latest work, there is definitely an improvement, although you've got plenty of room to grow. Here I can see that you're definitely making an effort to pay attention to individual physical features of the object's surface, and transfer them more directly. What's most important is that you've actually changed what you're trying to do. Your observational skills - that is, your ability to identify the specific characteristics of the information you're trying to transfer to your drawing - will continue to improve with practice, now that you're moving in the right direction.
I'm going to go ahead and mark this lesson as complete, so feel free to move onto lesson 3. I also recommend that you start GRADUALLY working through the 25 texture challenge, which is really just more of the same texture analysis exercise. You're meant to do this bit by bit in parallel with the other lessons, as this will give you the chance to get more practice with this sort of thing, while also allowing your brain to gradually work through the problems during the breaks in between attempts. So don't try and grind it all out immediately - spread it out while you continue to work on the other lessons.
Uncomfortable in the post "Lesson 3: Applying Construction to Plants (Patreon Critique Thread)"
2019-07-07 18:55
Hah! You caught me just as I was getting up. Overall you're demonstrating a pretty strong understanding of the material covered in the lesson, though I do have a few little observations to point out.
Starting with your arrows, they're very solid - you've got them flowing very fluidly through all three dimensions of space, and don't show any signs of stiffness or attachment to the limited two dimensions of the page itself. That's definitely great to see. This carries over nicely into your leaf exercises - you're not falling into the trap many students do, where they get overly focused on the idea that a leaf is a static, concrete object that starts and ends at specific points. You are instead capturing the illusion that each leaf is a physical representation of energy that flows through it - of the wind and air currents that cause it to move around, due to its lack of mass. As such, your leaves flow quite believably.
I can definitely see that you've got the right of it with the branches - there's definitely room for improvement and growth, but you're focusing on the main core of this exercise - constructing a long, complex curve by combining multiple smaller segments, and striving to get those segments to flow seamlessly from one to the next, giving the appearance of a single continuous stroke.
There are a couple things that can help with this:
-
First off, you do have, on occasion, the odd 'tail' that goes way off the mark. There's not a lot to be done about these, but if we look closely, we can see a lot of smaller, more minor tails that are off by just a little bit, but still noticeable. What can help here is getting used to using the end of your previous segment as a runway for the next - effectively overlapping that previous stroke intentionally as you draw it, rather than focusing on getting it to follow an independent path. This will help you to engulf that initial stroke and extend it in a seamless manner.
-
This isn't so much a tip, as much as something to focus on - work on maintaining a consistent width through the entire length of the branch. I'm seeing cases where they shrink or swell, and that's something we want to avoid, as it undermines the illusion that this branch is solid and three dimensional.
-
I'm actually pretty pleased with the fact that you're not including too many ellipses, but don't be afraid to pop one more in there if the particular section of the branch you're trying to tackle is too complex for you to manage confidently in one stroke. Splitting it up essentially is the focus of this exercise, and sometimes it's worth doing (even though the more we split things up, the more we will tend towards stiffening up the overall branch).
-
Try and make your ellipses bigger - this is a spatial challenge, and cramping up with small branches and small cross-sections is definitely going to hinder you at this point. Get used to doing things at a larger scale, where you can engage your whole arm and give your brain more room to think and solve these spatial problems, then gradually start working smaller and smaller.
Moving onto your plant constructions, these are generally well done. You're not at all afraid of drawing each and every form in its entirety, which is great to see. You don't cut things off where they get overlapped, and instead demonstrate a pretty strong understanding of how the entire thing sits in space, and how all these forms relate to one another.
There are a few things that can help you continue to improve:
-
Keep pushing the sense of flow for your petal/leaf flow lines. You did a great job with the exercise, but with examples like the daisy, many of those flow lines ended up stiffening up a great deal.
-
Using a minor axis line to help align your ellipses in your mushrooms is a great move, and demonstrates a good grasp of that particular tool. That said, you seem to have used it only for the stem portion of the mushroom - you can actually extend it through the whole thing, and use it to align the ellipses of the cap as well.
-
Right now you're not using any line weight after the fact to help organize your linework. Since you're confidently drawing through your forms (which again, is very good), you do end up with some complicated results with a lot of overlapping lines. Going back over them after the fact with limited, confident strokes to reinforce the line weight and clarify specific overlaps can really help give a lot of life to your drawings. It's not required, but it does help a great deal and is eventually something you'll want to get used to.
-
The venus fly trap is really the only drawing that went awry, and it's definitely a lot weaker than the rest. I think this is because you treated its major masses as being flat, but then had to add the spines somehow, despite these things actually having volume to them. If you look closely at your reference image, you'll likely see that the top and bottom do actually have a degree of thickness to them, resulting in a sort of "rim" from which those little spines can arise. Capturing and conveying that additional thickness is important in order to give the spines some degree of grounding - without it, you end up with two entirely contradictory statements being made in your drawing - that the top and bottom are flat, but that the spines which are not, somehow connect to it. Contradictions in a drawing are just like contradictions in a lie - a few small ones will cause some damage, but if they accumulate, or if you make some big ones, they're going to undermine your whole story and people will stop believing in what you're telling them.
Anyway! Overall you've done a pretty great job, and the issues I've raised here can be practiced further both on your own, as well as in later lessons, as construction is a topic we'll continue to address from many different angles. I'll go ahead and mark this lesson as complete, so feel free to move onto lesson 4.
Uncomfortable in the post "Lesson 2: Contour Lines, Texture and Construction (Patreon Critique Thread)"
2019-07-07 18:23
So I'll address your pen concerns first. You're probably right that it is an issue with pressure - a lot of students will, early on, apply way too much pressure and this will damage their pen tips, which in turn can impede the flow of ink. It's good that you've identified this yourself, as it is indeed the main cause of tip wear. Additionally, using an overly toothy, rough paper can also be a problem, as it'll cause more friction and also soak up a lot more ink. Your paper doesn't seem to fall into that category, however, based on your photos.
You don't have to purposely try and make as little contact as possible to keep your pen healthy - just don't go out of your way to press into the page. Additionally, you are welcome to rest your hand gently against the page to help with your pen's stability, as explained here.
Moving onto your actual work, let's start with the arrows. You're doing a good job of decreasing the width of the arrows as they move farther back in space, although you do need to be a little more aware of the spacing between the zigzagging lengths of ribbon. Perspective applies here too, compressing the space in between those lengths and bringing them closer together and even causing them to overlap as they move farther away from the viewer. I demonstrate this here, and it helps a great deal to convey a sense of depth to your scene.
Moving onto your organic forms with contour ellipses, the ellipses are generally pretty well done. I can see a slight degree shift from ellipse to ellipse (although you should probably exaggerate this further), and you're generally doing a good job of keeping them snug between the edges of the form. They're also very smooth and evenly shape. One thing I did notice however is that the sausage forms themselves are a little off. In the beginning of this exercise, I explain that your sausage forms should be the equivalent of two equally sized spheres connected by a tube of consistent width. Yours tend to continue to widen slightly through the length of the form, and your ends tend to be more elongated, like the spherical ends have been stretched out somewhat.
Your contour curves are also looking solid, and are wrapping around the forms quite nicely.
All things considered, I do feel that your texture analyses are coming along quite well, and that you're moving in the direction of understanding how to shift from relying heavily on line to thinking more exclusively in terms of the shadows cast by the little forms that exist on the surface of our objects. Now, you're not there yet - you're still relying a lot on line, for example with the standstone bricks, but you are definitely moving in the right direction. I also noticed that parts of your old bark did get a little scratchy and scribbly - relying more on little bits of auto-pilot drawing rather than directly identifying the little textural forms that exist in your reference and determining what kind of shadows they'd specifically cast, but again - you're headed in the right direction. Keep at it.
I actually feel you're continuing to improve on this through the dissections, where you're relying even more on cast shadows, so that's great to see.
Your form intersections are generally looking pretty good, although some of your boxes seem to be a little exaggerated in their foreshortening, which throws the sense of scale and cohesiveness off a little. Try and keep the foreshortening here more shallow, so you can ensure the forms relate to one another a little more consistently. Your pages were also somewhat bare, so in the future make sure to fill in all the space you have access to on a page.
Lastly, your organic intersections are solid. You've got a good grasp of how these forms exist in 3D space, and how they sag and slump against one another in search of a state of equilibrium. You're not giving the impression that they're just flat cut-out shapes pasted on top of each other - they relate to one another in three dimensions in a believable fashion, so you're definitely pushing that illusion quite strongly.
Keep up the good work. You've got a few things to work on, but by and large you're doing quite well. I'll go ahead and mark this lesson as complete, so feel free to move onto lesson 3.
Uncomfortable in the post "Lesson 3: Applying Construction to Plants (Patreon Critique Thread)"
2019-07-07 18:02
Big improvement! Very well done, you're demonstrating a much clearer grasp of construction as a whole, so I'm very satisfied with your results. I'll go ahead and mark this lesson as complete, so feel free to move onto lesson 4.
Uncomfortable in the post "250 Cylinder Challenge (Patreon Critique Thread)"
2019-07-07 17:56
Very well done! You've demonstrated a great deal of improvement over the set, and a keen eye for identifying the various elements of your ellipses (such as the true minor axes and such).
Starting with your ellipses constructed around an arbitrary minor axis, I can see your alignments improving a great deal, and from the beginning, you're definitely able to look past the minor axis you were aiming to align to and actually identifying the correct axis for each individual ellipse. This allows you to get the most out of checking your mistakes, and it definitely pays off overall.
One thing I am noticing however is that the degree of your ellipses doesn't seem to shift much in many cases. On cylinders like 132, you've got a healthy shift, but in many others the degrees seem roughly the same across both ellipses. Remember that the far end needs to be at least a little wider than the near end, for the reasons explained here.
Moving onto your cylinders in boxes, you continue to do a pretty great job. Your ability of dropping those ellipses into their containing planes well improves consistently across the set, and as always your analyses after the fact continue to give you a solid grasp of the kinds of mistakes you're making. I can also see fewer and fewer boxes that are proportionally squished - so you're continually trending more towards cuboid/square boxes, and as a result pushing more towards properly circular cylinders. There are still a few that definitely get visibly squashed, but you're still applying all of the correct principles to drop your cylinders inside of them.
All in all, your cylinders are coming along great, and you're definitely demonstrating an even further increased level of comfort with your boxes, which will serve you well as you continue to move forwards. This is pretty remarkable, as you definitely chose the earliest point you could to do this challenge (I accept it anywhere between lesson 2 and lesson 6, though I generally encourage folks to do it on the later end). So! I'll go ahead and mark this challenge as complete. Keep up the great work, and head onto lesson 3.
Uncomfortable in the post "Lesson 3: Applying Construction to Plants (Patreon Critique Thread)"
2019-07-07 16:53
While you did end up restarting a chunk of it, overall the work shown here is quite well done. There are a couple little things I want to address, but by and large you're following the major concepts of the lessons quite effectively.
Starting with your arrows, they're flowing quite nicely through space. Don't forget that as an arrow moves farther back into space, not only will its width decrease with perspective, but the spacing between the zigzagging lengths will compress as well. You are demonstrating this in many cases, though there are a few where it could be exaggerated further to really sell the illusion of depth.
The strong sense of flow carries over quite nicely into your leaves, where I'm pleased to see that you're applying the basic constructional steps quite conscientiously. I'm not entirely sure why you went with that full-black one in the bottom right there, but for the others you definitely applied your detail well - focusing on it only once the basic construction was down, and following that construction closely rather than treating it as a suggestion or contradicting it.
When drawing those little veins, try and focus on the idea that you're not drawing them directly - you're capturing the shadows they cast, and implying the veins' presence instead. This means focusing on how you're not drawing lines - you're capturing shadow shapes, that will usually be heavier towards one side and lighter towards the other.
Overall your branches are coming along well, with only minimal issues in getting your segments to flow smoothly from one to the next. I did notice however that you tended to draw your ellipses quite small, resulting in very narrow branches across the board. At this point, I'd definitely encourage you to draw them larger - both to engage your shoulder more, and to give yourself more room to think through the spatial problems that are their construction. As you get more comfortable with doing it larger, you can then work on smaller ones - but starting out quite so small isn't ideal.
As for the few little fly-away tails of some of your segments, one thing that should help is making a point to use the previous segment as a 'runway' all the way from the previous ellipse as you draw the next one, being more intentional in overlapping the previous stroke so as to eliminate any such breaks.
Your actual constructions - aside from being kind of small and not occupying as much space as the page affords them - are generally pretty good. You're applying the constructional method to each and every leaf, drawing through all of your forms, and you're very patient and clear with your decisions.
I do however have a couple more things to point out:
-
As you push more into the realm of detail and texture with your drawings, I'm seeing a slight dip in the quality of your construction. This suggests to me that when you know you're going to advance into greater detail, that you think ahead to that, taking your focus away from the task at hand. For example, if we look at the leaves on this last page, your actual flow lines end up becoming quite stiff, and then you start skipping steps - adding ripples in the leaf's edges without first establishing how the overall footprint of the leaf follows the flow line.
-
When dealing with texture, remember that there is no such thing as line. Line is just a tool we use to differentiate forms and masses when applying construction, and it's very useful to that effect. But when you look at a reference and analyze a texture, you need to realize that lines don't really exist, and that the application of line as a tool here is not unlike using a hammer on a screw. Instead, focus on how every little line you think you see is actually the result of some small form resting atop the surface of your object casting a very narrow shadow onto the surfaces around it. I'm saying this specifically in regards to the lines you've added on the petals of the flower on the left of this page. Also referencing back to the previous point about getting sloppy when you know you're going into texture - you seem to have stopped drawing through all of your forms and petals here, instead only drawing them until they get overlapped by another form. Back to texture - this matter of line also applies to things like the cactus here where you've explicitly outlined every little node. This tells the viewer that you're drawing every little feature there is going to be, and anything you haven't drawn doesn't exist. Instead when we deal with shadow alone, we end up focusing ONLY on implying information, giving us the freedom to draw bits and pieces of some forms, and allowing the viewer's brain to fill the rest in. Same goes for the gravel near the base of the cactus - you don't need to draw ever single form, just focus on the shadows they cast without outlining anything.
You definitely have it in you to do a great job, but you're allowing the allure of detail to distract you. So I want you to draw three more pages of plant drawings. I want you to take each of these as far as you can with construction, and then move onto the next. Take photos of all of them in their construction phase. Once they're all done, go back and add detail and texture. Make sure you draw these things much larger - it's totally fine to give one whole page to a single plant drawing, just make sure you're not squeezing it into a fraction of the space you've got.
Uncomfortable in the post "Lesson 3: Applying Construction to Plants (Patreon Critique Thread)"
2019-07-07 16:11
I tried to open your album just to take a peek, but it threw a 404 error. I haven't actually reached your submission as far as critiques go, so you've got some time to fix it before it results in a bit of a delay.
Uncomfortable in the post "Lesson 2: Contour Lines, Texture and Construction (Patreon Critique Thread)"
2019-07-07 02:54
Starting with your arrows, they are flowing well across the page, but you need to push yourself to think more about all three dimensions of space. Specifically, make sure that you're both applying perspective to the arrow itself (making the width of the ribbon decrease as it moves further back in space, as you have done a few times but entirely consistently) and as importantly, make sure you're shrinking the actual space between the zigzagging lengths of ribbon as it moves farther back, as explained here.
Your organic forms with contour ellipses and contour curves are pretty well done. Your ellipses are smooth and evenly shaped while being quite accurate and fitting snugly between the edges of the form, and your contour curves wrap very nicely around the forms. Your actual forms in the contour lines section are definitely better however, as here you stick more closely to the definition of a sausage form as being two equally sized spheres connected by a tube of consistent width. Avoid any swelling of the sausage through its midsection, and also try and keep the ends as spherical as you can (rather than stretching their rounded portion out over a longer distance).
Your texture analyses are a really great start, and demonstrate remarkable patience and care with observation, and the fact that you're definitely grasping the importance of thinking in terms of the shadows cast by the little textural forms that exist along the surface of your object rather than restricting yourself by outlining everything. You're moving in the right direction, and while at times you're still a little afraid to leave lines out and focus entirely on shadow (like in the snakeskin texture), you're definitely pushing yourself out of that comfort zone. Keep it up. Same goes for your dissections.
Your form intersections are coming along quite nicely - you're demonstrating a good grasp of 3D space and the relationships between the forms themselves. A couple things however:
-
You seem to be relying on drawing things in with a lighter stroke - don't. Every mark should be drawn with equal confidence, without any attempts or efforts towards making some lighter than others. If you want to go back over it with line weight afterwards, make sure that's sticking to clarifying overlaps only, and limiting yourself to portions of existing lines rather than trying to replace entire strokes.
-
In the instructions, I mentioned that you should stay away from any forms that are stretched in any one dimension, sticking instead to those that are more equilateral (the same length in all three dimensions). You seem to have some longer cylinders here - not a huge issue but still something worth calling out as far as following the instructions go. The reason for this one is to avoid bringing additional foreshortening into the mix of an already challenging exercise.
Lastly, your organic intersections are coming along very nicely. You're doing a great job of conveying how these exist in 3D space as individual forms, rather than as flat shapes that have been pasted on top of one another. The drawing is quite believable, and gives a good sense of how they are sagging and slumping against one another as they attempt to find a state of equilibrium.
All in all you are definitely doing quite well. I'll go ahead and mark this lesson as complete, so feel free to move onto lesson 3.
Uncomfortable in the post "Lesson 1: Lines, Ellipses and Boxes (Patreon Critique Thread)"
2019-07-06 01:03
Just a quick bit of housekeeping - I noticed that your flairs aren't showing up on your username, so you likely have "Show my flair on this subreddit" unchecked (it's usually on the sidebar). Make sure it's checked, as we use your flairs to track whether or not you're eligible for private critiques, and which lessons you've completed.
Uncomfortable in the post "250 Box Challenge (Patreon Critique Thread)"
2019-07-05 21:43
Looks like you submitted your lesson 1 work a couple days ago! Don't forget that students must wait a full two weeks in between submissions (except for when specific revisions are requested). This is both to avoid situations where students get the work done ahead of time and then dump it all together, as well as to ensure that students have plenty of time to do the work without the impulse to rush.
So go ahead and hold onto this work and resubmit it no earlier than July 16th.
Oh, and I took a glance at your work and saw that you didn't actually apply any of the line extensions, so you may want to read the lesson page and watch the video again. Make sure you're following the instructions to the letter to make sure you get the most out of every exercise.
Uncomfortable in the post "Lesson 5: Drawing Animals (Patreon Critique Thread)"
2019-07-05 17:42
Very nice work! The giraffe's head is a rather rough but the rest shows a considerable improvement over your previous work, and a much better use of the various constructional techniques and concepts covered in the lesson. You're much more mindful of how the forms you're utilizing all interact with one another in space, and you do a pretty good job of combining them in ways that further maintain the illusion of solidity and three dimensionality. I'm also very pleased to see a distinct lack of arbitrary little "pseudo detail" lines (aside from where you added them along the giraffe's snout).
I am happily going to mark this lesson as complete. Looks like your next step is the cylinder challenge, as that is a prerequisite for lesson 6.
Uncomfortable in the post "Lesson 4: Applying Construction to Insects and Arachnids (Patreon Critique Thread)"
2019-07-05 17:39
Honestly, your work here is strong. You've done a great job, and while there are a couple things that I'd like to point out, you're generally demonstrating a good grasp of constructional drawing, and all the concepts covered in the lesson.
To start with, your organic forms with contour lines are generally coming along very well. Your first page, with the contour curves, do have some sloppy cases among them (areas where your curves slip outside of the silhouette of the form, where the curves aren't aligning correctly to the minor axis, etc.) but towards the right side of that page, things get much better. Furthermore, your second page, with the contour ellipses, is exceptionally well done. I have just one comment there - on the top right, you have a form that bulges through its midsection. That's something you'll want to avoid, as we want to keep our sausages as simple as possible. Construction relies on successive passes with the addition of more simple forms to build up levels of complexity, rather than simply increasing the complexity of the base forms.
Now, this is a concept your insect constructions convey very nicely. You're building things up bit by bit, and demonstrating a strong awareness of how these forms relate to one another in 3D space.
The area that I feel is perhaps weakest is how you approach drawing your legs. There are areas where you approach these rather well (like the louse demo), but there are a variety of others where there are issues.
Starting with the scorpion, you've very clearly applied the sausage method. What I am noticing however is that when you built up around them (like here), you did so in a manner that felt much flatter and more two dimensional, like a flat shape being added to the drawing, rather than a solid three dimensional form being added to the three dimensional construction. As a result, this flattened out the drawing.
There are a few reasons why it felt this way. Firstly, the form itself was more complex - it's larger towards one end, and narrower towards the other. What might have been more successful would have been actually adding a ball mass towards the far end of this section, and then blending it up with the rest of the form, rather than tackling it all at once. Another is that we can see a rather nicely drawn contour line towards the bottom, covering the joint and defining a clear relationship between forms - but this additional shape you added ends short of that. Having it extend all the way down to it would have allowed it to benefit from that contour line's reinforcing qualities.
In other insect constructions, you deviated from the sausage method altogether, choosing to pick your approach on a case-by-case basis. For now, I really do want to stress the importance of applying the sausage method consistently to all subject matter, largely because of how well it allows us to capture the gestural rhythm of a limb, while also maintaining its solidity purely by reinforcing the intersections with a single contour line right at the joint. This is actually something that you're skipping on occasion - remember that as explained in this diagram, that contour line at the joints is key. This sausage method will also be put into play in the next lesson, when we tackle animals.
I think this drawing was definitely your weakest, and stands out a great deal from the rest. I believe this is because you deviated from the general process you followed for the rest of these - you're not as mindful of the construction as a whole (building up complexity gradually rather than all at once), and you have a tendency to treat your forms more as though they are flat shapes. For example, you laid down the abdomen form, as a basic ball mass, but then drew directly on top of it as though you could simply replace what was essentially a solid form that already existed in the world.
The last thing I want to mention is that your use of texture is, for the most part, really coming along well. It's bold and you don't shy away from really heavy areas. You also pay clear attention to the fact that the marks you're putting down for texture are the shadows cast by the little textural forms along the object's surface, and you're free to merge them together as you please. This helps you to avoid creating unintentional focal areas, so you can continue guiding the viewer's eye as you please.
So! You do have some things to work on, but by and large you've done a great job. I'll go ahead and mark this lesson as complete, so feel free to move onto lesson 5.
Uncomfortable in the post "Lesson 1: Lines, Ellipses and Boxes (Patreon Critique Thread)"
2019-07-18 13:37
Assuming the hatching being on one of the faces oriented towards the viewer, your lines are indeed being extended in the right direction, which is one of the first things I look for. That said, you do have lines that are very clearly diverging as they move off into the distance - if not for that hatching, I'd assume the boxes were the other way around. This begs the question, are you placing the hatching on the correct side of the box?
Other concerns include:
Convergences need to be considered while we actually construct the box, not just after the fact. The error checking is intended to reveal the importance of those convergences, and where you're going wrong, so you can think about how to adjust your approach while drawing to correct those uncovered mistakes.
Are you applying the Y method discussed in the video and in the organic perspective exercise from lesson 1 when constructing your boxes? It embodies the focus on convergences, which is what this exercise as a whole is all about.