Lesson 1: Lines, Ellipses and Boxes
11:37 PM, Sunday July 12th 2020
Thanks in advance!

Hey there, I'll be looking through this.
Starting off with the first exercises focusing on markmaking, your work looks very nice. Your superimposed and ghosted lines show considerable accuracy and smoothness, much better than myself when I started (and probably even now, honestly).
Moving on to ellipses and planes, your ellipses are nicely tightened up and quite accurately hitting the borders as well. I would have liked to see a little more variation in the angles of your planes to practice fitting varying degrees of ellipses into them, but regardless you did a nice job fitting them in, same with the funnels exercise. Overall, really high-quality markmaking (marksmanship?)
Now the boxes. Nice job on the two-point perspective exercise and the one point perspective exercise, and particularly good job on the rotated boxes for a beginner. There are some symmetry issues, and the boxes don't quite rotate entirely 90 degrees, but the purpose of the exercise is to attempt it and you did quite a nice job for a first try. Now for the organic perspective: what I wanted to hone in on in the first place. First off, again, really solid linework. As for the construction of the boxes, although I'm sure you'll learn this all too well in the 250 box challenge, there seems to be some gaps in understanding with how you're foreshortening your boxes. A few notes to keep in mind moving forward:
1. Many lines that you should be foreshortening are perfectly parallel or even slightly diverging rather than converging towards a vanishing point. Remember that, in three-point perspective, the center vertex where the "Y" of your box connects to is the closest point to the viewer. Every other line should converge towards the vanishing point of those three lines pointing away from that center vertex making up the Y, backwards into space. Consider reviewing the homework directions for a visual of this, it's the third picture, below the video.

2. Although it looks like you got better at this by the last page, remember that the angles between the lines of the Y cannot be less than 90 degrees. If it is at 90 degrees, then either you should be looking nearly directly at one face of the box and, therefore, shouldn't be seeing the Y at all, or you're using orthographic/isometric perspective (a.k.a. no foreshortening at all, all of the lines are parallel), which obviously isn't the point of the exercise. So, the closer one of the center angles is to 90, the less of the other faces you should be seeing, and as such, the smaller they should be.
Of course, you will get a much better grasp of these things in the upcoming challenge, which you should be off to now, since I'm more than happy to mark this lesson as complete. Nice work.
Next Steps:
250 Box Challenge!
Thank you so much for your thorough critique. You're right about the organic perspective work - I had difficulty understanding how the boxes were situated in free space like that. But I tried it either way and it was frustrating to say the least. I'll definitely keep your pointers in mind as I take on the 250 box challenge.
I appreciate your thorough critique. You're spot on with the organic perspective work. I struggled with understanding how the boxes looked in the space like that and a lot of the time I was just winging it to make the boxes. I'll have to reread that section again and I'll definitely keep your pointers in mind going into the 250 box challenge. Thank you again!
My pleasure! Good luck with the boxes!
...(you'll need it)....
Nice, I would say that you need some work in landing your lines where they need to be. Take your time to adjust the page for your perfect stroke, make sure to use the ghosting method and dont forget to execute with confidence.
Next Steps:
I would reccomend you to do some planes with elipses and ghosted lines as a warm up each day. Other than that it is my opinion for you to move onto the 250 box challenge.
I see you've caught on that too lol.. I noticed that I struggle with slowing down and taking the time to think through my lines and rushed through the ghosting method. Thank you for the reminder and recommendations!
I guess you noticed that too lol.. I noticed that I had trouble taking my time to think through my lines and I would rush through the ghosting method. Thanks for the reminder and recommendations!

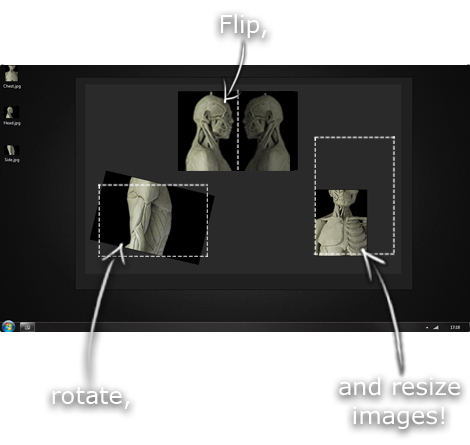
This is another one of those things that aren't sold through Amazon, so I don't get a commission on it - but it's just too good to leave out. PureRef is a fantastic piece of software that is both Windows and Mac compatible. It's used for collecting reference and compiling them into a moodboard. You can move them around freely, have them automatically arranged, zoom in/out and even scale/flip/rotate images as you please. If needed, you can also add little text notes.
When starting on a project, I'll often open it up and start dragging reference images off the internet onto the board. When I'm done, I'll save out a '.pur' file, which embeds all the images. They can get pretty big, but are way more convenient than hauling around folders full of separate images.
Did I mention you can get it for free? The developer allows you to pay whatever amount you want for it. They recommend $5, but they'll allow you to take it for nothing. Really though, with software this versatile and polished, you really should throw them a few bucks if you pick it up. It's more than worth it.
This website uses cookies. You can read more about what we do with them, read our privacy policy.