Lesson 6: Applying Construction to Everyday Objects

9:44 PM, Friday January 21st 2022

Drawabox Lesson 6: Applying Construction to Everyday Objects - Album on Imgur

Imgur: https://imgur.com/gallery/CfjQLdb

Discover topics like drawabox, and the magic of the internet at Imgur, a...

Hello again.

After another long break I finally managed to complete this lesson.

I found boxy objects to be a lot easier than cylindrical or especially irregular-shaped ones. While slightly distorted boxes usually look acceptable, in case of cylinders I think it's a lot harder to make them look good. I think 250 cylinders is not enough for me to be able to make them align properly on a minor axis. It would be good to have an undo button on mu pen.

0 users agree
4:03 AM, Tuesday January 25th 2022

Jumping right in with your form intersections, these are by and large coming along quite well. Not only are you constructing these forms such that they feel individually solid and consistent with one another within the same space, but you're also demonstrating a very well developing understanding of how these different forms relate to one another through the intersection lines. I'm seeing a fair bit of comfort not only with the simpler flat-on-flat intersections (like boxes intersecting with one another), but also a fair bit of growth with the much more difficult curved-on-curved (like cylinders and spheres).

One very minor point I did want to mention is that when it comes to adding line weight, try to focus it only on areas where overlaps occur between different forms. This way you can avoid having to trace back over long sections of line, and can focus it in those localized areas, making for more confident executions of those strokes (whereas tracing over things tends to become more hesitant). My go-to demonstration for this concept is two overlapping leaves - note how the line weight is concentrated in very specific areas.

Continuing onto your object constructions, while you did face down some challenges, by and large you've done a pretty decent job at addressing the core focus of the lesson - although I do believe I can suggest some things to keep you moving on the right track, especially for when you ultimately reach this lesson's big brother - lesson 7.

The core principle behind this lesson is the notion of 'precision'. Many people will conflate precision with accuracy, but they play different roles in the process of markmaking. When we apply the ghosting method (which of course should still be applied to every structural mark we freehand), the planning phase involves identifying first and foremost the specific nature of the mark we wish to make. In the case of a straight line, we place the start and end points. We can judge our accuracy by how close we came to executing a mark that falls between those points - but it is in having defined those points in the first place that increases the precision of our construction. That is, in knowing, and establishing our intentions beforehand. And at its core, that comes down to conscious choices that we make throughout the process, rather than skill.

At this point, I don't expect students to necessarily go whole-hog into making their drawings as precise as they reasonably could - that is ultimately achieved through a combination of extremely thorough orthographic studies to find out exactly where along the length of each dimension each element of a construction will sit, and then using subdivision to identify those same locations in the three dimensional version prior to actually constructing each form. All I hope to see is that students make a concerted effort to push in the direction of precisely determining these aspects of a fair bit of their constructions, at least for now.

Now that all said, there are some relatively easy cases where I think your precision can be expanded - or rather, where you perhaps took a bit more relaxed of an approach than you should have. For example, if you take a look at this bottle, I've highlighted in red some edges that are for all intents and purposes, imprecise. They're positioned arbitrarily, eyeballed/approximated, rather than positioned with specificity. Now there's two ways in which this could be remedied:

  • The overkill approach would be to find that an edge sits, say, 1/10th of the way into the bounding box's width, and thus subdivide until you can find 1/10th. This obviously is a bit obtuse as it's going to result in a ton of subdivision for a relatively minor element. Doesn't mean it's the wrong choice - if anything it's the most correct choice - but there's a middleground alternative.

  • Instead, you could approximate one side, then mirror it across the center of the plane using this technique from the notes, giving you at the very least an equal and symmetrical structure in 3D space.

The reason the second option is still far preferable to eyeballing both is that it reduces the amount of guesswork at play.

I should also call out the fact that you're working with a lot of arbitrary curves here, which as explained here is not likely to yield especially solid structures. It's better to first establish these structures using boxy forms and straight/flat edges/faces, then round them out towards the end.

Continuing on, there's just a couple other quick points I wanted to call out:

  • From what I can see, it looks like you actively made the decision not to use a ruler for all of your linework. You may have used it in some cases (although those might just be really well ghosted lines), but throughout the majority you opted to freehand quite a bit that simply did not require it. While I can understand that when it comes to ellipse guides, it may not be feasible to get one for the wide range of ellipses necessary in this lesson (for the 25 wheel challenge, a basic 'master ellipse template' will do fine despite its more limited sizes, and I highly recommend picking one up if possible), but a ruler or straight edge is ubiquitous enough that whenever a student neglects to use one here, it's likely out of choice. I must be clear - that is the wrong choice. I am not giving people permission to use a ruler out of kindness or softness of heart - it's because it eliminates something that otherwise pulls from their cognitive resources and makes them less likely to apply the lesson material as well as they could. If you're concerned with getting more practice in with your freehanded/ghosted lines, there are plenty of exercises that'll help you with that, which should already be part of your regular warmup routine.

  • Remember that as discussed in Lesson 2, form shading is not to play a role in our drawings throughout this course. You ended up applying it here.

  • It also appears that you may be working with more than one type of pen here - it looks like the bounding box/supporting construction/etc. may have been done with a ballpoint pen, but the later linework may have been drawn (or simply covered) with fineliner as a clean-up pass. I can't be completely sure - but for what it's worth, this approach is one I specifically warned against in the about your tools section, where permission to use ballpoint is mentioned.

While there are definitely things that could have been done better, you do have a number of constructions that were handled especially well. For example, this car key, simple as it is, is quite well broken down and demonstrates a lot of precision. I felt this table/bench was also handled quite well.

So, while I do wish you'd have worked with a ruler at the very least, I am going to go ahead and mark this lesson as complete. Just be sure not to make choices that actively make the work more difficult in the future - it's not beneficial, it merely puts more on your plate and makes it more difficult to absorb what you're meant to.

Next Steps:

Move onto the 25 wheel challenge.

This critique marks this lesson as complete.
9:50 AM, Tuesday January 25th 2022

Thanks a lot for the feedback.

I could definetly use more construction-based approach when drawing the ketchup bottle. That's true that I eyeballed all of its curvature and was not happy with the overall result, but overall I'm glad I tried to do it this way and saw why it was not the correct choice.

Regarding nose spray bottle I simply forgot about "no form shading" rule when I started doing it. After I remembered it I decided it's already too late and decided to apply it to the whole drawing for consistency.

I used ruler for some drawings, but I had problems controlling line weight when drawing with it and decided to not use it for some of the drawings. Lines would ususally be super thick or doesn't show at all. Maybe it's because my pen was running dry. Maybe that's the reason you thought I used ballpoint pen for some of the lines.

I already tried to do some wheels for the next challange and the results were... not satisfying to put it mildly. I'll go look for an ellipse guide.

Thanks again and see you later!

The recommendation below is an advertisement. Most of the links here are part of Amazon's affiliate program (unless otherwise stated), which helps support this website. It's also more than that - it's a hand-picked recommendation of something I've used myself. If you're interested, here is a full list.
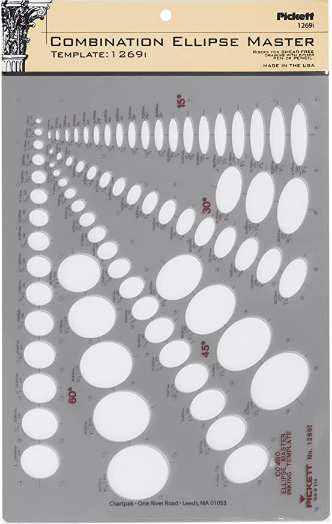
Ellipse Master Template

Ellipse Master Template

This recommendation is really just for those of you who've reached lesson 6 and onwards.

I haven't found the actual brand you buy to matter much, so you may want to shop around. This one is a "master" template, which will give you a broad range of ellipse degrees and sizes (this one ranges between 0.25 inches and 1.5 inches), and is a good place to start. You may end up finding that this range limits the kinds of ellipses you draw, forcing you to work within those bounds, but it may still be worth it as full sets of ellipse guides can run you quite a bit more, simply due to the sizes and degrees that need to be covered.

No matter which brand of ellipse guide you decide to pick up, make sure they have little markings for the minor axes.

This website uses cookies. You can read more about what we do with them, read our privacy policy.