


This website uses cookies. You can read more about what we do with them, read our privacy policy.
0 users agree
10:03 PM, Friday December 3rd 2021
Starting with your arrows, there are two main things I look for here: the confidence/fluidity with which the edges of the arrows have been drawn, and the correct use of foreshortening, specifically so that the gaps between the zigzagging sections steadily get smaller/tighter as we look farther back in space.
When it comes to the first point, your work is getting there, although there is still definitely some hesitation behind the execution of some of your marks, which causes them to waver a little. While it's not prominent, it is enough to undermine the fluidity with which the arrow itself appears to move through the world. For the second point - compressing the space between the zigzagging sections - that is also an area you're making some progress with (I can definitely see you attempting to apply it across most of these), though it can definitely be pushed further and exaggerated more. Also, with this one, I noticed that you put hatching on the wrong sections, which made it appear as though the arrow was actually getting smaller as it moved towards the viewer - but I expect that was a simple mistake.
Continuing onto your leaves, what immediately jumps out at me is the fact that you've covered what constitutes perhaps less than half of the page. What I'm seeing here is that you appear to be focusing more on the general idea of "get this exercise done" rather than "focus on benefiting as much as I can from the assigned quantity of work", and that never really goes well. Remember - while students of this course are not expected to produce perfect work, or even good work, they have one responsibility to meet: you must invest as much time so as to present the best of your current ability, and that is certainly not being done here.
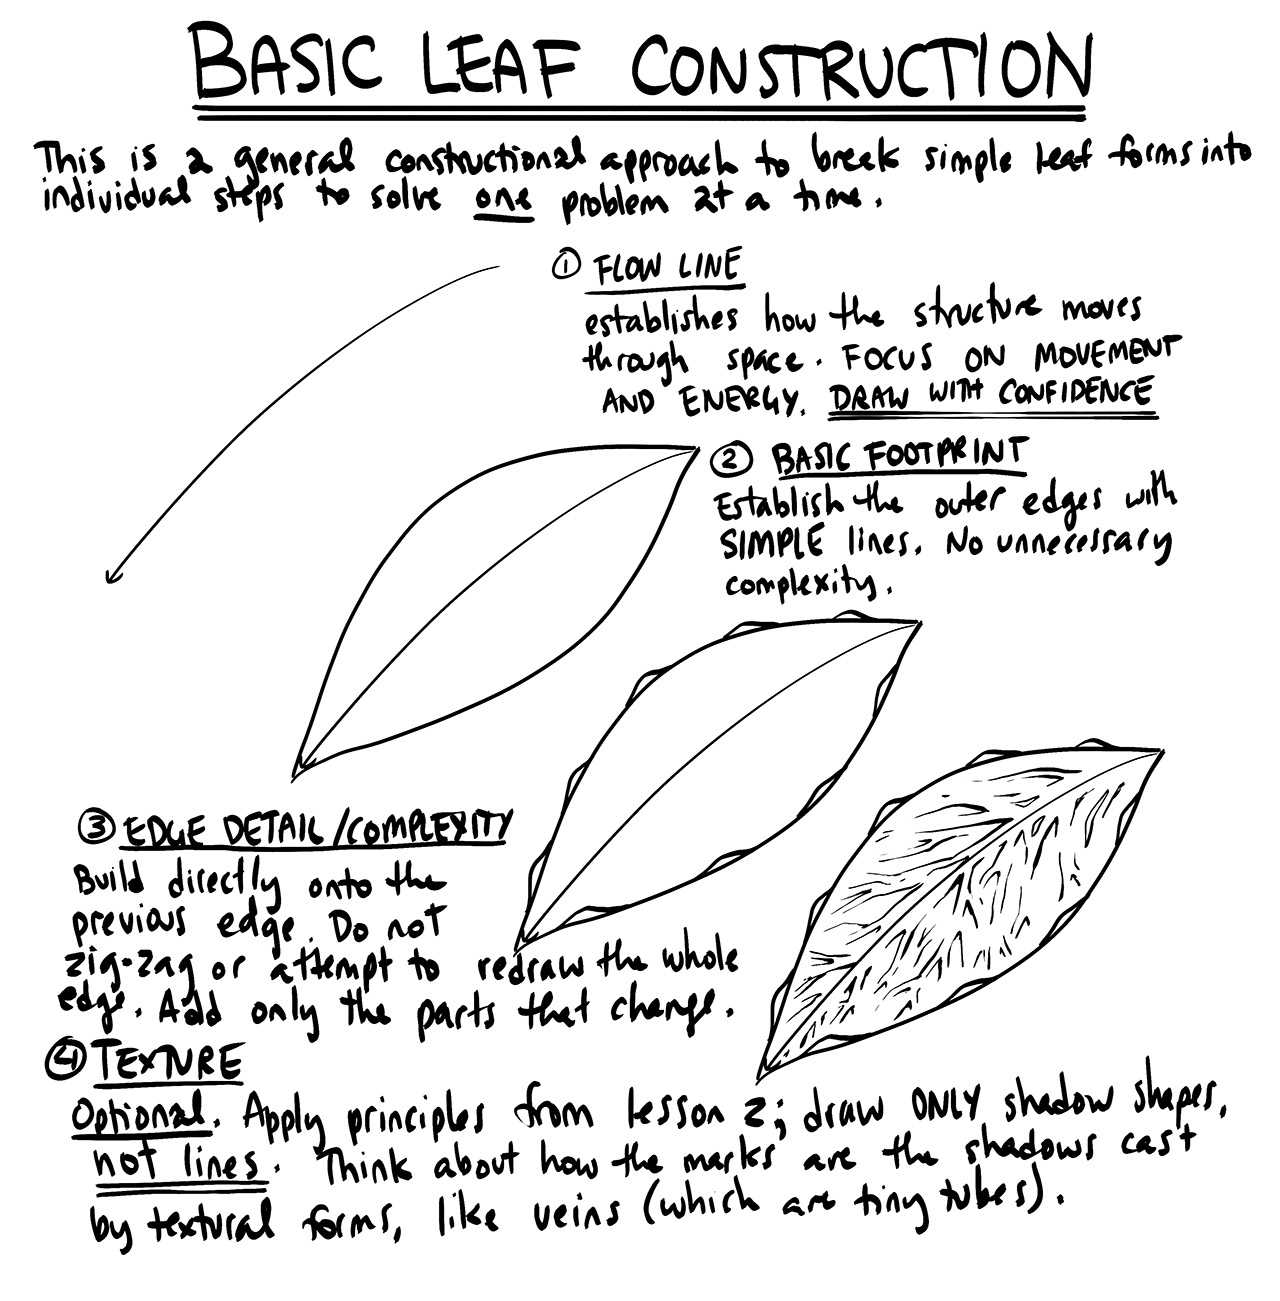
Similarly to the arrows, there's definitely hesitation behind your execution of that initial flow line, causing it to carry less of an impression of movement, and stiffening the resulting leaves. One thing I find helps with this is to draw that flow line with a little arrow head at its tip (you'll actually see an example of this right on the leaves exercise diagram. This can help remind us of the fact that the flow line is meant to represent an actual path of motion through the 3D world. In this, it is an incredibly important step, defining not just how our leaf sits statically in the world, but also how it moves through the space it occupies.
Fortunately, in the couple of spots where you have built up further edge detail, you do appear to mostly be doing so correctly, although you really should have explored this more than three or four times. Step 3 (where we add edge detail) is not an optional step, so it should have been applied to each of your leaves.
Before we move on from this exercise, I do want to mention one last thing. Here, and as we move on into the branches exercise, I'm noticing that you're drawing each of these individual objects quite small on the page. There's actually a lot of benefit to drawing things larger, and really giving them as much room as they individually require. When we limit how much space we give our drawings, we can withhold the space our brains require to think through spatial problems effectively, and we can also make it a lot harder to engage our whole arm while drawing. This, in turn, can result in precisely the kind of stiffness/rigidity we're encountering here. So along with adding that arrow head at the tip of each flow line, be sure to also give each leaf a little more space. This should also make it a little easier for you to fill the whole page without large areas of blank space.
Continuing onto the branches exercise, I have similar concerns about the confidence of your markmaking, and the size of each attempt, but you are adhering to most of the steps of this exercise fairly well. There are just a couple things to keep an eye on:
-
Remember that as explained here, each segment should extend fully halfway to the next ellipse. There are a lot of cases where you're falling short on this, which limits the overlap between the segments and hinders achieving a smoother, more seamless transition from one to the next.
-
Also, make sure that when you draw the ellipses, that you consider how their individual degree conveys the orientation of that circular cross-section in space. This is something we discuss back in Lesson 1's ellipses video](https://drawabox.com/lesson/1/5/video), but the gist is that as you slide along the length of the branch, moving away from the viewer, the contour ellipses should be getting wider.
Aside from those points, similarly to the leaves - draw bigger, and make better use of the space on the page. Don't prioritize doing enough to consider the page finished - prioritize getting as much out of the page as you can.
Moving onto your plant constructions, your results here are somewhat mixed. As far as the core principles of construction go, you're making good progress in following the idea of starting simple and building up to greater complexity - although there are a lot of cases here where you don't really push that far into a given construction, and seem to stop early.
This is especially true of when you follow along with some of the demonstrations - the potato plant, for example. Here there are a couple of major issues:
-
From what I can see, you may have rushed in a little too quickly, not spending enough time observing the individual steps listed in the demonstration. Now, I totally get that this particular plant has a lot going on, and it can definitely be overwhelming to draw on one's own - but that's why the demonstration breaks it down into steps. Instead of having the student process all the information present in the reference image themselves, we do all that processing for you, and simply have you patiently and carefully follow the steps that are laid out, so you can get a sense of how construction works as an exercise. It definitely seems that you may have severely underestimated how much time would be required of you to follow each step carefully, and so you ended up deviating from the demonstration quite a bit.
-
Given that deviation from the steps, you don't seem to have made too much of an effort in pushing that demonstration all the way to its end. Perhaps you thought it was a lost cause, because of how the decreased observation earlier in the process pushed you far off the tracks, but you certainly still could have tried to apply the subsequent steps with what you had - especially when it comes to finishing off your clusters of leaves, and having them cast shadows upon one another in order to better establish how they relate to one another in 3D space. Either way, here you definitely stop way too early, and I definitely wouldn't consider this drawing complete. In a similar fashion, it looks like this mushroom drawing seemed to hit some arbitrary point where you decided you were done. This begs the question - how are you deciding when you're finished?
The daisy drawing was definitely better in this regard. For the most part it does look like you were following along with the daisy demo, and that you were definitely taking more time to observe each individual step and apply it to the page - though weirdly its direction appears to be a reflection of what is shown in the demo. Either way, this drawing, and your approach to construction here, is solid. You're also generally taking more care with your individual marks here than you do in some of your other drawings.
Now, I can certainly talk about individual, specific issues in your drawings, but I don't think that's particularly helpful. Instead, it makes more sense to summarize the core issues I'm seeing across your set:
-
You need to take more time in the execution of each, individual mark. Use the ghosting method (that is, putting time into the planning and preparation phases of each mark, rather than executing your marks slowly and hesitantly).
-
You need to spend a lot more time observing your reference images - whether you're following along with a demonstration (in which case it's a matter of observing each step more carefully) or working from reference. Do not work from memory - always go back to your reference frequently in order to identify the next, specific form you need to add to your construction. This will also help you identify further levels of structural complexity that are present in your drawing. Construction isn't just about drawing our objects in their simplest state - it's about building upon that, bit by bit, and in order to find those later phases of construction, you need to pay a lot of attention to your reference.
-
Draw bigger. Your later drawings are definitely better at this, but earlier on you're definitely limiting yourself to drawing things in a more cramped fashion, which actually makes things harder for you.
I'm going to assign some revisions below, so you can apply what I've mentioned here. A lot of it is going to be on those earlier exercises, where I do not really feel like you filled the pages adequately enough to consider the exercises complete.
Next Steps:
Please submit the following:
-
1 page of arrows
-
1 page of leaves
-
1 page of branches
-
3 pages of plant constructions
10:17 AM, Tuesday December 28th 2021
Here is my revision on lesson 3
6:10 PM, Wednesday December 29th 2021
Solid work overall! As a whole you're doing a fair bit better with the issues I called out, though I did notice two things for you to keep an eye on:
-
As seen here in your hibiscus, you appear to be drawing your edge detail with a continuous stroke covering more than just one individual bump. This can lead to issues as seen here where you zigzag back and forth. Even if you are constructing each bump as a separate stroke, try to avoid having the overall path go back and forth like this - try to keep everything more grounded, with a tighter relationship to the previous edge.
-
You're making great progress with your branches, although remember to shift the ellipses' degrees to better reflect the orientation of each ellipse in 3D space, and also try to overlap the last chunk of the previous segment more directly rather than drawing your next segment where the previous one ought to have been. By dealing with any little mistakes directly, your control will develop more effectively, even if this makes things a little more challenging.
Anyway, I'll go ahead and mark this lesson as complete.
Next Steps:
Move onto lesson 4.
The recommendation below is an advertisement. Most of the links here are part of Amazon's affiliate program (unless otherwise stated), which helps support this website. It's also more than that - it's a hand-picked recommendation of something I've used myself. If you're interested, here is a full list.

Sakura Pigma Microns
A lot of my students use these. The last time I used them was when I was in high school, and at the time I felt that they dried out pretty quickly, though I may have simply been mishandling them. As with all pens, make sure you're capping them when they're not in use, and try not to apply too much pressure. You really only need to be touching the page, not mashing your pen into it.
In terms of line weight, the sizes are pretty weird. 08 corresponds to 0.5mm, which is what I recommend for the drawabox lessons, whereas 05 corresponds to 0.45mm, which is pretty close and can also be used.