250 Cylinder Challenge
5:54 PM, Saturday April 18th 2020
Hello,
Here is my lesson https://imgur.com/a/3tu4wKb
I've learned a lot from this. I will incorporate this in my daily warm up.
Have a wonderful day!

Hello,
Here is my lesson https://imgur.com/a/3tu4wKb
I've learned a lot from this. I will incorporate this in my daily warm up.
Have a wonderful day!
Your work here is largely well done. You've done a good job of being thorough in your application of the various correction methods in order to learn from your mistakes from page to page, and to improve upon them. There are a couple things I want to point out however that should help you as you continue to incorporate this exercise into your regular warmups.
One thing that I don't think you picked upon was how in your cylinders around an arbitrary minor axis' foreshortening impacts both the shift in scale from one end to the other, as well as the shift in degree. For the most part, you're applying the standard rules of degree-shift correctly - that is, the farther end of a cylinder is always wider than the closer end. This shift is related to the fact that as the far end of the cylinder gets further away, it shrinks in overall scale. But what many students tend not to pick up on (though I prefer giving them the opportunity to identify this themselves) is that these two 'shifts' are tied to one another.
To put it simply, if the far end of the cylinder is dramatically smaller than the closer end, then that far end should also have a considerably wider degree. If the far end is closer in scale to the near end, however, then the degree shouldn't shift very much. There will still be a slight shift in both of these aspects, but they're going to change consistently with one another. So, if you look at cylinder #8, you'll notice that the degree of the ellipses are prety similar, but the scale is considerably different. This is why you might think that this cylinder looks a little strange - because the scale is telling us that the cylinder has dramatic foreshortening (and is therefore probably very big overall), but the degrees of either end tells us the cylinder has shallow foreshortening (and is therefore pretty small overall).
There are some others that stand out like this, though aren't as obvious - 74 and 76 for instance have much larger degree shifts than scale shifts. I suspect that you were in the midst of understanding this more and more out of the intuition that was being developed just from drawing so many cylinders, but you were a little ways off from understanding the specific mechanics behind it.
Moving onto your cylinders in boxes, you've done a pretty good job with these and have shown a great deal of improvement. While you may not expect it, this exercise is actually more about teaching you to draw boxes that have faces which are proportionally square, than it is about drawing cylinders. The boxes we draw from the beginning aren't cubes - there's no restrictions to their cubes, and the corrections we'd apply to them with the line extensions only determined whether the sets of lines were parallel to one another. The additional corrections we apply with the cylinders (identifying the minor axis, the contact points, etc.) allows us to take this further and to determine whether or not the ellipse that sits within a given face is in fact a circle in 3D space. If it is, then the plane that encloses it is a square. As you gradually got better and better at drawing boxes that would make those extensions more and more consistent, the better you got at constructing boxes that had pairs of faces that were squares in 3D space (or closer to being square at least). And to that end, I think you've definitely shown a great deal of improvement.
So! Congratulations on completing the challenge. Keep up the great work.
Next Steps:
Feel free to move onto lesson 6.
Thank you for the critique!
I'm going to start working on lesson 6 now.
Have a wonderful day!

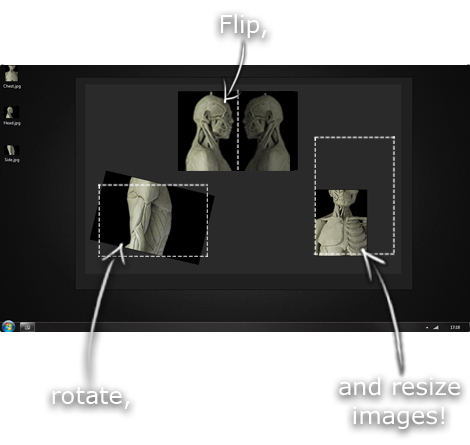
This is another one of those things that aren't sold through Amazon, so I don't get a commission on it - but it's just too good to leave out. PureRef is a fantastic piece of software that is both Windows and Mac compatible. It's used for collecting reference and compiling them into a moodboard. You can move them around freely, have them automatically arranged, zoom in/out and even scale/flip/rotate images as you please. If needed, you can also add little text notes.
When starting on a project, I'll often open it up and start dragging reference images off the internet onto the board. When I'm done, I'll save out a '.pur' file, which embeds all the images. They can get pretty big, but are way more convenient than hauling around folders full of separate images.
Did I mention you can get it for free? The developer allows you to pay whatever amount you want for it. They recommend $5, but they'll allow you to take it for nothing. Really though, with software this versatile and polished, you really should throw them a few bucks if you pick it up. It's more than worth it.
This website uses cookies. You can read more about what we do with them, read our privacy policy.