


Lesson 3: Applying Construction to Plants
1:54 PM, Thursday November 10th 2022

Starting to get some DOUBTS as I am moving on the other lessons whether they are related to my real goal
Hey Himanknyx, here's my critique.
Considering the lessons that differ from your goals, Drawabox has been structured in such a way that the lessons build upon and complement each other. Although someone wants to draw, for example, cars (lesson 7), they will still benefit from practicing on plants. And someone who likes plants will benefit from the rigorous training on cars. I hope this helps you make a good decision. Just wanted to point out that the lessons aren't random.
Organic Arrows
Your arrows look really good. They are very three dimensional and taper properly. Well done! The only thing you didn’t do was add a little shading to the overlaps, but that’s fine as I can clearly see you understand this exercise.
Leaves
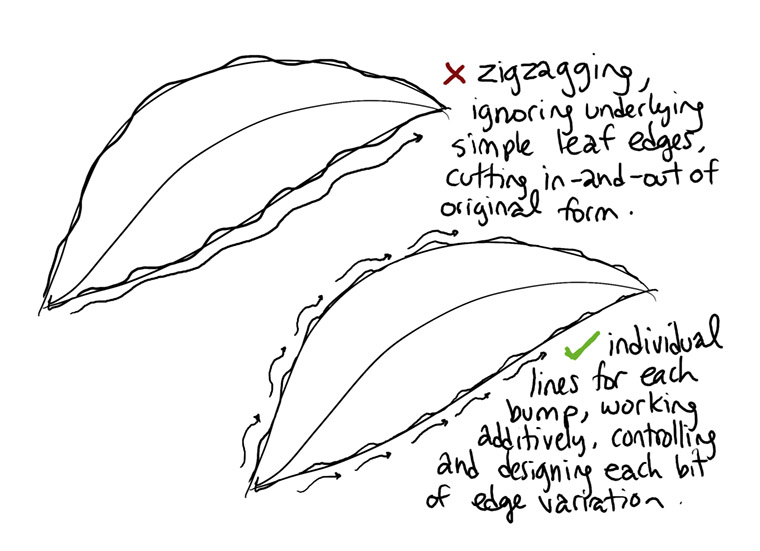
The lines are confident and flowing, and you are doing your best to fold the leaves naturally. There are some that fold in a strange way (the large one on the left). I see you attempted to texturize one leaf and cut it in and out of form. It seems you didn’t use reference much, but good job overall.
Branches
Again, all your lines are confident, and the ellipses have been drawn through 2 times and aligned to the minor axis. Great! You did well connecting the ellipses into a branch, there are very few stroke “tails” and everything looks pretty neat.
There are 2 things I must point out: you didn’t change the degrees of the ellipses, and you didn’t draw a full ellipse for the first branch (you have an arc). Changing the degrees is very important because it essentially describes the 3D forms we are drawing – having all the same degrees usually makes a strange, orthographic drawing.
Plants
Comfrey and manuka – it looks to me as if you used a single large stroke for comfrey, and started texturizing but quit? It would’ve been easier if you had drawn more guiding ellipses for the stem like in the branches exercise. The leaves are drawn well, with the same mistake repeated from the above exercise – you cut in and out of the forms. The rest seems fine.
Umbrella plant – I don’t have your reference, but from what I’ve found, the leaves start a bit later, not in the middle, starting them in the middle makes your plant look more like clover. Also, I am not sure what the round shape is?
Fawn flower – this one is much better, but you didn’t use what you’ve learned in the branches exercise again.
Slippery elm and juniper berrier – these are better considering the stems/branches and leaves (except the cutting in and out of the form of the leaves). The textures on the right are much better – you used shadows. On the left side you mainly used outlines which should be avoided in Drawabox.
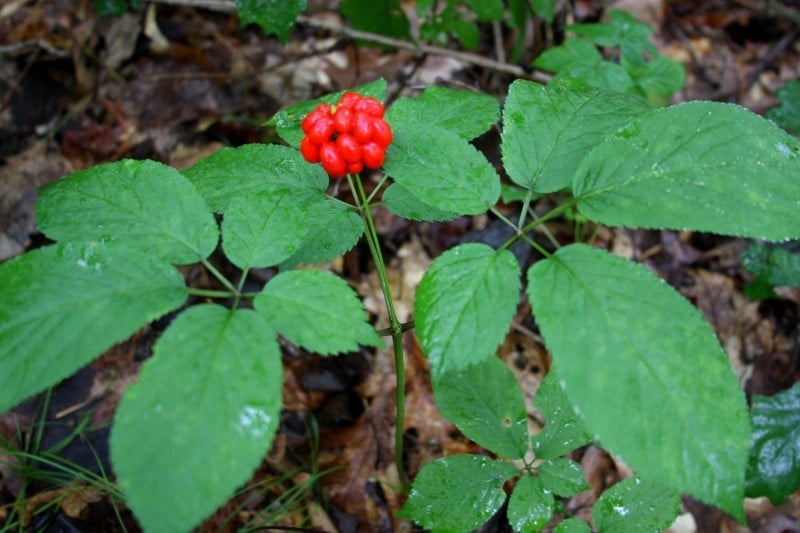
Ficus lyrata and ginseng – again, branches are good, and I’m glad that you draw through your ellipses. I don’t know your ginseng reference, but I think it might look a bit stiff, and ginseng’s leaves branch from a single point: see their 5-headed fork?
Aloe vera, ivy, rubber, cactus – nice work with using the branches exercise on aloe vera, and I like how you simplified your cactus. You can try choosing a focus point for the texture so you don’t have to do it all over the plant, just a part – much like in the Dissections exercise from lesson 2.
Mallow, cane, monstera – great job with the leaves of monstera – you cut only into the forms, this is what I wanted to see in the other plant drawings. Same for the common mallow – the leaves look good. I am not sure what the extra arrows are, though.
Clematis page – nice job here. You used your knowledge well. I can see progress and applications of the branches, leaves, and texture exercises which is really good.
Peace lily page – this looks fine, ignoring the arrows (?), but the texture of the lily isn’t really wrapping around, it looks a bit random.
Overall, I think you did quite well.
Next Steps:
You can move on to lesson 3!
I highly recommend drawing a few complex leaves and avoiding zigzagging their edge detail before that, but I have seen you do it right a couple of times, so I'm letting you move on without official revisions.
If you like, you can reply with your new leaves drawing here, I will look at it :)
I meant lesson 4* haha
Thank you soo much for your valuable critique,
If I understand correctly, where you are giving your opinion on my doubts, every lessons which I learn (both inside and outside the drawabox) that are applicable to any drawing topic, will be of help in my real goal related to art, like if I learned a technique of drawing, say cars or plants, I might be able to apply those techniques in some way or other, where all other techniques might fall!!!
I actually got shocked where I saw to do lesson 3 again lol!
actually I have already moved on and started doing the cylinder challenge (since i uploaded this plant lesson a long time ago) , but I don't have any objection on drawing some leaves,
I don't fully know what do you mean by "draw complex leaves" so it would be of great help if you could provide me some references and I can draw from it (NO HATE)
Thanks for your time once again!!
Hey! You're welcome :)
Yep, everything you learn about drawing can be applied to new things! That's what I meant when I mentioned the structure of Drawabox.
This doesn't mean you should do absolutely everything, but learning to draw some things unrelated to your goal can be very helpful, as you said.
By complex leaves, I meant something like the umbrella plant above, maybe maple, or oak, so you can practice designing the forms and compounding leaves like this.
I am so glad you came back, even after starting the cylinder challenge - it shows your dedication. Keep up the good work! Cheers!
Sorry!sorry! It took time more than I expected. Got so messed up in cylinder challenge that I forgor about it!
https://drive.google.com/drive/folders/1vPqF8feyAXjMR27TzSsq6dMsABHX_Inm
I have also attached the umbrella plant reference.
Along with it , the required homework. As it has time more than I expected, I continued to draw from your provided reference rather than doing my own study.
I hope you will continue to critique this one and the following lessons!! If you see mistakes in this work, please fell free to tell me. Like the oak's top is more even and it's bottom has more straight cut rather than inward curve.
I also tried to do some texture but felt that I was going a bit too far and crazy
If there is a need to do some more or of other type of the work , I will try my best to complete it in the best time!!

This recommendation is really just for those of you who've reached lesson 6 and onwards.
I haven't found the actual brand you buy to matter much, so you may want to shop around. This one is a "master" template, which will give you a broad range of ellipse degrees and sizes (this one ranges between 0.25 inches and 1.5 inches), and is a good place to start. You may end up finding that this range limits the kinds of ellipses you draw, forcing you to work within those bounds, but it may still be worth it as full sets of ellipse guides can run you quite a bit more, simply due to the sizes and degrees that need to be covered.
No matter which brand of ellipse guide you decide to pick up, make sure they have little markings for the minor axes.
This website uses cookies. You can read more about what we do with them, read our privacy policy.


