Lesson 3: Applying Construction to Plants

9:44 PM, Wednesday September 9th 2020

Drawabox hw3 - Album on Imgur

Direct Link: https://i.imgur.com/CmBXBME.jpg

Discover the magic of the internet at Imgur, a community powered enterta...

I Found this group of assignments to be some of the most difficult so far.

For the palm tree, I was unsure how to get across the individual little parts of the leaf and in the end I feel like I did more scribbling than actual detail.

0 users agree
9:56 PM, Thursday September 10th 2020

Starting with your arrows, these are certainly flowing fairly well through space, and conveying a good sense of confidence and fluidity in how they move. This carries over quite nicely into your leaves exercise, where you've captured not only how those leaves sit in space, but also how they move through the space they occupy from moment to moment. I'm also pleased to see that you're building further edge complexity directly onto the previous phase of construction, adding wavy edges bump by bump rather than attempting to redraw the entirety of an edge with a continuous zigzagging stroke. That shows a clear awareness of the principles behind the constructional method.

One issue I did notice though was that your contour lines do need a little bit more control - you have a tendency to overshoot past the silhouette of the leaf. Applying the ghosting method (as should be done with all marks) and getting into the habit of lifting your pen when it hits its intended end rather than slowing to a stop will usually help with this kind of issue.

Also, there admittedly was a fair bit of empty space left on the page that could have fit at least a couple additional leaves - make sure you're taking full advantage of the opportunities to practice that are afforded to you.

Moving onto the branches exercise, it seems to me you may not have fully understood the steps of the technique. You'll note in this demonstration of the steps, we are to draw our first segment from the first ellipse, past the second and halfway to the third. Then we draw the second segment from the second ellipse, past the third and halfway to the fourth. This results in a significant overlap between the two segments, allowing them to transition smoothly and seamlessly from one to the next. You instead appear to have tried to start the second segment where the first ended, or roughly around there, resulting in little to no overlap, and a much more halting transition from one to the next.

Continuing onto your plant constructions, I can certainly see the core principles of construction being adhered to and followed throughout the set, but I really can't shake the sense that you're not nearly putting as much time or effort into each drawing as you can. I say this for the simple reason that a number of these drawings appear to be half finished.

The best examples of this are where you follow along with the demonstrations - the hibiscus, the potato plant, etc. You stop at an arbitrary point and don't follow through the remaining steps. Now, I have one theory as to why this might be the case. It is not uncommon for students to feel that they are expected to complete a given drawing within the time available to them in a single sitting. This is an artificial limitation, of course - you are by no means restricted in that way. You can work on a single drawing through as many sittings and days as you wish. All that matters is that every aspect of the drawing - every line, every shape - is executed to the best of your current ability.

This also relates to the matter explained in the notes for the ghosted planes, where we have a tendency to look at the components of a drawing as being some percentage of the overall drawing, and allocating our effort accordingly. If our drawing consists of six lines, then we might put a fair bit of time and effort into each individual stroke. If our drawing consists of a hundred lines however, we may care a lot less about the individual line. This of course is the wrong way to look at it, but it is often how we start out looking at the distribution of our efforts. Again - every single mark you draw must be executed with your full focus and attention, regardless of what proportion of the overall drawing it constitutes.

Arguably the only drawing I would consider to meet that criteria would be this one. It's certainly not perfect, but as a whole it does demonstrate a solid use of construction, and while the large ellipses at the mouth of the bowl are quite loose, this is understandable due to ellipses of that size being hard. Of course, make sure you're executing those from your shoulder, and using the ghosting method.

Loose ellipses aside, you clearly made an attempt to capture more of the complexity of the bowl - giving its rim a thickness, for example, which is often overlooked.

That's not to say there aren't other issues:

  • When drawing a form that is made up of a series of ellipses, it helps to construct it around a central minor axis line, as this will help keep those ellipses aligned to one another.

  • The individual leaves appear to have wavy edges. I'm not sure if that's intentional or if it's from hesitation when executing the marks. If they're intentional, then they would require you to first establish a simpler leaf shape, then to build those waves on top of it as you did in the leaves exercise.

  • The pebbles inside the bowl constitute a texture, but don't actually leverage the concepts covered from lesson 2's texture section. That is, instead of outlining each individual rock, it would have been far better to focus only on the shadow shapes cast by each individual form on its neighbouring rocks.

As to that palm tree, one thing to keep in mind is that you are rarely going to be in a situation where drawing a line that exists on its own to represent some object is the correct course of action. Every object is a form, and so it should be captured as such, with an enclosed outline. With the palm leaves themselves, they are made up of a lot of smaller leaves following the path of this larger leaf-like structure, coming off its spine and extending out to its edges. It's basically just like this structure, just with many more individual leaves. Now, you can choose to construct it that way (you don't have to construct every last little leaf, you can focus on larger ones), or you can instead choose to draw one big simple leaf, and then to cut back into the silhouette of its flat surface.

Now, I've laid out a number of things for you to work on, so I'm going to go ahead and assign some additional pages for you to work on. Take your time, be patient, and acknowledge your desire to work quickly in order to get it under control. You are not being held to any deadline or timeline - you will spend as much time as is needed to do everything to the best of your ability so that the critiques I give you are actually relevant and useful.

Next Steps:

Please complete the following:

  • 1 page of leaves

  • 1 page of branches

  • 4 pages of plant drawings

When finished, reply to this critique with your revisions.
6:57 PM, Tuesday September 15th 2020

I am currently touching up the drawings for submission, and I decided to focus soley on construction and to do the details for each drawing last after everything has been completed. How vital is it to apply details and textures to the plant drawing assignments? I ask this because one of the drawings I did was of an orange branch and I am currently trying to get the texture of the orange down but I am finding it exceedingly difficult. I just don't know If I should continue putting my efforts into getting the texture of this orange right or If I should put more effort into putting details in places where I can do so more reliably, like leaves. Picture attached. https://cdn.discordapp.com/attachments/439236683150524439/755502128964829204/orange-branch-12808538.jpg

7:59 PM, Tuesday September 15th 2020

Texture and detail is not a major focus of this course. We introduce it because students have pushed for that, but at its core Drawabox focuses on construction and spatial reasoning above all else. So keep that in mind when you decide how to spend your time. There are even plenty of instances where I've asked people to specifically avoid all details/texture as part of their revisions if I feel they're being too distracted by them, to the detriment of their constructions.

10:02 PM, Wednesday September 16th 2020
edited at 10:04 PM, Sep 16th 2020

Here are my revisions. https://imgur.com/a/2hgKFBu

And here are my references if they are of any importance. https://imgur.com/a/1RCapot

I feel that your comment saying I rushed through the plant drawings is 100% true, as I am the type of individual to rush my work, no matter what it is. I have tried my best to pace myself and to slowdown, although I feel like the orange branch drawing was a bit rushed, although everything else was taken slower and I feel that because of it the quality of work for those drawings increased.

I have attempted to improve on all your other points, although some lines still end up a little shaky. My final note, for the Lily drawing, I went over the lines again to add a little weight to them, but I feel that it resulted in a more wobbly and shaky line, compared to what I originally put down. I have left one petal on the lily untouched, to give an idea of how my linework was before I went over it again.

edited at 10:04 PM, Sep 16th 2020
View more comments in this thread
The recommendation below is an advertisement. Most of the links here are part of Amazon's affiliate program (unless otherwise stated), which helps support this website. It's also more than that - it's a hand-picked recommendation of something I've used myself. If you're interested, here is a full list.
PureRef

PureRef

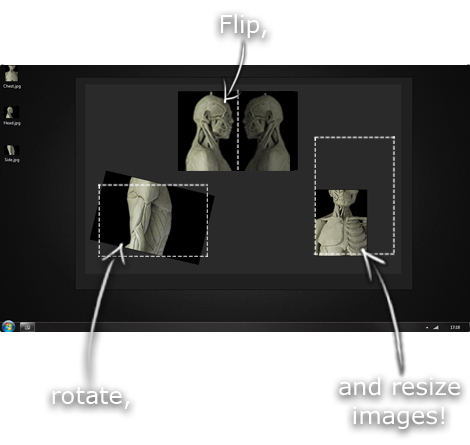
This is another one of those things that aren't sold through Amazon, so I don't get a commission on it - but it's just too good to leave out. PureRef is a fantastic piece of software that is both Windows and Mac compatible. It's used for collecting reference and compiling them into a moodboard. You can move them around freely, have them automatically arranged, zoom in/out and even scale/flip/rotate images as you please. If needed, you can also add little text notes.

When starting on a project, I'll often open it up and start dragging reference images off the internet onto the board. When I'm done, I'll save out a '.pur' file, which embeds all the images. They can get pretty big, but are way more convenient than hauling around folders full of separate images.

Did I mention you can get it for free? The developer allows you to pay whatever amount you want for it. They recommend $5, but they'll allow you to take it for nothing. Really though, with software this versatile and polished, you really should throw them a few bucks if you pick it up. It's more than worth it.

This website uses cookies. You can read more about what we do with them, read our privacy policy.