View Full Submission View Parent Comment
11:01 PM, Tuesday August 16th 2022

I had forgotten about the warm-up bit about only including exercises into your pool only after you've completed the lesson.

https://imgur.com/a/pu8pomE

Also, more branches? I feel like I did better on the leaves, but I feel iffy about that page of branches.

6:20 PM, Wednesday August 17th 2022

Your branches are definitely doing better, as you're following the instructions and building up the edges with separate strokes. There are definitely cases where your segments don't extend fully halfway to the next ellipse, so keep an eye on that, but in general you're doing well. Also, don't forget that the ellipses' degree should be getting wider as we move farther away from the viewer, as discussed back in Lesson 1's ellipses video.

As to your leaves, it seems you may not have gone through the provided instructions as carefully as you ought to have. As shown here there are two main issues:

  • You frequently skip constructional steps, jumping into more complexity than the existing structure can handle initially. You can see this explained here, and you'll find an example of another more complex leaf structure here.

  • You still appear to be zigzagging some edge detail, rather than building it up one mark at a time, rising off and returning to the existing structure. In a number of these you didn't really have an existing structure to build off due to the first point, although on the bottom right we can see a more usual case of this mistake. Towards the bottom left (where I also marked out zigzagging) it appears that you may have tried to draw these as separate additions, but they still appeared to flow into one another, creating the same general result of replacing previous phase of construction or otherwise weakening the relationship between those phases of construction. I linked these notes on the issue previously, though if you have questions about it feel free to ask.

I'd like you to do one more page of leaves.

Next Steps:

Please submit one more page of leaves.

When finished, reply to this critique with your revisions.
7:57 PM, Wednesday August 17th 2022

Okay, I can do that.

Just to clarify and verify that I get it, when you say as start simple as possible when constructing it's almost as if you want to first define an initial convex bounding shape of what the object is you're attempting to draw and then recursively create more shapes that bound the complex regions and eventually adding more detail and textures based on top of those shapes. Which is basically what you state on the complex leaf structure note just with the additional steps/information based on it being about a leaf.

On the topic of starting simply as possible what would be a good heuristic to use when deciding what the initial bound shape should be? I guess I am asking when does a shape need to be become two shapes or more and what should it look like? Like in the leaf/branch I drew in the top left if I had a another branch coming off the same initial starting point with similar branching leaves would the initial shape be something constrains both branches or would each branch get their own? Is the heuristic simply pain and experience?

Also, I'll try to be more conscious of zig-zagging as I think what have been doing is not really thinking about building on top or cutting from the form I've placed and instead just thinking of it as a "guide" causing any sense of 3D/volume to fall flat simply because the lines stop have a sense of form and just become 2D lines.

I realize I am almost parroting what you've already said in many different forms of media as well as maybe asking questions that you've already answered and for that I apologize and I also want to apologize for potentially being one of those students that takes up more of your reviewing time than most.

9:04 PM, Wednesday August 17th 2022

In regards to the heuristic, it is something you'll get more comfortable in judging with experience - but in general, focusing on what it means to be simple versus complex may help. A line that maintains a single trajectory - like a simple arc, unchanging throughout its length - is inherently simpler than a line that follows a trajectory, then suddenly incorporates a little cut into its path, and then resumes the same trajectory.

You can also refer to the concepts from the Principles of Markmaking - the third for example addresses the matter of zigzagging quite specifically.

As to what you said about using the previous phase of construction as a "guide" - what we're doing here is fundamentally the opposite. Every step involves establishing a solid structure in 3D space - something we actively treat as though it exists physically. So for example, the by the second step of the leaf construction exercise (as outlined here), we have a structure that is akin to having a leaf shape cut out of a piece of paper. In the next step, we add edge detail to it in a variety of ways, all of which occur in 3D space:

  • We can lift or droop sections of the edges to create a wavy edge.

  • We can add protrusions - yet more pieces of paper stuck on - to have little spikes come off the edge.

  • We can physically cut with scissors into the shape, where the lines we're drawing denote the path the scissors would follow.

This is core to the course as a whole - we are not sketching loosely, nor drawing. We are building in 3D space, and the visualization of what we build is what ends up on the page.

View more comments in this thread
The recommendation below is an advertisement. Most of the links here are part of Amazon's affiliate program (unless otherwise stated), which helps support this website. It's also more than that - it's a hand-picked recommendation of something I've used myself. If you're interested, here is a full list.
PureRef

PureRef

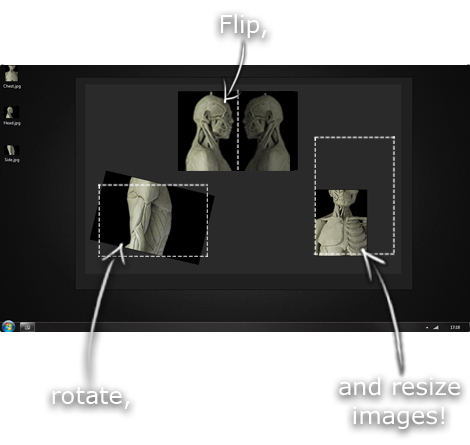
This is another one of those things that aren't sold through Amazon, so I don't get a commission on it - but it's just too good to leave out. PureRef is a fantastic piece of software that is both Windows and Mac compatible. It's used for collecting reference and compiling them into a moodboard. You can move them around freely, have them automatically arranged, zoom in/out and even scale/flip/rotate images as you please. If needed, you can also add little text notes.

When starting on a project, I'll often open it up and start dragging reference images off the internet onto the board. When I'm done, I'll save out a '.pur' file, which embeds all the images. They can get pretty big, but are way more convenient than hauling around folders full of separate images.

Did I mention you can get it for free? The developer allows you to pay whatever amount you want for it. They recommend $5, but they'll allow you to take it for nothing. Really though, with software this versatile and polished, you really should throw them a few bucks if you pick it up. It's more than worth it.

This website uses cookies. You can read more about what we do with them, read our privacy policy.