


This website uses cookies. You can read more about what we do with them, read our privacy policy.
0 users agree
3:44 PM, Wednesday April 22nd 2020
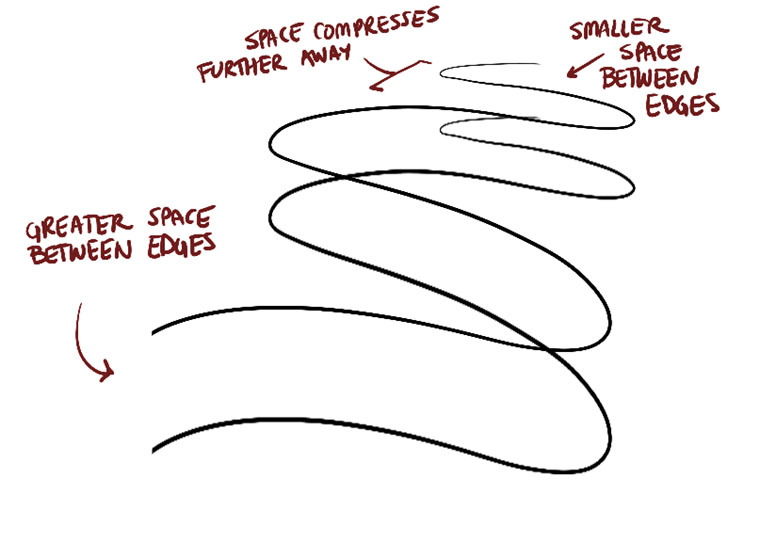
Starting with your arrows, they're flowing confidently through space, but there's one key problem that I called out when critiquing your Lesson 2 work, but that has not been fixed. Currently, while the ribbon of your arrow gets narrower and narrower as we look farther back into space, the spacing between your zigzagging sections remains entirely consistent. Perspective applies to both the positive space of an object (like the width of the ribbon) and the negative space (the distances between its various components) in the same way. Therefore the further back we look, the more those gaps should compress. This is demonstrated here.
Moving onto your leaves, you've done a pretty good job here of drawing leaves that flow fairly well through space. You've also done a good job of building up further edge detail in a way that follows the previous phase of construction (the simpler edges) directly, rather than treating it as a suggestion. I'm very pleased to see this. Do however note that the additional detail you added to those edges appears to be a lot wobblier and less confident than the others. This may be intentional, but it definitely makes the lines feel a lot more hesitant - so try and focus on getting those marks to be drawn more confidently in order to uphold the solidity of the overall leaf.
There are a few key problems with your branches to be addressed:
-
First of all, you're not drawing through your ellipses.
-
When doing these in the future, try to keep the width of the branches more consistent.
-
It seems that you're often not extending your line segments fully halfway towards the next ellipse. The way this works, your segments should start at the first ellipse, go past the second ellipse, then stretch halfway to the third ellipse. Then your next segment starts at the second ellipse, goes past the third ellipse, and stretches halfway towards the fourth ellipse. This will give you more room to actually aim/orient the segment towards the next goal properly.
-
Also, since you're getting some pretty significant separation between your segments, it may help to try and use the last chunk of the previous segment as a runway for the next segment. That is, overlapping it directly overshooting off towards the next goal. This will force you to actually deal with the situations where they fly off track, rather than being able to draw your next segments where the previous ones ought to have been. It'll force you to improve on that faster, since right now those mistakes are visible, but not otherwise affecting your process enough to really have as significant an impact on you.
-
On this page, we can see you treating the "simple" leaf shape as more of a suggestion, letting the smaller leaves constructed within there push past them more loosely. Remember that every step of construction is you making a decision. In this case, that simpler leaf shape established how far out the leaves would extend in space. The flow lines for those leaves should have extended to that edge, and the smaller leaves should have only extended as far as their flow lines.
With the remainder of the plant constructions, you're moving in the right direction to be sure and there are many elements of your process that are correct, but these do feel rushed in a lot of ways. For example,
-
Your leaves have a tendency to not be fully closed - you tend to leave gaps and holes where lines don't meet one another properly. We can see a lot of this on the last page.
-
Contour lines, where you use them, seem a bit half-assed, and come out kind of shallow as shown here.
I suspect that you may be a little too focused on getting into details, and as a result, you're not putting as much time into making every individual mark using the ghosting method, and really investing the time in the right places to create a more solid underlying structure. You definitely do get pretty invested in the detailing, so all this suggests that you're thinking ahead to that more interesting phase of the process, causing you to work on construction while being more distracted.
On the topic of detail, I can see you leveraging your cast shadows effectively in a number of places, though there are some key issues here as well:
-
You're still relying a lot on outlines in cases like the caps of these mushrooms. As discussed back in Lesson 2, you should not be using any outlines to convey texture. Use cast shadows only.
-
In a few cases, including this page, you end up getting into a lot of form shading rather than cast shadows. [As explained here back in Lesson 2](), you should not be getting into form shading at all. Form shading is specifically where a surface gets lighter or darker based on whether it is turned towards or away from the light source. The heavy black filled shapes are reserved only for cast shadows, which are where one form blocks the light source, and casts a shadow onto the surface of a different surface. So form shading goes on the form in question, cast shadows go on a separate form.
-
Also, related to the previous point but it warrants its own - when you draw shadow shapes, you should be outlining the shape itself first, then filling it in. You appear to be just scribbling shadows in, without a specific intent for how the shape itself should be designed. Before putting any mark down, you need to consider the specific parameters and requirements for it. Don't try and work through this stuff instinctually - these exercises are all about developing your instincts, so you have to be more conscious and purposeful with every action you use now. Using your instincts to train your instincts.. doesn't really make sense.
One last thing, about your drawings in general - you tend to draw many of these things quite small on the page, which limits your brain's capacity for spatial reasoning. Take advantage of the full amount of space available to you on the page. Draw bigger. It'll engage your brain's capabilities more, and also engage your full arm when executing your marks.
So! You've got some important progress in the right direction, but there are some key adjustments we need to make with how you approach these drawings, and mark making in general. You absolutely exhibit the capacity to draw your lines with more forethought and planning, but you have a tendency to drop it when other more interesting and challenging tasks fall into your lap. At the end of the day, a line is just a line, and it will always require the same amount of focus and attention in order to be executed correctly.
Before I mark this lesson as complete, I'd like you to do some additional pages, which I will outline below.
Next Steps:
I'd like you to submit the following:
-
1 page of branches. Draw through your ellipses, keep the width of your branches more consistent, extend your segments fully halfway towards the next page and overlap that last bit with your next segment, using it as a runway instead of drawing your next segment where the first ought to have been.
-
4 pages of plant drawings, with no detail whatsoever. Focus only on construction, and take that construction as far as you can reasonably take it. Build as much as you can out of forms, and stop just when you're about to get into the territory of detail. Use the ghosting method for every single mark you put down to ensure both confidence behind your stroke, as well as control and accuracy. A smooth, flowing stroke is obviously the first priority, but you should still be putting as much effort as you can into getting your shapes to be fully enclosed without gaps or overshooting wherever possible.
-
2 pages of plant drawings where you may get into detail. Remember - detail uses no outlines whatsoever to capture the little textural forms, just shadow shapes. Those shadow shapes themselves can and should be outlined first, before being filled in.
5:05 AM, Friday April 24th 2020
Thank you so much! New submissions attached below:
4:58 PM, Friday April 24th 2020
This is a big improvement. Just a few things to keep in mind as you continue forward:
-
Along the top of this page, you've drawn those complex wavy edges without any structure supporting their complexity. You should be building them in stages - first laying down simpler edges to capture how those sections are oriented in space, then breaking them down into more complex information, somewhat as shown here. Note how the waves are built off the simpler edge, as though the edge is simply being pushed around, rather than having a new edge built independently of the one that was there previously.
-
Along the base of your cactus, you'll have a better time capturing those pebbles if you treat them as texture - which means implying their presence purely through drawing the shadows they cast rather than the outlines of each individual stone.
Anyway, I'll go ahead and mark this lesson as complete. Feel free to move onto lesson 4.
Next Steps:
Feel free to move onto lesson 4.
7:55 PM, Friday April 24th 2020
Hooray! Thanks so much.
Question about the mushroom (I attached my reference). I had a really hard time trying to wrap my head around where I should break down the structure at the top left, which in turn made it a little free spirit. Is there a different way I should have approached it (adding more structure at the top, different angle of my original circle)?
https://blog.ecogreenlawncare.com/category/gardening/104434/chanterelle-mushrooms
The recommendation below is an advertisement. Most of the links here are part of Amazon's affiliate program (unless otherwise stated), which helps support this website. It's also more than that - it's a hand-picked recommendation of something I've used myself. If you're interested, here is a full list.

Ellipse Master Template
This recommendation is really just for those of you who've reached lesson 6 and onwards.
I haven't found the actual brand you buy to matter much, so you may want to shop around. This one is a "master" template, which will give you a broad range of ellipse degrees and sizes (this one ranges between 0.25 inches and 1.5 inches), and is a good place to start. You may end up finding that this range limits the kinds of ellipses you draw, forcing you to work within those bounds, but it may still be worth it as full sets of ellipse guides can run you quite a bit more, simply due to the sizes and degrees that need to be covered.
No matter which brand of ellipse guide you decide to pick up, make sure they have little markings for the minor axes.